
Installation Instructions
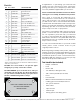


Contractors Wardrobe
®
, 26121 Avenue Hall, Valencia, CA 91355 | Phone: 661.257.1177 Fax: 661.257.4907 | CwDoors.com
Coast
™
-PRIN-2800-0220
11
Using a caulking gun and clear silicone, seal inside
your shower enclosure in the following areas:
• At the bottom of the Left and Right Wall Jamb
inside where the Curb and Wall Jamb meet.
• Inside of the shower from the top of the Header,
down the Wall Jamb to the sill of your opening.
• Inside of the shower from wall to wall, along the
Curb where the Curb and sill meet.
Note: Silicone sealant must cure before you use your
new enclosure. Silicone curing will vary. Please follow
curing instructions on the tube.
Step 11 Silicone sealing the enclosure
Step 12 Cleaning the Door Panels
B. Installing the Knob and Recessed Finger Pull on
the Inside Door Panel
1. Locate the Knob and Recessed Finger Pull.
Refer to Figure 12 to help identify the parts.
2. Slide both Door Panels to the wall opposite the
shower head. Now slide the Inside Door Panel
5-6” toward the shower head. This will give you
clearance to perform the next step.
3. Detach the Recessed Finger Pull from the
Knob, keeping one Washer and Bushing on the
Recessed Finger Pull.
4. From outside the shower, insert the Recessed
Finger Pull with one Washer and Bushing through
the hole on the Inside Door Panel, so that the end
sticks out from the back side of the glass Panel.
If your unit has the benefit of CwShield™ Glass
Protection, following the detailed maintenance
instructions below will ensure many years of
satisfaction.
• After each use: Use a small plastic bowl or pitcher
(a handheld shower sprayer will also work) to
carefully pour clean water along the top edge
of the glass in a stream as you move across the
panel, being careful not to pour the water out
through any gaps that may exist in the enclosure.
The majority of the soapy residual water will drain
off. Use a small hand towel to pat dry the few
remaining droplets.
5. Place the other Washer over the exposed end
of the Recessed Finger Pull, and screw it into the
Knob.
Note: The Solana Knob comes with screws which go
through the Recessed Finger Pull to attach them to
the Knob. Tighten with a phillips screwdriver.
6. Tighten the Knob/Recessed Finger Pull. The
Knob should face the inside of the shower (See
Figure 13).
C. Installing the End Cap and Recessed Finger Pull
on the Inside Door Panel
1. Locate the End Cap and Recessed Finger Pull.
Refer to Figure 12 to help identify the parts.
2. Ensure that the Knob is installed correctly (See
Figure 13). Gently slide both Door Panels to the
wall with the shower head. Now slide the Inside
Door Panel 5-6” toward the opposite wall. This
will give you clearance to perform the next step.
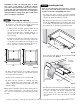
Figure 13
Correct Knob orientation
Incorrect Knob orientation
3. Detach the Recessed Finger Pull from the End
Cap, keeping one Washer and Bushing on the
Recessed Finger Pull.
4. From inside the shower, insert the Recessed
Finger Pull with one Washer and Bushing through
the hole on the Inside Door Panel, so that the end
sticks out from the front side of the glass Panel.
5. Place the other Washer over the exposed end
of the Recessed Finger Pull, and screw it into the
End Cap.
Note: The Solana End Cap comes with screws which
go through the Recessed Finger Pull to attach them
to the End Cap. Tighten with a phillips screwdriver.
6. Tighten the End Cap/Recessed Finger Pull.
The End Cap should face the outside of the
shower (See Figure 13).