
User guide

Enclosure User Guide
34
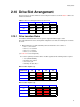
Drive Location Sequence (3)
Column/row 1/# 2/# 3/# 4/#
#/1 1 2 3 -
#/2 5 6 7 -
#/3 9 10 11 -
Drive Location Sequence (4)
Column/row 1/# 2/# 3/# 4/#
#/1 1 2 3 4
#/2 5 6 7 8
#/3 9 10 11 12
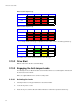
3 If a change in drive technology is required then a new column of drives should be populated, e.g.
Column/row 1/# 2/# 3/# 4/#
#/1 - SAS 2 SATA 3 -
#/2 - SAS 6 SATA 7 -
#/3 - - SATA 11 -
All members of the column should maintain the same drive type.
2.10.2 Drive Start
With two active PSUs all drives start immediately.
2.10.3 Engaging the Anti-tamper Locks
The anti-tamper locks are fitted in the drive carrier handles and are accessed through the small cutout in
the latch section of the handle.
Drives are supplied with the locks set in the locked position.
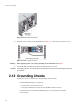
2.10.3.1 Activating the Locks
1 Carefully insert the lock key provided into the cutout in the handle.
2 Locate the key into its socket.
3 Rotate the key in a clockwise direction until the indicator is visible in the aperture beside the key.