
Installation Instructions

2
A & B
C
Fig. 9
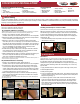
Delaminated Countertops
• Failure to keep the countertop surface
even with the surface of the range, could
result in a delaminated countertop. Heat
will reactivate the glue, causing the
end cap to come loose from the countertop.
• Failure to use waterproof wood glue on miters can lead to
countertops delaminating.
• Failure to install Dishwasher Moisture Barrier tape when a
dishwasher is present can lead to countertops delaminating.
COUNTERTOP
COUNTERTOP
WRONGCORRECT
Improperly Filed Edges
Itisrecommendedthatyouuseaslight2°to3°anglewhileling.
Misuseofhandlewillresultinscratchesonthelaminate.
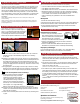
5) APPLYING END CAP
1 Application of the end cap.
A. Set iron to 350° and allow time for the iron to warm up. Center the
trimmed end cap on the countertop edge with 1/16" overhang
on all sides.
B. Starting in the middle of the end cap, use the iron to apply heat and
rmpressureuntiltheendcapadherestothecountertop.Workfrom
the middle of the end cap to the outer edges holding the iron the
same place for approximately 10 seconds. Use a cool damp cloth or
sponge and apply pressure to the end cap. This will cool the end cap
and set the glue.
C.Verylightlypullonthetopedgeoftheendcaptoensureitisrmly
attached. If the edge pulls away from the countertop, reheat the end
cap with the iron and cool again until proper adhesion is achieved.
2
File the end cap ush to the countertop
A
A. File the end cap toward the countertop
at an upward angle using a medium
facedleandrmpressureuntilthe
cap is approximately 1/32" away from the
countertop surface. Filing in a motion
away from the countertop can damage
the end cap. It is recommended that you
useaslight2°to3°anglewhileling.
Misuseofhandlewillresultinscratchesonthelaminate.
B. Once the end cap is approximately 1/32" away from the countertop
surface, use a fine faced file and light pressure until the end cap is
flush with the countertop.
C. Clean off the countertop with acetone to remove any remaining dust
or glue.
4) ATTACH COUNTERTOPS TO CABINETS
(NOTE: Hammer and small block of wood required)
Place countertop in place and fasten (Fig. 9.)
using 3 1-1/4" black drywall screws through the
build-up strips (using longer screws will result
in puncturing the surface of the countertop).
Shims may be required if cabinets are not level.
CARE AND MAINTENANCE
1. Wash the surface with mild dish washing liquid or powdered
detergent; add warm water. Use a soft dish cloth. Rinse with warm
water and dry with cloth. Water is generally all that is needed. A quick
wipe will clean most stains.
2. For harder-to-remove spots, use an all-purpose cleaner or bathroom
cleanser. Follow the manufacturer’s instructions. Rinse with warm
water and dry with a soft cloth.
(NOTE: Do not use cleaners that contain harsh acids or abrasives.)
3. For stubborn spots, make a paste with baking soda and water. The
paste will be slightly abrasive. Work carefully to keep from damaging
the surface you are cleaning. Dip a soft bristle brush into the paste
to cover the bristles. Gently rub the spot with the brush, moving in
a circular motion and pressing very lightly. You may also use a Magic
Eraser
®
stain remover following the manufacturer’s instructions for
stubborn stains.
(NOTE: Color-matched caulk; included in installation kit sold separately)
• Use color-matched caulk to seal around backsplash and walls.
• Color-Match Caulk will dry darker.
• Color-MatchCaulkisnon-toxic,non-ammable,andmildewresistant.
• Manufacturer makes no warranty of any kind, expressed or implied,
concerning the use of this product. User assumes all risk of handling
or use whether in accordance with the directions or not.
• Clean countertops per guidelines in the Care and Maintenance
section.
INSTALLATION MISTAKES
For Everything CustomCraft
™
has to Offer,
Visit www.midwestmanufacturing.com
¡ Brochures
¡ Videos
¡ Installation Instructions
¡ Detailed Warranty Information
10) CAULK BACKSPLASH
1. Knead the caulk tube before using.
2. Surfaces must be clean and free of dust, dirt, oil and other substances.
3. Place bead of adhesive caulk to seal where backsplash meets wall.
4. Usingmoderatepressureandmoistnger,removeexcesscaulk
(Product will shrink as it cures).
Backsplash
Questions or Concerns:
For guest assistance contact countertop help
by sending an email to:
CountertopHelp@MidwestManufacturing.com
¡ Features and Benefits Guides
¡ New Products
¡ Inspirational Images
3) NON FACTORY SINK CUT-OUT
(NOTE: Sink or Cooktop Cut-out If Needed)
If a drop-in sink or cooktop is to be installed, the hole should be cut at
this time. Follow all sink manufacturer instructions on placement and
cut-out size. When cutting the sink from the laminate side, masking
tape should be applied where the cut will be made to avoid chipping.
It is helpful to drill relief holes using a drill with a 1/4" bit at all corners.
Use a sharp blade in your jig saw. (Do not install sink or cooktop at this
time). It may be easier to cut the sink hole from the underside of the
countertop.
(NOTE: Never cut through a miter joint for a sink or cooktop cut-out. Doing so will
void the warranty.)
(NOTE: If a cutout is done on site it must not be any closer than 2” from the edge of the
countertop. Anything less and the warranty will be void as there is not enough space to
properly support the sink.)