
Installation Instructions

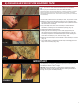
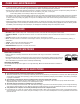

1. Thoroughly clean the area with soap and water.
2. Use the applicator to apply seam ller into the joint. Draw the repairer across the area to be lled with your nger. This
action will force the material down into the area to be lled.
3. Remove any excess material from around the area being lled using a cloth and warm water. The repair will be dry to the
touch in 1-2 hours and full cure in 24 hours depending on temperature and humidity.
4. Seam ller/repairer is a water based product and some shrinkage may occur. If the material has shrunk below the surface
being repaired, simply repeat steps 2 & 3 until the repair is satisfactory.
5. Use a clean cloth and warm water applying light pressure to blend the material level with the surface.
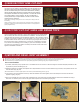
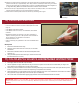
10) CAULK BACKSPLASH
(NOTE: Color-matched caulk; included in installation kit sold separately)
• Use color-matched caulk to seal around backsplash and walls
(Fig. 15).
• Color-Match Caulk will dry darker.
• Color-Match Caulk is non-toxic, non-ammable, and mildew
resistant.
• Manufacturer makes no warranty of any kind, expressed or
implied, concerning the use of this product. User assumes all
risk of handling or use whether in accordance
with the directions or not.
• Clean countertops per guidelines in the Care and Maintenance
section.
1. Knead the caulk tube before using.
2. Surfaces must be clean and free of dust, dirt, oil and other
substances.
3. Place bead of adhesive caulk to seal where backsplash meets
wall (Fig. 15.)
4. Using moderate pressure and moist nger, remove excess caulk
(Product will shrink as it cures).
Backsplash
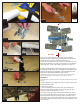
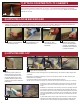
File the end cap ush to the
countertop
A. File the end cap toward the countertop at an upward angle using a medium faced le and rm
pressure until the cap is approximately 1/32" away from the countertop surface. Filing in a motion
away from the countertop can damage the end cap. It is recommended that you use a slight 2° to
3° angle while ling. Misuse of hand le will result in scratches on the laminate.
B. Once the end cap is approximately 1/32" away from the countertop surface, use a fine faced file
and light pressure until the end cap is flush with the countertop.
C. Clean off the countertop with acetone to remove any remaining dust or glue.
IMPORTANT: Failure to use seam ller on seams will void warranty. Seam ller not only blends seams but also prevents
moisture exposure to the core of the countertop. Moisture exposure to the countertop core causes delamination and
swelling.
7
4
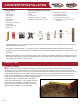
11) COLOR-MATCH SEAM FILLER/REPAIRER INSTRUCTIONS
Fig. 15