
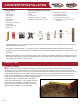
Installation Instructions

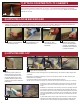

(NOTE: Sink or Cooktop Cut-out If Needed)
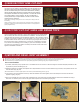
If a drop-in sink or cooktop is to be installed, the hole should be cut at
this time. Follow all sink manufacturer instructions on placement and
cut-out size. When cutting the sink from the laminate side, masking
tape should be applied where the cut will be made to avoid chipping.
It is helpful to drill relief holes using a drill with a 1/4" bit at all corners.
Use a sharp blade in your jig saw (Fig. 8). (Do not install sink or
cooktop at this time). It may be easier to cut the sink hole from the
underside of the countertop.
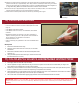
DUAL ACTION FASTENERS
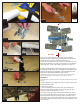
(NOTE: Follow the instructions for assembling your miter/eld joint based on the applicable fastener method ordered. Your backsplash has been tipped forward by design to ensure a
tight seam. This creates a noticeable gap at the miter during the dry t. This gap will disappear as the miter is drawn tight with the fastening system.
We recommend that you complete 9c, 9e & 9f rst as a dry t (without glue), then repeat with glue (Fig. 9d) to complete the miter joint).
1. If possible, assemble your top upside down in a suitable area on saw horses or other level supports. Provide adequate protection for the
top surface to prevent scratching (Fig. 9).
2. Attach the fasteners in a slightly offset pattern at an equal distance from front to back. With the long bolt loose, each plate should be 1/8"
from the miter edge (Fig. 9a).
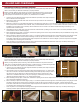
(NOTE: Offset fasteners to create an angular pattern in the center to provide added clamping tension (Fig. 9b).
3. Use a clamp to aid in the alignment of the top. After all fasteners have been applied, remove the clamp & loosen the two halves to
prepare for gluing (Fig. 9c).
4. Glue is an essential part of any miter. Apply a liberal amount of the miter bond glue (485-4284) provided in the installation kit using a
clean shim or other thin piece of wood. The glue should squeeze out of the miter joint (Fig. 9d).
i
3
Fig. 8
3) NON FACTORY SINK CUT-OUT
5) MITER AND FIELD JOINT ASSEMBLY
(NOTE: Never cut through a miter joint for a sink or cooktop cut-out. Doing so will void
the warranty.)
(NOTE: If a cutout is done on site it must not be any closer than 2" from the edge of the
countertop. Anything less and the warranty will be void as there is not enough space to
properly support the sink.)
Fig. 9b
Fig. 9 Fig. 9a
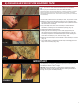
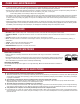
4) FACTORY CUT OUT SINKS AND RANGE TOPS
If your countertop had a range top or drop-in sink designed into the original design,
the countertop will come with a pre-routered for installation. The hole will not be
routered all the way through as to help maintain structure of the countertop until it is
installed. Once the top is installed, you can tap lightly in the corner of the cut out with
a rubber mallet to knock out the cut out. Clean up any rough edges with a coarse
le and the hole is ready to install the sink or range top. If reinstalling an existing
sink, remove all old caulking prior to installing in your new countertops. DO NOT
use silicone or any adhesive to fasten countertops to cabinets. Follow sink and/or
appliance installation instructions.