
Installation Instructions
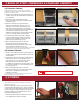


Loose backsplashes are cut to the next foot. If the backsplash needs to be trimmed to the length of the countertop, place a piece of
painters tape and make a cut line. Painters tape will aid in seeing line and help reduce chipping. Matching end caps are available when
purchasing a backsplash.
(NOTE: Wood backsplash (loose splash) is a wood based product and is subject to board movement)
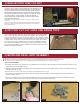
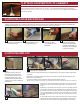
A. Place the build up stick and
backing block ush to the edge
of the countertop where the end
cap will be applied. Use 2 nails
to fasten the backing block to the
countertop and 4 nails to fasten the
buildup stick.
Apply the build up stick and back
block
Prepare the end cap prole edge.
Application of the end cap.
A. Line up the end cap to the edge of the countertop leaving 1/8" bottom and back edges of the
countertop.
B. Trace the countertop prole edge onto the end cap using a maker. For best results lay the
maker at on the countertop.
C. Once the prole has been traced trim the access laminate with scissors.
(NOTE: You do not need to cut perfectly, as you will le down the excess laminate. Be sure not to over trim)
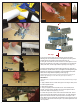
A. Set iron to 350° and allow time for the iron to warm up. Center the
trimmed end cap on the countertop edge with 1/16" overhang on all
sides.
B. Starting in the middle of the end cap, use the iron to apply heat and
rm pressure until the end cap adheres to the countertop. Work from
the middle of the end cap to the outer edges holding the iron the same
place for approximately 10 seconds. Use a cool damp cloth or sponge
and apply pressure to the end cap. This will cool the end cap and set
the glue.
C. Very lightly pull on the top edge of the end cap to ensure it is rmly
attached. If the edge pulls away from the countertop, reheat the end
cap with the iron and cool again until proper adhesion is achieved.
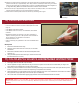
(NOTE: Hammer and small block of wood required)
Place countertop in place and fasten (Fig. 14.) using 3 1-1/4" black drywall screws through the build-up
strips (using longer screws will result in puncturing the surface of the countertop). Shims may be required if
cabinets are not level.
6
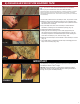
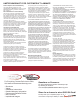
8) APPLYING LOOSE BACKSPLASH
9) APPLYING END CAP
1 2
3
1
Trace the contour of the wall
to the top of the backsplash
with marking utensil.
2
Sand non-laminated side
of the backsplash to the
marked wall contour.
3
Dab color-matched caulk
along the top, back,
and underside of loose
backsplash.
4
Place a 1⁄8" bead of color-
matched caulk between
the top of the backsplash
and wall, and between the
backsplash and countertop
to seal from moisture.
Fig. 14
7) ATTACH COUNTERTOPS TO CABINETS
A
B C
A
A & B C