
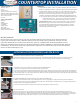
Installation Instructions
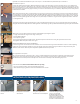

Wipe up with a damp cloth. If the ketchup has dried, wash it off with mild detergent and warm water.
A lighted cigarette allowed to remain on a decorative laminate surface, it could blister the surface or cause a
permanent stain.
Washes off with a mild detergent. For dried coffee stains, repeat above steps as needed.
Laminate surfaces are resistant to heat damage. However, prolonged exposure to high heat can cause blistering,
staining, or delamination.
If not removed immediately, repeat above steps as needed.
Apply Goo Gone to remove adhesives.
Wipe with a soft cloth with acetone.
CARE AND MAINTENANCE
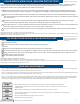
This product has been designed to bond (adhere) to the backer of HPL (high pressure laminate). The backer is either
brown or black in color. It will also adhere to particle board, medium density fiber board, and plywood. It is not
designed to adhere to the actual color layer or surface of laminates.
Prepare the surface of the area to be repaired by exposing the backer or substrate. Throroughly clean the area
with seam filler/repairer solvent (acetone). It is important to use 100% acetone when working with the product.
Squeeze the seam filler/repairer onto your finger. Draw the repairer across the area to be filled with your finger.
This action will force the material down into the area to be filled. Repeat this action several times until the material
starts to harden.
Remove any excess material from around the area being filled with the leading edge of the laminate sample
square provided. Wait approximately 15 minutes to allow the product to completely dry.
Seam filler/repairer is a solvent based product and some shrinkage will occur. If the material has shrunk below the
surface bing repaired, simply repeat steps 2 & 3 until the repair is satisfactory.
Use a clean cloth with seam filler/repairer solvent and light pressure to blend the material level with the surface.
-Keep away from sources of ignition. Avoid contract with eyes.
-Manufacturer makes no warranty of any kind, expressed or implied, concerning the use of this product. User assumes all risk of handling or use
whether in accordance with directions or not.
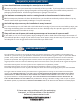
Backsplash
Knead before using.
Surfaces must be clean and free of dust, dirt, oil and other substances.
Sink Rims
Remove all old caulking from sink (if reinstalling same) prior to application.
Place bead (thickness may vary) of Adhesive & Caulk to one side of the joint and spread evenly with a moist finger.
Using moderate pressure and a moist finger, remove excess caulk. Some shrinkage will occur as product cures.
Product cleans easily with water.
Do not allow product to freeze.
-Color-Match Adhesive & Caulk will dry darker.
-Color-Match Adhesive & Caulk is non-toxic, non-flammable, and mildew resistant.
-Manufacturer makes no warrantly of any kind, expressed or implied, concerning the use of this product. User assumes all risk of handling or
use whether in accordance with the directions or not.
1
2
1
2
3
4
5
1
2
3
4
5
COLOR-MATCH SEAM FILLER / REPAIRER INSTRUCTIONS
Cigarette Burn
3
COLOR-MATCH ADHESIVE & CAULK INSTRUCTIONS
(Optional and sold seperately)
(These instructions are for color-
matched caulk included in the
optional Installation Kit sold
seperately)
Marker or Crayon
Step 1: Wash the surface with mild dish washing liquid or powdered detergent and warm water. Use a soft dish cloth. Rinse with warm water and dry with
the cloth. Water is generally all that is needed. A quick wipe will clean most stains.
Step 2: For harder to remove spots, use an all-purpose cleaner or bathroom cleanser. Follow the manufacturers instructions. Rinse with warm water and dry
with a soft cloth. NOTE - Do not use cleaners that contain harsh acids or abrasives.
Step 3: For very stubborn spots, make a paste with baking soda and water. The paste will be slightly abrasive so work carefully to keep from damaging the
surface you are cleaning. Dip a soft bristle brush into the paste to cover the bristles. Then, gently rub the spot with the brush, moving in a circular motion
and pressing very lightly. You may also use a Magic Eraser Stain Remover following the manufacturer’s instructions for stubborn stains.
Common Stains