
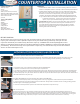
Installation Instructions

11
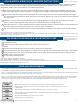
After all the fasteners have been screwed into place loosen the long center bolt on each fastener so that you can pull the two mitered
tops apart about 1/2”. Apply a liberal amount of the CTI Miter Bond wood glue from the installation kit. Use a shim to spread the glue
to get maximum coverage along the entire miter. You have about five minutes of working time before the glue begins to set. Slide the
two pieces back together, align the front edge and use a quick clamp to hold them. Snug each of the long bolts up and be careful not
to over tighten them.
You should now level the miter by adjusting the screws on the Dual Action Fasteners. If you are using miter bolt system carefully tap
along the miter until level. Wipe off excess surface glue with a warm damp rag. After you have finished allow the glue to dry about 60 minutes.
2
APPLYING LOOSE BACKSPLASH
5
Action fasteners required.
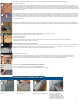
Slide the two mitered pieces together. Center the fasteners onto the two mitered pieces, so that 4 screw holes are on one mitered top
and the other 4 screw holes of the fastener are on the other mitered top. Secure the fasteners to the mitered tops using the 3/4“ screws.
Make sure that before you screw down the fasteners that you have the fastener closed. The long bolt should be hand tightened into the
nut so the fastener doesn’t have any play in it when you secure it to the underside of your countertop. Repeat this process until you have
all the fasteners installed.
Hammer and small block of wood required for Miter Bolt.
Locate the high side of each miter from the laminate side. Pound down the high side with hammer and wood. After adjusting,
tighten the closest miter bolt. Repeat process for the length of the seam. Before moving the adhesive in the joint must dry for a
minimum of 60 minutes. After the joint is dry further adjustments will not be possible.
9
6
7
10
Miter bolts, 7/16” open faced wrench, miter biscuits (included with tops), and glue required.
1. Apply a liberal amount of glue to the edge of each piece.
2. Install supplied biscuits.
3. Slide pieces together.
4. Snug (not tighten) miter bolts with wrench. The mitered pieces should not move easily, but yet be able to be moved
for alignment with a sharp blow. Wire excess glue.
8
Color-matched caulk (Included in Installation Kit sold seperately)
1. Use color matched caulk to seal around backsplash and walls.
2. Clean Countertops per guidelines in the Care and Maintenance section.
Screw gun and screws required
Place glued and fastened countertops in place. Using 1-1/4” black drywall screws, attach the countertop to the build-up strips.
Using longer screws will result in puncturing the surface of your countertop. Shims may be required if cabinets are not level.
This will ensure that both liquids and solid objects do not roll of the countertop. Install sink and range tops now.
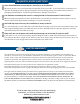
1
Trace contour of wall to top
of backsplash with marking
utensil.
2
San non-laminated side of
backsplash to the marked
wall contour.
3
Dab color-matched caulk
along the top, back and
underside of loose backsplash
4
After applying color-matched
caulk and setting backsplash,
secure to top and wall
(preferably with painters
tape) until caulk dries. Place
a bead of color-matched caulk
between top backsplash and
the wall to seal frommoisture.
If you have selected the miter bolt fasteners proceed to steps 8-11. For action fasteners please follow steps 5-7 and 10-11.