#0970 Enforcer 7 Direct Drive Racing Kit 1
Thank you for purchasing the Enforcer 7 Sprint Car! Since its introduction in 1991 the Enforcer has consistently been the most successful 1/10th scale sprint car competing on “high bite” dirt ovals across North America. The continued evolution of the car over 25 years has led to the exciting new Enforcer 7, building on the strength of prior versions and adding many new features. This kit includes most of the parts required for the build. The following additional equipment must be added to complete the car.
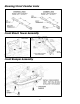
Front Arm Assembly Front Kick-Up Assembly Caster Block Assembly 3
Steering Servo Mounting Servo Saver Assembly Steering Block Assembly 4
Steering/Front Camber Links Front Shock Tower Assembly Front Bumper Assembly 5
Rear Adjustable Arm Assembly Rear Suspension Mount Assembly 6
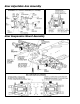
Differential Assembly 7
Transmission Assembly Rear Shock Tower Assembly Rear Hub Carrier Assembly 8
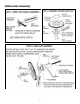
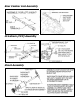
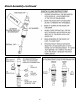
Rear Camber Link Assembly Drivetrain (CVD) Assembly Shock Assembly 9
Shock Assembly continued 10
Shock Mounting Electronics Mounting 11
Cage Assembly 12
Cage Assembly continued 13
Cage Attachment Body Assembly Body pieces are shown painted for ease of viewing. Trim pieces and drill all holes BEFORE painting. On most pieces, a protective green film will keep overspray from getting on the outside of the body. Clean pieces with a mild detergent and dry before painting. 1. Hood – Cut on trim lines and drill ¼” holes on (2) dimples front and back. 2. Nose piece – Cut as shown and drill ¼” hole on the rear dimple as shown (do not follow trim lines).
2. Nose piece continued – Remove the front nerf bar and install the nose piece as shown. Mark the location of the 3 holes on each side and then drill with a .125 drill. The optional low downforce nose piece can also be prepared in a similar manner. 3. Side panels – install side panels on the cage (you will have to remove some of the screws already installed). Trim the side panels to clear the rear shock tower as shown. The left side panel will also need trimmed to clear the motor. 4.
6. Top wing – build the top wing using the instructions included. Mount in the location shown on the cage. 7. Front wing – Assemble the front wing and mount to the front nerf bar as shown. Congratulations! The assembly process is nearly complete. Install wheels and tires of your choice using the included wheel nuts and bearings. Install the 1/8” spacers on the OUTSIDE of the front wheels and the black flat washers on the OUTSIDE of the rear wheels before tightening the nuts. Do not overtighten the nuts.
patterns below to start. Cross-grooves on the rear tires should be roughly ¼” apart for medium bite tracks and 3/8” apart for higher bite surfaces. Next the tires should be prepped with a traction additive. We have found Dr. Witt’s Magic “It” to be one of the most consistent traction additives available. Other more aggressive traction additives can oversoften the tires and are often not consistent over the length of a race. The final step is to scuff the tires.
5. Ride height The ride height is the distance between the track and the bottom of the chassis. For most tracks the normal ride height should be 12mm in the rear and 11mm in the front. A little more ride height in the rear is usually good because the rear of the car will squat under acceleration. Ride height is adjusted using the threaded collars on the springs. Ride height can be lowered for extremely smooth high bite tracks, and can be raised if the chassis is bottoming out. 6.