LT7028 USER’S MANUAL 1
Contents 1. Safety Notices…………………………………………………………4 2. Ready to use…………………………………………………………..5 2.1 Packing List………………………………………………………5 2.2 Appearance………………………………………………………6 2.3 Instructions on Keys…………………………………………….6 2.4 Features Overview…………………………...…….……………7 2.5 Technical Specifications………………………………………...7 3 Quick Guides……………………………………………………..……9 3.1 Touch Panel Calibration…………………………………….…..9 3.2 Switch On/Off………………………………………………….…9 3.3 Orientation Sensor Setting…………………………………….10 3.
4.4.4.4 Application Program Settings ………………………35 4.4.4.5 TF Card and Device Storage Settings …………….36 4.4.4.6 Language Keyboard Settings ………………………37 4.4.4.7 Date and Time Settings ……………………………..38 4.4.4.8 Touch Screen Calibration ………………………...…39 4.4.4.9 About the Device ………………………………….....39 4.5 Desktop Function Icon Settings …………………………….....40 4.5.1 Add & Remove Desktop Function Icon…………………40 4.5.2 Wallpaper Setting……………………………………..….41 4.5.3 Tap icon Shortcut to search engine……………………..41 4.5.
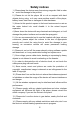
Safety notices 1 ) Please keep the device away from strong magnetic field in order to avoid the damage to the product 2 ) Please do not let the player fall or rub or compact with hard objects during using, or it may cause surface scratch of the player, battery loose, data lose or damages of other hardware. 3 ) Never let this product expose to the humid environment or rain as the water leaked into could disable it to the extent beyond reparation.
15 ) Only qualified maintenance personnel can install or repair the device 16 ) Please use the original accessories and battery, don’t use the incompatible products 17 ) The device is not waterproof, please keep it dry 18 ) For the sake of data safety, please back up the important information of the MID or keep a handwritten record.
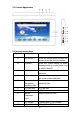
2.2 Product Appearance 2.3 Instructions on Keys Symbol Name A MIC/RESET B POWER C MENU D ESC E Track Ball Navigation/ Indicating light TF Card Slot HDMI Stereo Earpieces Jack F G H I J DC Socket MINI USB Port Description Press this button shortly to reset the system when the device is halted.
K L USB Port Display Host Port for external USB Driver,3G Dongle, Mouse, etc HD Display area 2.4 Features Overview Adopt the RK2818B as the main chip, ARM embedded Dual CPU Structure(ARM600MHZ+DSP550MHZ),ANDROIED2.1 smart operation system 7” high resolution TFT touch panel LCD display, 800 x 480 pixel resolution Support 2GB-8GB built-in Flash Memory, support 128MB-32GB external TF card Support HD 720P MKV、AVI、RM、RMVB、MP4、MOV、VOB、 DAT 、 FLV 、 3GP,H.
LCD Display PC interface Built-in Flash Built-in RAM Capacity Expansion Power Supply Music Function Video Function Photo browse E-book Function WI-FI Function HDMI Function Recording function Working temperature Languages Operation systems supported Size 7.0” TFT touch panel LCD display,160k color 800*480 Resolution High speed USB2.0(FS) Flash Memory :2GB~8GB RAM:DDRII 128MB(256MB option) Support TF Card,capacity 128MB~32GB Built-in 3.
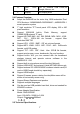
3 Quick Guide 3.1 Touch Panel Calibration When there are offset and invalid tap on the touch panel, please press and hold the “ESC” key for 3 seconds to log into the interface of the Touch Panel Calibration, tap the center of the “Cross” indicated by the red circle one time, the screen will display “Calibration Successful” message when it is OK, see the figures below 3.
the “POWER” key for 3 seconds, the screen will display the power off interface, choose the power off item to confirm, the system will shut automatically 【Note】When the device with low battery it will alarm continuous and shut automatically without charging. If the device can not start up please check if the battery is low, and try it again after the battery is charged 3.
3.4 Battery management and charging a. Charge the battery at about 8-12 hours to make sure the battery is fully charged at the first time. b. Insert the micro port of the battery adaptor into DC slot on the device, and connect the other side with the power socket. Then the Power indicating lamp of the device is in high light blue color, the keep rolling which shows it is desktop icon of the battery charging, please wait until the battery is fully charged, don’t disconnect the power when charging.
Back to main menu Note when the system finds new devices. Show current power status Set the alert time The current system time Reduce the volume back Louder the volume menu Menu for Function Block. Google search Switch the interface System clock WIFI on/off Music playing tool bar Update icon for Music/audio inventory new mail 3.6 WI-FI Setting a.
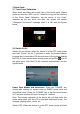
b. Set the WIFI and connect to the network: Press “Wifi setting” to enter into the wifi, the system will find the WIFI name automatically. Please refer to the picture as below, it has found two WIFI network name: c. IP address setting and connection: There are two setting methods to set the IP address. 1.
Press the right top menu “ ” on the screen and press “save” when complete this setting, see the figure as below: Press back when complete saving, press the WIDI network name, For example, double press “KW”, then it will to enter into a interface to ask you input the code. Then input the right code, press “finish”. Then the system will connect and distribute IP address automatically, it will show “connected” once the system is completed connection.
in the right top of the screen to press “save”, see the Press the figure as below: Back to press the WIFI network name when complete saving. For example: press “KW” Then it will have an interface, asking for input the code, input the right code, and then press the “finish”. Then the system will be connected and will distribute the IP address automatically, it will show “connected” once the system is completed connection. You can see the network connecting status accordingly when you press the network name.
Connection information 3.7 USB HOST Function: a. Turn on The USB- HOST: Press menu icon , enter into the function list, press “setting” to enter into setting interface, press “USB Mode select” to select the “HOST MODE” ad it shows in the red circle as below: b.
c. External 3G USB Dongle: Insert the 3G USB- Dongle in to the Host port, connect with the internet directly. 3.8 HDMI Function: Enjoy the high definition video in the Video player function. z Connect the TV with the device by the high definition cable, that is, connect the HDMI output Port with the TV input port. in the video play interface, then enter into a popup z Press menu, select “HDMI”: Popup a high definition Mode, select the HDMI 720p, then you can enjoy the high definition videos.
3.9 TF Card Storage There is a TF card slot in this device, it support reading the files in TF card. Insert the TF card into the card slot in right way, when take it out, just push the TF toward to the inside, then the slot will release the TF card, the TF card will pop out automatically, take it then. a. Please insert the TF into the card slot in the right side of the device. b. Don’t pull out the card when operating ( reading, copying), otherwise, it may cause data error c.
After entering, select the APK format setting program in the right side, tap to install, back to the main interface when complete this operation, then it finished the installing, and there is a relevant software menu accordingly. • Manage :Tap manage and enter into the third part software interface. - Startup: run the software. - Export: export the software to the TF card. - Uninstall: uninstall the software. - Search: search the software in the software shops. - Cancel: cancel the operation.
4 Operation details: 4.1 Desktop System 1(Multimedia Music / Video / Picture / Recording) 4.1.1 Music Enter the music player:In the programs interface, tap the icon into the main interface of Music Player, Double-click the favorite in the list to play music as shown in the following picture: Drag the playing progress bar to adjust the playing process. Instructions for the buttons in the Music player.
Button Instruction button Instruction Artist Album song Playing Music list Random Play Loop playback Play song the last Play song Pause the next play Audio player In the main menu or desktop, click the icon to play the audio z When no music files in the audio player playlist, the system will automatically load the music files from the card to the audio player playlist after turning on the audio player (the device supported audio file format: mp3, wav, midi, wma).
z z z enter the audio playing In the music playing interface, tap list Drag the playback progress bar to adjust audio playback progress Audio player buttons description button description button description Browse the playlist online music searching artist album other to view the music files of disc audio New Playlist switch to audio playing EQ quit setting(normal,rock,classical,pop) A-B repeat Playing order mode add audio to the pause an audio playlist raise the volume go lower the vo
4.1.
Play and pause a video Video format 16:9 /4: 3 quit menu lower the volume raise the volume z Click this button to set up delete bookmark, play mode, TV-Out, HDMI etc. See the figure as below z Tap play mode to select one of play modes: single, repeat one, repeat all, or tap back to A menu. 4.1.
Picture Browser button description: button description button Previous image Zoom in Next image Zoom out Enter the Image Slide mode Rotate image 90 degree counterclockwise Quit the interface of Image Browser Brightness Setup Rotate the image 900 clockwise Image settings z description Adding image(supports the format of picture:BMP、JPG、 JPEG、PNG、GIF) When no files in the photo list, the system will automatically load the image files from the card to the photo browsing list after opening the photo
4.1.4 Recording function In the main menu or desktop, tap the record icon to enter the to start recording, tap this record interface, tap record button to stop recording, the system will remind you to use this button recording or give up, please select manually. Recording playing: please select audio player to play the recording, firstly select the record files from the explorer, then click it and playing, further details please refer to 4.1.1(audio player). 4.1.
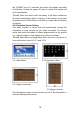
4.2 System desktop 2(Shelves)(E-Book Function) Support formats of E-Book: TXT、LRC、PDF、Html、Htm、EPUB etc., Support automatic browsing, zooming, bookmarks, page etc. 4.2.1 Shelves (E-Book Function) z In the main menu or desktop, tap Shelves application icon to read the e-book.
automatically jump to the specified page. to add, delete display z Bookmark setting: tap bookmark icon the Bookmarks. to view the outline of book z Outline: tap the outline icon to view the book name and z Book info: tap book info icon information of the author. 4.3 Desktop System 3(Web applications) 4.3.1 IE Browser When WIFI connection is in normal(details refer to chapter 3.
to operate. 4.3.2 Email Inbox Auto enter inbox interface when succeed in landing: This interface shows received E-mails, double click each E-mail, to check, reply to sender, reply to all, etc. Button Description Button Description Refresh New Email Account Check label Search Setting Edit E-mail Tap taskbar interface.
on the contrary, tap it again to delete. Tap Attach icon to add E-mail attachment. Tap Edit Subject icon Tap Discard icon to enter subject line and edit directly; to give up writing E-mail; Input receiver address & relevant information, Tap Send icon send E-mail; to Sent Tap icon to choose sent, pop up interface as below: This interface shows sent E-mails, double click each E-mail , , to check, reply to sender, reply to all, etc. 4.3.3 You Tube online video.
4.4 Desktop System 4 (other functions) 4.4.1 Calculator Click Calculator icon on the desktop to open calculator: 4.4.2 Alarm Clock Tap Alarm Clock icon enter setting interface, you can select the√ behind the clock time to set three clocks simultaneously, details as below: tap any of above clock time to set up: time, bell, vibration, repeating and label.
4.4.3 APK Installer on main menu or desktop enter installing Tap APK installer icon interface, to get details from 3.10 APK chapter. 4.4.4 Device Setting of main menu or desktop to set wireless and network, sound Tap and backlight, location and safety, application and so on, slide on screen to page up/down 4.4.4.1 Wireless And Network Settings Details please refer to WIFI setting in Chapter3.6 4.4.4.
z c. Set operating sound (screen choosing) and TF card till highlight notifications as optional, tap and tick displaying. z Display settings: a 【Orientation】 The display screen will change the direction automatically when it rotating b 【Animation】 Display all animation in all windows c【Brightness】Drag to adjust brightness,tap “OK” and “back”.
d 【Screen timeout】 4.4.4.
Draw the unlock pattern, at least to connect 4 points, tap “next” ,then finish. 4.4.4.
z Running service settings: Tap【Running service】to see and control the running service z Development setting:advised to use factory defaults, or any change will make some function not available . 4.4.4.
4.4.4.6 Language Keyboard Settings Tap【Language Keyboard】to enter setting interface z Language Setting: The device support multi-languages, you can select operation interface of different languages according to your needs.
z Android Keyboard setting: 4.4.4.7 Date & Time Setting: Select Setting Menu > Date and Time into setting interface, select the √ behind the Automatic option , to modify the Date, Time Zone & Time.
z Time Setting: to select hours & minutes, e.g.: 10:50, and tap Tap to confirm OK。 icon z Date Format Setting: 4.4.4.8 Touch Panel Calibration Details refer to3.1 Touch Panel Calibration Section Chapters 4.4.4.9 About the Device • Check power consumption, legal information, device state & software version, etc.
4.5 Desktop Function Icon Setting 4.5.1 Add & Remove Desktop Function Icon: at top-left corner of main interface, into desktop setting Tap icon interface, you can select wallpaper and add widget, etc. Shortcut Icon: Tap icon into desktop widget interface as follow: Select shortcut icon to add to main interface, tap the matching option to add.
etc to add: 4.5.2 Wallpaper Setting: Tap icon tap , to change the wallpaper and select the picture you want, , wallpaper setting successed. 4.5.
4.5.4 Shortcut Notification Tap icon to check the current notification status: 4.5.5 Add, Move or Delete Desktop Icon Tap icon at the main interface, into function menu list, display all the application icons by pages. Press and drag the application icon to copy to current desktop i.e. set the shortcut on the desktop. Long press the application icon on the desktop, enter into editing status and you can move the icon.
5. Troubleshooting 1. Can not turn on the device. You can not turn on the device when the is below the critical level, please charge the battery connect to the computer via USB cable or charge via AC charger, try to turn on again while ensuring quantity of electricity. Press the RESET button on the top of the device and check if the restarting is normal or not. Check if the charger is connected well or not. 2. The stand-by time of the MID is too short.
Please check if the memory space is full. Please check if the USB cable is broken Specifications are subject to change without notice.