GPD359B User Manual
A. Basic Operation............................................................................................................................3 1. Understanding of the Product Components ..........................................................................3 1.1 Front components........................................................................................................3 1.2 Back components .......................................................................................................
Precaution and Notice The PND is used only as a navigation aid. It is not for precise measurement of direction, distance, location or topography. The user must follow all traffic signs and local regulations along the roads. GPS satellite signals cannot pass through solid materials (except glass). When you are in a tunnel or building, GPS position is not available. At least 4 GPS satellite signals are needed to determine the current location.
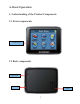
A. Basic Operation 1. Understanding of the Product Components 1.1 Front components Touch Screen 1.
1.3 Top components Charging Indication Power 1.4 Left-side components MIC 1.
1.6 Bottom components Installing the T-flash Memory Card The T-flash memory card contains the map data which PND needs. Please insert the memory card into the slot on the right side of the PND. Once the card is inserted, it can not be removed during the process of the device operation. If you need to remove the card, please switch off the unit first. And then push the card in and it will eject from the slot. 2. Accessory Operations 2.
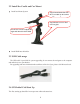
2.2 Install the Cradle and Car Mount Install car Mount System Step2: Install the holder into the Car cradle by the sockets l k l Step1: Rotate screw to lock onto car glass Use the two screws to adjust the angle and direction of the PND Install PND into the holder 2.3 USB Cable usage The USB cable is provided for system upgrading. It can connect the navigator to the computer and make these two synchronize. For upgrading and more information about Micros oft Active Sync, please visit Microsoft web. 2.
Hold until the device receives 4 GPS satellite signals, then you can program your trip. Note: There are various ways for searching a location on the map or planning your routing. Please follow Navigation User Manual which will guide you when driving. B. Functions Operation 1 Powering & Main Menu Long time press the “Power” button to power the equipment on and you will see the power-on interface. Long time press the “Power” button again to turn the unit off. 2 Main Interface 2.
2. Tap the song name you want to choose to enter into the following interface: Repeat Random File shift Tap the REPEAT icon to repeat the selected file. Tap the RANDOM icon to randomly play the files loaded on the card. Tap “Next” to play the next file and Tap “Previous” to play the previous piece of music. Tap the “X” to return to the file list interface. 2.3 Photo 1.
Double tap on the file name to enter into the following interface: Previous Next File shift Full Screen Document Name 1. Tap “Previous” button to display the previous picture, tap “Next” button to display the next picture. 2.
3. The picture will be displayed automatically at full screen mode, and tap the screen to return to the following interface: 4. Tap the “X” to return to the picture list interface. 2.4 Ebook 1.
Document shift Document Name Page select Current Page/ Total Page 1. Tap “Previous Page” button to turn to the previous page and tap “Next Page” to turn to the next page. 2. Tap “Page select” button to choose the page which you want. 3. Tap the “X” to return to the E-Book list interface. 2.5 Video 1.
2. Tap the movie file you want to choose with the touch panel to start play the movie Full Screen File shift Progress 3. Tap “Full Screen” button to play the movie in full screen. 4. During play in full screen, double tap the screen to return to the interface above.
2.6 System 1. Tap the system icon to enter into the interface as follows: 2. Tap the “Volume” button to enter into sound setting interface as follows: 3. Tap the “Power” button to enter power setting interface as follows: 4.
If you do not choose “Auto-Brightness”, tapping the left button will gradually diminish the lightness; while tapping the right button will gradually increase the brightness. If you choose “Auto-brightness”, the system will automatically adjust the brightness of the display screen along with the light intensity of its surrouning. At this time, the buttons on the left and right sides of the “Backlight Display” bar do not function. 5.
6. Tap the “Language” button to enter into the language and skin setting interface as follows: 7.
Tap the “USB” to set the USB working mode. You can calibrate the touch screen if it does not respond accurately to your stylus taps. a) Tap the Calibration button on the System info. Screen. b) Tap to the calibration indicated on the screen. c) Tap and hold at the center of the target. d) When the target moves to another position, tap and hold at the center of the new target. e) Repeat each time to complete the calibration process. When completed, tap screen to return to the Settings screen.
GPD359B Guide utilisateur
A. Utilisation de base ........................................................................................................................3 1. Découvrir les fonctions du système ......................................................................................3 1.1 Composants avant .......................................................................................................3 1.2 Composants arrière.............................................................................................
Consignes et notice d’utilisation Le PND n’est qu’un outil d’aide à la navigation. Il n’offre pas une mesure précise de la direction, de la distance, de l’emplacement ni de la topographie. L’utilisateur doit respecter les signalétiques et le code de la route en vigueur dans son pays. Les signaux satellite du GPS ne peuvent pas passer au travers de matériaux solides (excepté le verre).
A. Utilisation de base 1. Découvrir les fonctions du système 1.1 Composants avant Ecran tactile 1.
1.3 Composants supérieurs Indicateur de charge Aliment 1.4 Composants latéraux MIC 1.
1.6 Composants de la partie centrale Installer la carte mémoire T-flash La carte mémoire T-flash contient la carte dont va se servir le PND. Veuillez insérer la carte mémoire dans la fente située sur la partie latérale du PND. Une fois la carte insérée, elle ne peut plus être retirée pendant le fonctionnement du système Si vous aviez besoin de retirer la carte, veuillez d’abord éteindre le système. Effectuez ensuite une légère pression sur la carte; elle sera automatiquement éjectée de la fente. 2.
2.2 Installer la base et le support Installer le système de charge Etape 2: Installer la base sur le support au moyen des prises Etape 1: Faites tourner pour fixer le système au pare-brise Utilisez les deux vis latérales pour adjuster l’ angle et la direction du PND Installer le PND sur le support 2.3 Utilisation du câble USB Le câble USB permet d'augmenter les capacités du système. Il peut relier le navigateur à l’ordinateur et leur permettre de se synchroniser.
2.4 Premier démarrage du GPS La première mise en marche du système doit avoir lieu dans une zone extérieure, libre de tout obstacle. Attendez que le système reçoive 4 signaux satellite GPS. Vous pourrez ensuite programmer votre voyage. Remarque: Il existe différents moyens de rechercher un emplacement sur la carte ou de programmer votre itinéraire. Consultez le Manuel utilisateur; ce dernier vous guidera dans votre navigation. B.
2.2 Musique 1. Cliquez sur l’icône “Musique” du menu principal pour accéder à l’interface musicale: 2. Entrez le nom de la musique de votre choix afin d’accéder à l’interface suivante: Répéter Lecture aléatoire Liste musicale Cliquez sur l’icône REPETER pour rejouer le fichier musical Cliquez sur l’icône ALEATOIRE pour lire de manière aléatoire tous les morceaux enregistrés sur la carte.
photographies: Cliquez deux fois sur le fichier pour accéder à l'interface suivante: Précédent Suivant Liste des fichiers Plein écran Titre du document 1. Cliquez sur la touche “Précédent” pour afficher la photographie précédente et sur “Suivant” pour afficher la photographie suivante. 2.
3. L’image s’affichera automatiquement en mode plein écran et vous n’aurez qu’à cliquer n’importe où sur l’écran pour retourner à l’interface suivante: 4. Cliquez sur “X” pour retourner à la liste des photographies. 2.4 E-book 1. Cliquez sur l’icône “E-book” de l’interface principale pour accéder à l’interface E-book.
Navigation dans le fichier Titre du document Sélection de la page Page actuelle/ Total des pages 1. Cliquez sur “Page précédente” pour retourner à la page précédente puis cliquez sur “Page suivante” pour passer à la page suivante. 2. Cliquez sur “Sélection de la page” pour sélectionner une page en particulier. 3.Cliquez sur “X” pour retourner à la liste de l’interface E-Book. 2.5 Vidéo 1.
2. Cliquez sur le fichier vidéo que vous souhaitez lire, puis cliquez sur l’ écran pour lancer la lecture du fichier: Plein écran Navigation dans le fichier Progression 3. Cliquez sur la touche “Plein écran” pour lire le fichier en plein écran. 4.
2.6 Système 1. Cliquez sur l’icône du système pour accéder à l’interface suivante: 2. Cliquez sur la touche “Volume” pour accéder à l’interface suivante de réglage du volume: 3. Cliquez sur la touche “Power” pour accéder à l’interface de configuration suivante: 4.
Si vous ne sélectionnez pas “Auto-éclairage”, cliquez sur la touche de gauche pour réduire l’intensité de façon graduelle. A l’opposé, cliquez sur la touche de droite pour augmenter l’intensité de façon graduelle. Si vous sélectionnez “Auto-éclairage”, le système ajustera automatiquement l’intensité et l’éclairage à l’écran. Les touches situés à la gauche et à la droite de la barre “Configuration de l’éclairage" ne sont pas disponible à cet instant. 5.
6. Cliquez sur la touche “Langue” pour accéder à l’interface de paramétrage de la langue et de l’arrière-plan: 7.
Cliquez sur “USB” pour définir le mode de fonctionnement du port USB Si votre écran tactile ne répond pas correctement à vos clics de stylet, vous pouvez configure l’écran. a) Cliquez sur la touché Calibrage depuis l’écran Informations du système. b) Cliquez sur la touche Calibrage située à l’écran. c) Cliquez sur une zone et maintenez votre stylet enfoncé. d) Lorsque la cible passé à une autre position, cliquez au centre de la nouvelle cible et restez enfoncé quelques secondes.