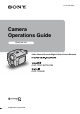
2-515-259-12(1) Camera Operations Guide Read this first Video Camera Recorder/Digital Video Camera Recorder CCD-TRV138/TRV338 DCR-TRV280 © 2005 Sony Corporation
Read this first Before operating the unit, please read this manual thoroughly, and retain it for future reference. WARNING To prevent fire or shock hazard, do not expose the unit to rain or moisture. For customers in the U.S.A. and CANADA RECYCLING LITHIUM-ION BATTERIES Lithium-Ion batteries are recyclable. You can help preserve our environment by returning your used rechargeable batteries to the collection and recycling location nearest you.
CAUTION You are cautioned that any changes or modifications not expressly approved in this manual could void your authority to operate this equipment. b Notes: • This equipment has been tested and found to comply with the limits for a Class B digital device, pursuant to Part 15 of the FCC Rules. These limits are designed to provide reasonable protection against harmful interference in a residential installation.
• The illustrations used on this manual are based on the model DCR-TRV280. • The screens shown in this manual are from a Windows XP computer. The screens may vary depending on the OS. Notes on using the camcorder • Hold your camcorder correctly. • To ensure a good grip, fasten the grip belt as shown in the following illustration. • Be careful not to press buttons on the LCD frame accidentally when you open or close the LCD panel, or when you adjust the angle of the LCD panel.
Table of Contents CCD-TRV138: DCR-TRV280: TRV138 CCD-TRV338: TRV280 TRV338 Read this first ............................................................................................. 2 Quick Start Guide Recording movies ...................................................................................... 8 Recording/Playing back with ease ........................................................... 10 Getting started Step 1: Checking supplied items....................................................
Superimposing a title................................................................................ 31 Searching for the last scene of the most recent recording – END SEARCH ................................................................................. 33 Playback Viewing pictures recorded on a tape........................................................ 34 Playing back in various modes ..................................................................................
Advanced operations Customizing Your Camcorder Changing the menu settings ..............41 Using the (MANUAL SET) menu – PROGRAM AE/P EFFECT, etc. ...............................................42 Using with your computer Features ( TRV280) ........................72 Installing the software and “First Step Guide” on a computer ( TRV280) ..................................74 Using “First Step Guide” ( TRV280) ..................................78 Using the (CAMERA SET) menu – 16:9 WIDE/STEADYSHOT, etc. ...
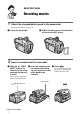
Quick Start Guide Recording movies 1 Attach the charged battery pack to the camcorder. To charge the battery, see page 12. a Lift up the viewfinder. b Slide the battery pack in the direction of the arrow until it clicks. 2 Insert a cassette into the camcorder. a Slide the OPEN/ b Insert the cassette with c Press . Close the cassette lid after EJECT lever in the its window-side facing the cassette compartment direction of the arrow up, then push the center slides back in by itself.
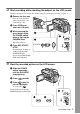
3 Start recording while checking the subject on the LCD screen. The date and time is not set up in the default setting. To set the date and time, see page 17. a Remove the lens cap. Quick Start Guide Lens cap is not attached when you purchase your camcorder (p. 104). b Press OPEN and open the LCD panel. c While pressing the green button, slide the POWER switch down to light up the CAMERA lamp. The power turns on. d Press REC START/ START/STOP STOP. Recording starts.
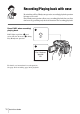
Recording/Playing back with ease By switching to Easy Handycam operation, recording/playback operation becomes even easier. Easy Handycam operation allows easy recording/playback for even first time users by providing only the basic functions for recording/playback. Press EASY when recording/ playing back. EASY lights up in blue (1) and screen font size increases (2) during Easy Handycam operation. Easy Handycam operation ON For details, see instructions for each operation.
Getting started Step 1: Checking supplied items Make sure you have following items supplied with your camcorder. Stereo: ( TRV280) USB cable (1) ( TRV280) The number in parentheses indicates the number of that item supplied. Getting started AC Adaptor (1) Rechargeable battery pack NP-FM30 (1) CD-ROM “Picture Package Ver.1.5” (1) ( TRV280) Camera Operations Guide (This manual) (1) Power cord (1) Lens cap (1) See page 104 on how to attach the lens cap.
Step 2: Charging the battery pack 1 Lift up the viewfinder. 2 Attach the battery pack by sliding it in the direction of the arrow until it clicks. 3 With the v mark on the DC plug facing up, connect the AC Adaptor to the DC IN jack on your camcorder. You can charge the battery by attaching the “InfoLITHIUM” battery pack (M series) to your camcorder. b Notes • You cannot use batteries other than the “InfoLITHIUM” battery pack (M series) (p. 96).
6 Slide the POWER switch up to (CHG) OFF. To check the remaining battery – Battery Info The CHG (charge) lamp lights up and charging starts. The CHG (charge) lamp turns off when the battery is fully charged. Disconnect the AC Adaptor from the DC IN jack.
at 25°C (77°F). (10 – 30°C (50 – 86°F) recommended.) Battery pack Continuous recording time Typical* recording time 145 NP-FM50 280 135 NP-FM50 150 NP-QM71D 675 330 NP-QM71D 260 NP-QM91D 1010 495 NP-QM91D 360 Battery pack NP-FM30 (supplied) For Recording time when recording with the LCD screen on Approximate number of minutes available when you use a fully charged battery pack at 25°C (77°F).
Using an outside power source You can use the AC Adaptor as the power source when you do not want the battery to run out. While you are using the AC Adaptor, the battery pack will not lose its charge even when it is attached to your camcorder. PRECAUTION Even if your camcorder is turned off, AC power (house current) is still supplied to it while connected to the wall outlet via the AC Adaptor.
Step 4: Adjusting the LCD panel and viewfinder 3 Turn the SEL/PUSH EXEC dial to select [LCD BRIGHT], then press the dial (p. 51). 4 Adjust the brightness of the LCD screen with the SEL/PUSH EXEC dial, then press the dial. 5 Press MENU. Adjusting the LCD panel You can adjust the angle and brightness of the LCD panel to meet various recording situations.
Step 5: Setting the date and time Set the date and time when using this camcorder for the first time. If you do not set the date and time, the [CLOCK SET] screen appears every time you turn on your camcorder. 3 Press MENU.
To check the preset date and time For TRV138/338: Press DATE to display the date indicator. Press TIME to display the time indicator. Press DATE (or TIME) and then press TIME (or DATE) to simultaneously display the date and time indicator. To hide the date and/or time indicator, press DATE and/or TIME again. Step 6: Inserting a cassette tape You can use standard 8 mm and Hi8 , Digital8 video cassettes on your camcorder. For details on these cassettes (such as writeprotection), see page 95.
2 Insert a cassette with its window-side facing up. Window-side Step 7: Setting the screen language You can select the language to be used on the LCD screen. MENU Getting started Push the center of the back of the cassette lightly. 3 Press . The cassette compartment automatically slides back in. 4 1 Turn on your camcorder. 2 Press OPEN to open the LCD panel. 3 Press MENU. MANUAL SET PROGRAM AE P EFFECT AUTO SHTR Close the lid.
5 Turn the SEL/PUSH EXEC dial to select [ LANGUAGE], then press the dial. SETUP MENU STBY CLOCK SET USB STREAM ENGLISH LTR SIZE LANGUAGE ENG[SIMP] DEMO MODE FRANÇAIS ESPAÑOL PORTUGUÊS [MENU] : END 6 Turn the SEL/PUSH EXEC dial to select the desired language, then press the dial. 7 Press MENU. z Tip • Your camcorder offers [ENG [SIMP]] (simplified English) for when you cannot find your native tongue among the options.
Recording Recording movies 2 Press OPEN and open the LCD panel. 3 Slide the POWER switch until the CAMERA lamp lights up. Before recording, follow steps 1 to 7 in “Getting started” (p. 11 - p. 19). For TRV138/338: Movies will be recorded along with monaural sound. For TRV280: Movies will be recorded along with stereo sound. Your camcorder is set to the standby mode. Slide the POWER switch while pressing the green button. Recording Camera recording lamp 4 Press REC START/STOP. Recording starts.
Indicators displayed during recording The indicators will not be recorded on the tape. G Time code/Tape counter (hour: minute: second)/Tape photo recording ( TRV280) TRV138/338: For 1 2 3 60min SP 4 REC 0:00:00 6 5 For TRV280: Date/time and camera settings data (p. 37) will not be displayed during recording. 1 60min 2 3 SP REC 7 0:00:00 5 A Remaining battery time The indicated time may not be correct depending on the environment of use.
Recording for a longer time To record for a longer time To record wider range of view Move the power zoom lever towards W. The subject appears farther away (Wide angle). To record closer view Move the power zoom lever towards T. The subject appears closer (Telephoto). To use the zoom buttons on LCD frame Recording In the (TAPE SET) menu, select [REC MODE], then [LP] (p. 52). In the LP mode, you can record longer than when recording in the SP mode (2 times longer for TRV138/338, 1.
: Automatically turns on and off according to the ambient brightness. m : Always turns on. To turn off the built-in light Press LIGHT repeatedly until no indicator appears on the screen. b Notes • The built-in video light emits very bright light, which is perfectly safe in normal use. However, avoid directly aiming the light at a subject’s eyes from very close range. • The battery pack discharges quickly while the builtin light is turned on.
Superimposing the date and time on pictures ( TRV138/338) You can record the date and/or time displayed on the screen superimposed on the picture. Recording still images – Tape photo recording ( TRV280) You can record still images. Before recording, follow steps 1 to 7 in “Getting started” (p. 11 - p. 19). OPEN PHOTO Recording DATE TIME CCD-TRV338 Press DATE to record the date. Press TIME to record the time. Press DATE (or TIME), then press TIME (or DATE) to record the date and time.
3 Slide the POWER switch to select the CAMERA mode. Recording with ease – Easy Handycam Slide the POWER switch while pressing the green button. 4 Press and hold PHOTO lightly. You will hear a small beep sound, and the picture will become a still image. Recording does not start at this point. 60min 5 With this Easy Handycam operation, most of the camera settings are set to automatic mode, only basic functions become available, and screen font size increases for easy viewing.
Easy Handycam operation ON Adjusting the exposure The exposure is adjusted automatically in the default setting. 5 Press REC START/STOP. Recording starts. [REC] appears on the LCD screen and the Camera recording lamp lights up. Press REC START/STOP again to stop recording. Slide the POWER switch up to (CHG) OFF. To cancel Easy Handycam operation When your subject has its back to the sun or other light, you can adjust the exposure to prevent the subject from becoming shadowed.
Adjusting the exposure manually You can fix the brightness of a picture at the best exposure. When recording indoors on a clear day, for instance, you can avoid backlight shadows on people next to the window by manually fixing the exposure to that of the wall side of the room. EXPOSURE 1 2 – NightShot plus You can record subjects in dark places (such as when capturing the face of your baby sleeping) with this function. SEL/PUSH EXEC dial Press EXPOSURE in CAMERA mode.
z Tip • If you record subjects in complete darkness, set [N.S. LIGHT] to [ON] in the menu settings. The maximum shooting distance using the NightShot Light is about 3 meters (10 feet). If you record subjects in dark places (such as night scene or in moonlight), set [N.S. LIGHT] to [OFF] in the menu settings. You can make image color deeper (p. 48). Adjusting the focus manually The focus is adjusted automatically in the default setting.
Tips for focusing manually • It is easier to focus on the subject when you use the zoom function. Move the power zoom lever towards T (telephoto) to adjust the focus, and then, towards W (wide angle) to adjust the zoom for recording. • When you want to record a close-up image of a subject, move the power zoom lever towards W (wide angle) to fully magnify the image, then adjust the focus. Recording a picture using various effects FADER To adjust the focus automatically Press FOCUS again.
[STRIPE FADER] This feature is for TRV138/338 only. Superimposing a title You can insert a title when recording. You can select one of the 8 preset titles and the 2 custom titles. [MONOTONE FADER] When fading in, the picture gradually changes from black-and-white to color. When fading out, the picture gradually changes from color to black-and-white. Slide the POWER switch to select the CAMERA mode.
4 Turn the SEL/PUSH EXEC dial to select [POSITION] (position) You can select from 8 to 9 choices. the desired character, then press the dial. STBY P1 TITLE SET S_ _ _ _ _ _ _ _ _ _ _ _ _ _ _ _ _ _ _ ABCDE 1 2 3 4 5 FGHIJ 6 7 8 9 0 KLMNO ÀÈÌÒÙ PQRST ÁÉÍÓÚ UVWXY ÂÊÔÆŒ Z& ? ! ÃÕÑçß ’ . , / – ÄÏÖÜÅ [TITLE] : END $ ¥DM£ ¿iø”: [ C ] [ cP2 ] [O K] To erase a character: Select [C]. To enter a space: Select [Z& ? !], then select the blank part between & and ?.
Searching for the last scene of the most recent recording – END SEARCH END SEARCH Recording This function is handy when you have played back the tape, for example, but want to start recording right after the most recently recorded scene. The END SEARCH function will not work once you eject the cassette after you have recorded on the tape. POWER switch 1 Slide the POWER switch to select the CAMERA mode. 2 Press END SEARCH.
Playback Viewing pictures recorded on a tape Make sure you have a recorded cassette inserted into your camcorder. When you want to play back the recorded picture on your TV, see page 39. 3 Press (rewind) to go to the point you want to view. 4 Press (play) to start playback. To adjust the volume Press either of the two buttons on VOLUME. When you close the LCD panel, sound is turned off. :To turn the volume down :To turn the volume up To stop playback Press (stop).
For TRV280: 60min 0:00:00:00 b Note • For TRV138/338: When you play back a tape recorded in the LP mode, noise may appear on the LCD screen in the following cases: – Playback pause – Picture search A Remaining battery time B Recording mode (SP or LP) C Tape transport indicator Playback D Tape counter (hour: minute: second) ( TRV138/338) E Hi8 format ( TRV138/338) This appears while playing back Hi8 format tapes.
Playing back with ease 4 Play back a tape. The following buttons can be operated. (play)/ (stop)/ (pause)/ (fast forward)/ (rewind) – Easy Handycam Easy Handycam operation allows easy playback for even first time users by providing only the basic functions for playback. Also screen font size increases for easy viewing. Make sure you have a recorded cassette inserted into your camcorder.
Various playback functions You can display the recorded date on the screen. DISPLAY/BATT INFO POWER switch During playback, you can view the date/time data ([DATE/TIME]) and the camera settings data ([CAM DATA]) that are automatically recorded while recording pictures on a tape. 1 Slide the POWER switch repeatedly to select the PLAY/EDIT mode. 2 Press MENU during playback or playback pause. 3 Turn the SEL/PUSH EXEC dial to select (OTHERS), then press the dial.
To hide the date/time or the camera settings data Follow steps 2 to 4, and select [OFF] in step 5. Camera settings data display In the date/time data display, the date and time is displayed in the same area. If you record the picture without setting the clock, [--- -- ----] and [--:--:--] will appear. 60min 0:00:00:00 1 2 AUTO 100 AWB F1.
Playing the picture on a TV For Connect your camcorder to a TV using the supplied A/V connecting cable as shown in the following illustration. Connect the supplied AC Adaptor to the wall outlet for the power supply (p. 12). Refer also to the instruction manuals supplied with the devices to be connected. To copy to another tape, see page 61.
When your TV is connected to a VCR Connect your camcorder to the LINE IN input on the VCR using the A/V connecting cable. Set the input selector on the VCR to LINE. When your TV is stereo For TRV138/338: Connect the audio plug of the A/V connecting cable to the left (white) input jack of your TV.
BAdvanced operations OTHERS (p. 57) Customizing Your Camcorder TAPE SET REC MODE SP AUDIO MODE REMAIN FRAME REC I N T. REC RETURN Changing the menu settings You can change various settings or make detailed adjustments using the menu items displayed on the screen. STBY [MENU] : END 4 Turn the SEL/PUSH EXEC dial to select the desired item, then press the dial. The available menu items vary depending on the position of the POWER switch. Unavailable items will be grayed out.
Using the (MANUAL SET) menu – PROGRAM AE/P EFFECT, etc. You can select items listed below in the MANUAL SET menu. To select these items, see “Changing the menu settings” (p. 41). The default settings are marked with G. The settings you can adjust vary depending on the power mode of your camcorder. The screen shows the items you can operate at the moment. Unavailable items will be grayed out.
**Your camcorder is adjusted to focus only on distant subjects. b Note • When you set the NIGHTSHOT PLUS switch to ON, [PROGRAM AE] does not work. P EFFECT For TRV138/338: You can add special effects (such as films) to a picture before recording. appears when each effect is selected. For TRV280: You can add special effects (such as films) to a picture before or after recording. appears when each effect is selected. Select when not using the Picture effect setting.
z Tip • For TRV280: You can copy pictures edited using picture effects to another tape (p. 61). AUTO SHTR 44 GON Select to automatically activate the electronic shutter to adjust the shutter speed when recording in bright conditions. OFF Select when recording without using the electronic shutter.
Using the (CAMERA SET) menu – 16:9 WIDE/STEADYSHOT, etc. You can select items listed below in the CAMERA SET menu. To select these items, see “Changing the menu settings” (p. 41). The default settings are marked with G. The settings you can adjust vary depending on the power mode of your camcorder. The screen shows the items you can operate at the moment. Unavailable items will be grayed out. CAMERA SET D ZOOM 1 6 : 9W I DE STEADYSHOT N. S.
16:9 WIDE For TRV138/338: You can record a cinema-like picture ([CINEMA] mode) or a 16:9 wide picture ([16:9 FULL] mode) to watch on the 16:9 wide-screen TV. Refer also to the manuals supplied with your TV.
z Tips • The ID-1 system sends aspect ratio information (16:9, 4:3, or letter box) by inserting signals between video signals. • When you record in the [16:9 FULL], the date or time indicator will be widened on widescreen TVs. • For TRV338: The SteadyShot does not work. If you set [16:9 FULL] in the menu settings when the SteadyShot is working, flashes and the SteadyShot does not function. For TRV280: You can record a 16:9 wide picture on the tape to watch on a 16:9 wide-screen TV ([16:9 WIDE] mode).
STEADYSHOT For TRV338/ TRV280: You can select this function to compensate for camera-shake. GON OFF ( Standard setting (enable the SteadyShot function). If you select a function that STEADYSHOT cannot work with, appears. ) Select to deactivate the SteadyShot function. Select to shoot a stationary subject with a tripod, or when using a conversion lens (optional). Natural pictures are produced.
Using the (PLAYER (VCR SET) SET)/ menu – HiFi SOUND/EDIT, etc. The default settings are marked with G. The settings you can adjust vary depending on the power mode of your camcorder. The screen shows the items you can operate at the moment. Unavailable items will be grayed out. You can select the items listed below in the menu (the PLAYER SET menu for TRV138/338, the VCR SET menu for TRV280). To select these items, see “Changing the menu settings” (p. 41).
TBC For TRV138/338: GON Select to correct jitter (horizontal picture shake during playback). OFF Select to not compensate picture distortion when playing back a tape on which you have dubbed repeatedly or recorded TV game signals. DNR For TRV138/338: GON Select to eliminate color noise in the picture. OFF Select to minimize picture artifacts in a picture containing lots of movement. AUDIO MIX For TRV280: You can adjust the audio balance between ST1 (the originally recorded sound) and ST2.
Using the (LCD SET) menu – LCD B.L./LCD COLOR, etc. The default settings are marked with G. The settings you can adjust vary depending on the power mode of your camcorder. The screen shows the items you can operate at the moment. Unavailable items will be grayed out. You can select the items listed below in the LCD SET menu. To select these items, see “Changing the menu settings” (p. 41). LCD SET LCD BR I GHT LCD B. L. LCD COLOR [MENU] : END LCD BRIGHT See page 16 for details. LCD B.L.
Using the (TAPE SET) menu – FRAME REC/ INT.REC, etc. You can select items listed below in the TAPE SET menu. To select items, see “Changing the menu settings” (p. 41). The default settings are marked with G. The settings you can adjust vary depending on the power mode of your camcorder. The screen shows the items you can operate at the moment. Unavailable items will be grayed out. TAPE SET REC MODE AUDIO MODE REMAIN FRAME REC I NT.
• When you set [ORC TO SET], a non-recorded section of about 0.1 second appears on the tape. However, note that this non-recorded section disappears from the tape when you continue recording from this section. • To check if you have already set this setting, select [ORC TO SET] in the menu settings. [ORC ON] is displayed if it is already set.
INT.REC For TRV280: You can achieve excellent recordings of flowers blooming, etc., with this function. Connect your camcorder to the wall outlet using the supplied AC Adaptor during the operation. [a] [a] [b] [a] [b] a. [REC TIME] b. [INTERVAL] 1 Turn the SEL/PUSH EXEC dial to select [SET], then press the dial. 2 Turn the SEL/PUSH EXEC dial to select [INTERVAL], then press the dial. 3 Turn the SEL/PUSH EXEC dial to select the desired interval time (30 seconds, 1, 5, 10 minutes), then press the dial.
Using the (SETUP MENU) – CLOCK SET/USB STREAM/ The default settings are marked with G. The settings you can adjust vary depending on the power mode of your camcorder. The screen shows the items you can operate at the moment. Unavailable items will be grayed out. LANGUAGE, etc. You can select items listed below in the SETUP MENU. To select items, see “Changing the menu settings” (p. 41). SETUP MENU CLOCK SET USB STREAM LTR SIZE LANGUAGE DEMO MODE [MENU] : END CLOCK SET You can set the date and time (p.
LANGUAGE You can select or change the language used for the on-screen display (p. 19). You can select from English, Simplified English, Canadian-French, Latin American Spanish, Brazilian-Portuguese, Traditional-Chinese, or Korean. DEMO MODE When you remove a cassette from your camcorder, and select the CAMERA mode, you can view the demonstration in about 10 minutes. GON Select to see an overview of the functions available such as when you are using this camcorder for the first time.
Using the (OTHERS) menu – WORLD TIME/VIDEO EDIT, etc. You can select items listed below in the OTHERS menu. To select items, see “Changing the menu settings” (p. 41). The default settings are marked with G. The settings you can adjust vary depending on the power mode of your camcorder. The screen shows the items you can operate at the moment. Unavailable items will be grayed out. OTHERS WORLD TIME BEEP A.
b Note • When you connect your camcorder to the wall outlet, [A.SHUT OFF] is automatically set to [NEVER]. DISPLAY GLCD Select to show the displays such as the time code on the LCD screen and in the viewfinder. V-OUT/LCD Select to show the displays such as the time code on the TV screen, LCD screen, and in the viewfinder. GON Select to turn on the camera recording lamp on the front of your camcorder during recording. OFF Select this setting in the following recording situations.
Dubbing/Editing Connecting to a VCR For You can create a copy of the picture recorded on your camcorder on other recording devices (p. 61). For TRV280, you can also record the picture from a VCR to a tape on your camcorder (p. 66). Connect your camcorder to a VCR as shown in the following illustration.
For TRV280: A/V OUT jack Connecting with an i.LINK cable i.LINK cable (optional) i.LINK jack DV Interface Yellow White A/V connecting cable (supplied) VCRs Red Signal flow b Notes • Use the A/V connecting cable to connect your camcorder to other devices. Before connecting, make sure the [DISPLAY] setting in the (OTHERS) menu is set to [LCD] (the default setting) (p. 58).
Dubbing to another tape You can copy and edit the picture played back on your camcorder to other recording devices (such as VCRs). 1 Connect your VCR to your camcorder as a recording device (p. 59, 60). 2 Prepare your VCR for recording. • For TRV280: When your camcorder is connected to the VCR via the DV Interface, you cannot record the title or indicators. • For TRV280: Pictures edited with Picture effect ([P EFFECT] p. 43) cannot be output via the DV Interface.
Dubbing a tape easily – Easy Dubbing ( 5 TRV138/338) EASY DUBBING SETUP I R SETUP PAUSE MODE I R TEST RETURN You can control VCR for dubbing with your camcorder easily with the VCR connected to the camcorder. Step 1: Preparing your camcorder and VCR for operation Follow the steps below when you are performing the Easy Dubbing for the first time. You can skip this setting if you have set up the VCR by the following procedure before.
10Point the infrared ray emitter of your camcorder towards the remote sensor on your VCR, from about 30 cm (12 in.) away, with no obstructions. Remote sensor VCR Infrared ray emitter [IR SETUP] code list The following [IR SETUP] codes are recorded on your camcorder by default. (It is set at “3” as the default setting.) Manufacturing company [IR SETUP] code Sony 1, 2, 3, 4, 5, 6 Admiral (M. Wards) 89 Aiwa 47, 54, 80 Akai 49, 51 Audio Dynamic 21, 35 Bell&Howell (M.
Manufacturing company [IR SETUP] code Multitech 23, 32, 80 NEC 21, 33, 35 Olympic 77, 78 Optimus 22 Orion 60 Panasonic 16, 17, 77, 78 Pentax 8, 42 Philco 26, 70, 77, 78 Philips 47, 77, 78, 83 Pioneer 78 Quasar 6, 16, 17, 77, 78 RCA/PROSCAN 7, 8, 16, 40, 41, 42, 77, 78, 78*, 83, 101 Realistic 22, 36, 37, 77, 80, 88 You can insert a title. You can select one of the 8 preset titles and the 2 custom titles. See steps 1 to 4 on page 31 to create original titles.
4 Turn the SEL/PUSH EXEC dial to select [OK], then press the dial. 2 The title lights up. EASY DUBBING START T I T LE SEL MODE SEL SETUP When you select [NORMAL] You can record into the VCR normally. 0 :0 0 :0 0 ON When you select [PREVIEW] You can make a time-lapse dubbing by setting the VCR to automatically repeat 5 seconds’ recording and 25 seconds’ standby. HELLO! NORMAL [ E A S Y D UB ] : E N D b Notes • You can put a title only into the tape of the VCR.
2 Turn the SEL/PUSH EXEC dial to select [EXECUTE], then press the dial. When dubbing ends, your camcorder and VCR stop automatically. Then the display returns to the Easy Dubbing initial screen. To stop dubbing during editing Press (stop) on your camcorder. To quit Easy Dubbing Press EASY DUB. b Note • [NOT READY] appears on the screen when [START] is not carried out. Recording pictures from a VCR ( TRV280) You can record and edit pictures from a VCR on a tape inserted in your camcorder.
Dubbing selected scenes from a tape – Digital program editing ( 2 Prepare your VCR. • Insert a cassette for recording. • Set the input selector to input mode, if your VCR has one. TRV280) You can select up to 20 scenes (programs) and record them in the desired order to other recording device such as VCR. 3 • Insert a cassette for editing. • Slide the POWER switch repeatedly to select the PLAY/EDIT mode.
9 5 Point the infrared ray emitter of your Turn the SEL/PUSH EXEC dial to select [i.LINK] or [IR], then press the dial. camcorder towards the remote sensor on your VCR, from about 30 cm (12 in.) away, with no obstructions. When connecting with an i.LINK cable After selecting [i.LINK], go on to “Step 2: Adjusting the synchronization of the VCR” (p. 68).
3 Turn the SEL/PUSH EXEC dial to select [ADJ TEST], then press the dial. VIDEO EDIT EDIT SET CONTROL ADJ TEST ”CUT–IN” ”CUT–OUT” IR SETUP PAUSEMODE IR TEST RETURN [MENU] : END 4 8 The calculated start position for recording is set. 0:08:55:06 RETURN EXECUTE ENGAGE REC PAUSE 9 Turn the SEL/PUSH EXEC dial to select [EXECUTE], then press the dial. 0:08:55:06 0 10Turn the SEL/PUSH EXEC dial to select the average numerical value of [OUT], then press the dial.
2 3 4 Press MENU. 8 The ending point of the first program is set, and the lower part of the program mark changes to light blue. Turn the SEL/PUSH EXEC dial to select (OTHERS), then press the dial. VIDEO EDIT MARK UNDO ERASE ALL START EDIT SET Turn the SEL/PUSH EXEC dial to select [VIDEO EDIT], then press the dial. VIDEO EDIT MARK UNDO ERASE ALL START EDIT SET 0:08:55:06 1 IN TOTAL 0:00:00:00 SCENE 0 [MENU] : END Press the SEL/PUSH EXEC dial.
To end Digital program editing Press MENU. To save a program without using it to record Press MENU in step 11. The program is stored in memory until the cassette is ejected. To erase programs 1 Follow steps 1 to 4 in “Recording the selected scenes as programs” (p. 69). 2 Turn the SEL/PUSH EXEC dial to select [UNDO] or [ERASE ALL], then press the dial. When you select [UNDO] You can erase the last set program. When you select [ERASE ALL] You can erase all the programs.
Using with your computer Features ( TRV280) When you install the Picture Package software on a Windows computer from the supplied CDROM, you can enjoy the following operations by connecting your camcorder to your computer. Software and features available for Macintosh computers differ from those available for Windows computers. For details, refer to chapter 6 of “First Step Guide” on CD-ROM. For “First Step Guide,” see the next section. z Tip • There are 2 ways to connect your camcorder to a computer.
About “First Step Guide” “First Step Guide” is an instruction manual you can refer to on your computer. This “First Step Guide” describes basic operations, from initial hookup of your camcorder and computer and making settings, to general operation the first time you use the software stored on the CD-ROM (supplied). After installing the CD-ROM, reading “Installing the software and “First Step Guide” on a computer ( TRV280)” (p. 74), start the “First Step Guide,” then follow the instructions.
• Display: Minimum 1 024 × 768 dots, 32 000 colors (this product will not operate correctly at less than 1 024 × 768 dots or 256 colors.) • Application: QuickTime 4 or later (QuickTime 5 recommended) • Other: Disc drive Installing the software and “First Step Guide” on a computer ( TRV280) You need to install the software etc., with the supplied CD-ROM on your computer before connecting your camcorder and your computer. Once you install it, the installation is not required thereafter.
For Windows 2000/Windows XP Log on as Administrators for installation. 1 Confirm that your camcorder is not connected to the computer. 2 Turn on the computer. 5 Select the language for the application to be installed, then click [Next]. 6 Click [Next]. 7 Read [License Agreement], check [I accept the terms of the license agreement] when you agree, then click [Next]. 8 Select where to save the software, then click [Next].
9 Click [Install] on the [Ready to Install the Program] screen. The installation of Picture Package starts. 13If the [Installing Microsoft (R) DirectX(R)] screen is displayed, follow the steps below to install DirectX 9.0c. If not, skip to step 14. 1 Read [License Agreement], then click [Next]. 10Select the language for “First Step Guide” to be installed, then click [Next]. 2 Click [Next]. Depending on the computer, this screen may not be displayed. In such a case, skip to step 12. 3 Click [Finish].
(and “First Step Guide,” if installed by steps 11-12) appear on the desktop. 15Remove the CD-ROM from the disc drive of your computer. If you have any questions about Picture Package 7 Double-click [IMXINST.SIT] in the folder it was copied to. 8 Double-click the unzipped [ImageMixerVCD2_Install]. 9 When the user acceptance screen is displayed, enter your name and password. The installation of ImageMixer VCD2 starts. For details on how to use ImageMixer VCD2, refer to the software’s on-line help.
Using “First Step Guide” ( TRV280) Viewing “First Step Guide” Starting up on a Windows computer Double-click the icon on the desktop. • You can also start by selecting [Start], [Programs] ([All Programs] for Windows XP), [Picture Package], and [First Step Guide], then start up [First Step Guide]. Starting up on a Macintosh computer Double-click “FirstStepGuide.pdf.” z Tip • To view the PDF, Adobe Reader is needed.
• iMac, iBook, Macintosh, Mac OS, PowerBook and PowerMac are trademarks of Apple Computer, Inc., registered in the U.S. and other countries. • eMac is a trademark of Apple Computer, Inc. • QuickTime and the QuickTime logo are trademarks of Apple Computer, Inc. • Roxio is a registered trademark of Roxio, Inc. • Toast is a trademark of Roxio, Inc. • Macromedia and Macromedia Flash Player are trademarks or registered trademarks of Macromedia, Inc. in the United States and/or other countries.
– Europe http://www.vaio-link.com/ – USA http://www.ita.sel.sony.com/support/ dvimag/ – Asia Pacific Regional http://www.css.ap.sony.com/ – Korea http://scs.sony.co.kr/ – Taiwan http://vaio-online.sony.com/tw/vaio/ – China http://www.sonystyle.com.cn/vaio/ – Thailand http://www.sony.co.th/vaio/index.html – Latin America http://vaio-online.sony.com/ switch repeatedly to select the PLAY/ EDIT mode. Use the supplied AC Adaptor as the power source since it takes a few hours to create a DVD.
WRITING: The picture is being written onto the DVD. z Tip • If you use a DVD-RW/+RW which has other data stored on it, the message [This is a recorded disc. Delete and overwrite?] appears on the LCD screen of your camcorder. When you press the SEL/PUSH EXEC dial, the existing data is erased and new data is written.
Troubleshooting Troubleshooting If you run into any problem using your camcorder, use the following table to troubleshoot the problem. If the problem persists, remove the power source and contact your Sony dealer. If “C:ss:ss” is displayed on the LCD screen or the viewfinder, the self-diagnosis display function is activated. See page 92 for details. Overall operations Symptom Cause and/or Corrective Actions The power does not turn on.
Symptom Cause and/or Corrective Actions The power abruptly turns off. • [A.SHUT OFF] in the (OTHERS) menu is set to [5 min]. (p. 57) cWhen approximately 5 minutes have elapsed while you do not operate your camcorder, the camcorder is automatically turned off. Slide the POWER switch down to turn the power on again. (p. 15) Or use the AC adaptor. A problem occurs when the camcorder is connected to the AC Adaptor. cTurn off the power, and disconnect the AC Adaptor from the wall outlet.
Recording Symptom Cause and/or Corrective Actions The tape does not start when you press REC START/STOP. cSlide the POWER switch to turn on the CAMERA lamp. (p. 15) cThe tape has reached the end. Rewind it, or insert a new cassette. cSet the write-protect tab to REC or insert a new cassette. (p. 95) cThe tape is stuck to the drum due to moisture condensation. Remove the cassette and leave your camcorder for at least 1 hour, then re-insert the cassette. (p. 99) The power abruptly turns off. • [A.
Symptom Cause and/or Corrective Actions The built-in light does not function. cPress LIGHT repeatedly to select . cIf the problem presists, contact your Sony dealer or local authorized Sony service facility. Playback Cause and/or Corrective Actions Cannot play back. cIf the tape has reached the end, rewind the tape. (p. 34) Horizontal lines appear on the picture. The displayed pictures are not clear or do not appear. cClean the head using the cleaning cassette (optional). (p.
Dubbing/Editing 86 Symptom Cause and/or Corrective Actions Cannot dub correctly using the A/V connecting cable. cSet [DISPLAY] to [LCD] in the For TRV280: Pictures from connected devices are not displayed correctly. • The input signal is not NTSC. (p. 66) For TRV280: Digital program editing does not function. cSet the input selector on the VCR correctly, then check the connection between your camcorder and the VCR. (p.
Connecting to a computer Symptom Cause and/or Corrective Actions For TRV280: The computer does not recognize your camcorder. cDisconnect the cable from the computer and camcorder, then connect it again firmly. cDisconnect the USB device other than the keyboard, the mouse, and the camcorder from the computer. cDisconnect the cable from the computer and camcorder, restart the computer, then connect them again correctly.
Symptom Cause and/or Corrective Actions For TRV280: The image does not appear on the screen of the Windows computer when using the USB cable. cThe USB driver has been registered incorrectly as the computer was connected to your camcorder before the installation of the USB driver was completed. Follow the procedure below to install the USB driver correctly.
Symptom Cause and/or Corrective Actions For TRV280: The image does not appear on the screen of the Windows computer when using the USB cable. For Windows 2000 Log on as Administrators. 1 Check that your camcorder is connected to a computer. 2 Right-click [My Computer], then click [Properties]. The [System Properties] screen appears. 3 4 5 6 Click the [Hardware] tab. Click [Device Manager]. Click [View], then click [Devices by type].
Symptom Cause and/or Corrective Actions For TRV280: The image does not appear on the screen of the Windows computer when using the USB cable. For Windows XP Log on as Administrators. 1 Check that your camcorder is connected to a computer. 2 Click [Start]. 3 Right-click [My Computer], then click [Properties]. The [System Properties] screen appears. 4 5 6 7 Click the [Hardware] tab. Click [Device Manager]. Click [View], then click [Devices by type].
Symptom Cause and/or Corrective Actions For TRV280: There is no sound when the camcorder is connected to the Windows computer via a USB cable. cChange the settings for your computer environment as described in the following procedures: 1 Select [Start], [Programs] ([All Programs] for Windows XP), [Picture Package], [Handycam Tools], and [USB Streaming Tool], then start up [USB Streaming Tool]. 2 Select another device on the [Select audio device] screen.
Warning indicators and messages Self-diagnosis display/Warning indicators If indicators appear on the screen, check the following. See the page in parentheses for details. Indication Cause and/or Corrective Actions C:ss : ss/E:ss : ss (Selfdiagnosis display) Some symptoms can be fixed by yourself. If the problem persists even after you tried a couple of times, contact your Sony dealer or local authorized Sony service facility.
Indication Cause and/or Corrective Actions Z (Eject cassette warning)* Slow flashing: • The write-protect tab on the cassette is set to lock. (p. 95) Fast flashing: • Moisture condensation has occurred. (p. 99) • The self-diagnosis display code is displayed. (p. 92) * You hear a melody or beep sound when the warning indicators appear on the screen. Warning messages The following messages will appear to prompt you to correct the situation.
Additional Information Using your camcorder abroad Power supply You can use your camcorder in any country/ region using the AC Adaptor supplied with your camcorder within AC 100 V to 240 V, 50/60 Hz. Use a commercially available AC plug adaptor [a], if necessary, depending on the design of the wall outlet [b]. AC-L15A/L15B [a] [b] On TV color systems Your camcorder is an NTSC system-based camcorder.
Usable cassette tapes You can use standard 8 mm and Hi8 , Digital8 video cassettes on your camcorder. Hi8 system This Hi8 system is an extension of the standard 8 mm system, and was developed to produce higher quality pictures. You cannot play back a tape recorded in the Hi8 system correctly on video recorders/ players other than a Hi8 video recorder/player. Digital8 control signals for copyright protection of software. [Cannot record due to copyright protection.
About the “InfoLITHIUM” battery pack This unit is compatible with the “InfoLITHIUM” battery pack (M series). Your camcorder operates only with the “InfoLITHIUM” battery pack. “InfoLITHIUM” M series battery packs have the mark. • What is the “InfoLITHIUM” battery pack? • The “InfoLITHIUM” battery pack is a lithiumion battery pack that has functions for communicating information related to operating conditions between your camcorder and an optional AC Adaptor/charger.
your camcorder in tape recording standby until the power goes off. About i.LINK About battery life • The battery life is limited. Battery capacity drops little by little as you use it more and more, and as time passes. When the available battery time is shortened considerably, a probable cause is that the battery pack has reached the end of its life. Please buy a new battery pack. • The battery life varies depending on how it is stored and the operating conditions and environment for each battery pack.
device. It is also indicated near the i.LINK interface on some device. The baud rate may differ from the indicated value when the unit is connected to device with a different maximum baud rate. * What is Mbps? Mbps stands for “megabits per second,” or the amount of data that can be sent or received in one second. For example, a baud rate of 100 Mbps means that 100 megabits of data can be sent in one second. To use i.
• Do not wrap your camcorder with a towel, for example, and operate it. Doing so might cause heat to build up inside. • When disconnecting the power code, pull by the plug and not the code. • Do not damage the power code such as by placing anything heavy on it. • Keep metal contacts clean. • If the battery electrolytic liquid has leaked, – consult your local authorized Sony service facility. – wash off any liquid that may have contacted your skin.
• For TRV280: If the following problem occurs, clean the video heads for 10 seconds with the Sony V8-25CLD cleaning cassette (optional). – Mosaic-pattern noise appears on the playback picture or the screen is displayed in blue. – Playback pictures do not move. – Playback pictures do not appear or the sound breaks off. – [ Dirty video head. Use a cleaning cassette.] appears on the screen during recording. LCD screen • Do not add excessive pressure on the LCD screen, as it may cause damage.
Specification Video camera recorder System *1Objects unable to be seen due to the dark can be shot with infrared lighting. Input/Output connectors Audio/Video output AV MINIJACK Video signal: 1 Vp-p, 75 Ω (ohms), unbalanced, sync negative Audio signal: 327 mV (at output impedance more than 47 kΩ (kilohms)), Output impedance with less than 2.2 kΩ (kilohms) For TRV138/338: Monaural minijack (ø 3.5 mm) For TRV280: Stereo minijack (ø 3.
General Rechargeable battery pack (NP-FM30) Power requirements DC 7.2 V (battery pack) DC 8.4 V (AC Adaptor) Average power consumption (when using the battery pack) For TRV138/338: During camera recording using the viewfinder 1.8 W During camera recording using the LCD 2.7 W For TRV280: During camera recording using viewfinder 2.5 W During camera recording using LCD 3.4 W Operating temperature 0° C to 40° C (32° F to 104° F) Storage temperature -20° C to + 60° C (-4° F to + 140° F) Dimensions (approx.
Types of differences Model CCDTRV138 DCRTRV338 TRV280 Recording system Hi8 Hi8 Digital8 Playback system Hi8/8 Hi8/8 Digital8 Audio recording Monaural Monaural Stereo OUT OUT OUT — — IN/OUT USB jack — — z SteadyShot — z z AUDIO/VIDEO jack DV Interface z Provided — Not provided Additional Information Additional Information 103
Quick Reference Identifying parts and controls Camcorder A Lens cap (p. 21, 25) L FADER button (p. 30) B LCD screen (p. 3, 16) M BACK LIGHT button (p. 27) C OPEN button (p. 16) N FOCUS button (p. 29) D REC START/STOP button on LCD frame (p. 21) * This button has a tactile dot. E Zoom buttons on LCD frame (p. 23) F VOLUME –/+* button (p. 34) G END SEARCH button (p. 33) H Speaker I Viewfinder (p.
E Microphone B Lens F NIGHTSHOT PLUS switch (p. 28) C Infrared ray emitter (p. 62, 68) G EASY button (p. 26, 36) D Camera recording lamp (p. 21, 26) H DISPLAY/BATT INFO button (p. 13, 37) A Jack cover E For TRV138/338: A/V OUT jack (p. 39, 59) Quick Reference A Built-in light (p. 23) B For TRV280: A/V OUT jack (p. 39, 60) C For TRV280: DV Interface (p.
A RESET button (p. 82) I PLAY/EDIT mode lamp (p. 15) B For TRV280: BURN DVD/VCD You can easily take a picture recorded on the tape and burn it onto a DVD or CD-R. For details on BURN DVD, see “Creating a DVD (Direct Access to “Click to DVD”)” (p. 79), and on BURN VCD, see “First Step Guide” in the supplied CD-ROM. For TRV138/338: EASY DUB (Easy Dubbing) button (p. 62) J For TRV280: Rec buttons (p. 66) REC (rec) C TITLE button (p. 31) D EXPOSURE button (p. 28) E MENU button* (p.
A Viewfinder lens adjustment lever (p. 16) B Eyecup C Cassette lid D OPEN/EJECT lever (p. 18) E Tripod receptacle Make sure that the length of the tripod screw is less than 5.5 mm (7/32 inch). Otherwise, you cannot attach the tripod securely, and the screw may damage your camcorder. To attach the shoulder strap B BATT (battery) release button (p. 12) Attach the shoulder strap supplied with your camcorder to the hooks for the shoulder strap. C Hooks for shoulder strap D For TRV280: PHOTO button (p.
Indicators for the LCD screen and viewfinder Following indicators will appear on the LCD screen and viewfinder to indicate the state of your camcorder. Indicators and their on-screen/viewfinder positions vary depending on your camcorder model. Indicators Meanings Manual exposure (p. 28) 9 Manual focus (p. 29) . Back light (p. 27) PROGRAM AE (p. 42) Example: Indicators in the CAMERA mode Picture effect (p. 43) 16:9 WIDE/CINEMA/16:9 FULL (p. 46) Time code (p. 22)/Tape counter (p.
Index Numerics 16:9 WIDE mode .........46, 47 A A/V connecting cable .........................39, 59, 60 AC Adaptor........................15 Adjusting the viewfinder ...16 AUDIO MIX......................50 AUDIO MODE ..................52 AUTO DATE.....................55 AUTO SHTR .....................44 Auto shut off function (A.SHUT OFF) ...........57 B BACK LIGHT ...................27 Battery Battery Info .................13 Battery pack ................12 Remaining battery time .......................
P U PAL ................................... 94 Picture effect (P EFFECT)................ 43 Picture Package ................. 74 Picture search .................... 35 Playing time ...................... 14 Power mode....................... 15 PROGRAM AE................. 42 USB cable ..........................72 USB jack..........................105 USB Streaming (USB STREAM) .........55 Using abroad ......................94 R Recording capacity Display........................ 22 REMAIN ................
Printed in Japan