
Owners manual

Curt Manufacturing Inc., warrants this product to be free of defects in material and/or workmanship at the time of retail purchase by the original purchaser. If the product is found to be defective,
Curt Manufacturing Inc., may repair or replace the product, at their option, when the product is returned, prepaid, with proof of purchase. Alteration to, misuse of, or improper installation of
this product voids the warranty. Curt Manufacturing Inc.'s liability is limited to repair or replacement of products found to be defective, and specifically excludes liability for incidental or
consequential loss or damage.
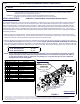
**DO NOT EXCEED RECOMMENDED VEHICLE TOWING WEIGHT!**
60632
**REMOVE ALL REAR WINDOW ACCESSORIES BEFORE TOWING**
INSTALLATION STEPS CONTINUED
3) Remove all lines from top of frame rail on driver side. Lower the brake lines by unbolting factory brake line bracket and
replace with Curt supplied bracket by using existing bolts, then attach factory bracket to Curt bracket using supplied
8MM bolts and nuts.
4) Install the rear cross arm by sliding it between the frame and truck bed floor above the passenger side rear tire. After
spanning the frames, rotate the cross arm vertically with the (4) center threaded holes towards the ground. On short
bed applications, the location of the cross arm should be behind the bed rail support towards the rear of the truck.
Note: If vehicle is equipped with wheel well liners they may need to be temporarily removed for cross arm installation.
5) Install the front cross arm by sliding it between the truck frame and truck bed above the passenger side rear tire. With
the cross arm spanning the truck frame, rotate it vertically with the holes towards the bottom. On Short bed
applications, the cross arm will be located in front of the bed rail support towards the rear of the truck. Once vertical,
slide the cross arm up against the bed rail support.
6) Install the center section by carefully raising it above the fuel tank from beneath the truck. Insert four 1/2" x 1 1/2" hex
bolts with a washer and lock washer through each of the slots on the inside of the center section, and thread them finger
tight into the front cross arm. Repeat that process for the rear cross arm. While installing the center section, be sure
that the round hitch cylinder that protrudes from the top of the center section fits into the hole in the bed of the truck.
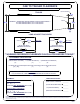
7) Install the sideplates with the large hole towards the back of the truck aligning them with the existing slot in the frame.
Refer to Figure 1 on page 1 for directions on which mounting plate hole to use. Attach using a 3/4-10 x 5 1/4" hex bolt
and 3/4" washer, pushing it through the frame while putting (2) CM-SP13 spacers on the bolt between the frame and the
sideplate, then attach the sideplate with a CM-SP58 spacer and a 3/4" flange nut. Finger tight both sides. With the
sideplates mounted at the slot, attach the flanges to the cross arms using two 1/2" x 1 1/2" hex bolts with 1/2" washers
and 1/2" lock washers. Thread them through the inside of the sideplate flanges into the cross arms. (Finger tight only!)
8) Finish attaching sideplates to the frame using the provided U-bolts. For long box applications, use the larger U-bolt.
The smaller U-bolt is used on the short box applications. Position the U-bolt from the inside of the truck frame, make
sure not to damage or pinch the wiring harness or brake lines. Attach to the sideplate using two 1/2" flange nuts.
(Finger tight only)
9) With the sideplates installed on both sides, torque all 1/2" fasteners to 110 ft-lbs, and 3/4" fasteners to 380 ft-lbs in the
following order:
First: Torque the center section to the front and rear cross arms.
Second: Torque the sideplates to the truck frame on both sides. (When torquing the U-bolts, make sure to tighten
them slowly alternating between the top and bottom of the U-bolt until equally tightened to maximum of 40 ft-lbs.)
Third: Torque the sideplate flanges to the front and rear cross arms.
PAGE 2
(REFER TO GOOSENECK HITCH INSTRUCTIONS FOR INSTALLATION AND OPERATION PROCEDURES)
Maintenance
(Required every 30 days or prior to use)
1. Keep hitch ball lubricated regularly. Use sillicone spray or equivalent to prevent wear and rust.
2. Keep hitch assembly free of dirt and other foreign debris.
3. Check for proper torque on all nuts and bolts before each use. Also check for excessive wear.
4. Check ball wear before each use. (Note: Do not tow trailer with worn or damaged parts.)
CHEVY / GMC 1500 SILVERADO / SIERRA NEW BODY ONLY - ALL BEDS