
Installation Guide

INSTALLATION INSTRUCTIONS
1. Read instructions thoroughly before beginning.
2. Open the rear tailgate. Remove oor cover, spare tire
cover and tray and set to the side. Remove threshold plate
by removing two clips on threshold plate and gently pulling
up.
Set threshold plate to the side.
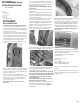
3. Starting on driver’s side use a at screwdriver to open the
cargo net hook covers. Use a phillips screwdriver and remove
bolts. Use a 10mm socket to remove bolts on oor cargo tie
downs. Gently pull side panel away from body taking care not
to damage alignment tabs. Locate vehicle tail light connectors.
They will be similar to those on the RV harness. Repeat
this step on the passenger side panel but rst remove spare
tire jack.
Figure 1
4. Remove driver’s side taillight by using a phillips screwdriver.
Unplug the set of Gray connectors and gently pull on taillight
taking care not to break locking tabs. Pull grommet away from
body and set taillight to the side.
5. Starting on driver’s side position RV harness with
connectors containing Yellow wires between separated vehicle
harness connectors. Press connectors rmly into vehicle
connectors until they lock into place. Pull on connectors to
ensure the locks are engaged.
*Note: At this point there is only one connection on
driver’s side.*
RV TOW Harness
INSTALLATION INSTRUCTIONS
Wiring Kit
Kit Includes:
(1) Wiring Harness
with 4-Flat Connector
(1) 48” 4-Flat Extension
(20) 15” Cable Tie
(1) 4-Flat Bracket
(3) #8 Self-Tapping Ground Screw
Fits: Honda CRV
RV TOW HARNESS
6. Locate a clean and accessible mounting location on the
vehicle near the RV harness ends within reach of white wire and
ring terminal. Remove any debris or undercoating to expose a
clean metal surface and drill a 3/32” hole.
*Caution: Take care not to drill through the body or any
exposed surface.*
7. Attach ring terminal on the White wire using the ground
screw provided.
8. Route portion of RV Harness with connectors containing
Green wires down to bottom of side wall panel along the
rear of vehicle and up behind passenger side panel. Repeat
Step 5 for connector plugging.
9. Cut the cable ties on 4-Flat portion of harness. Route the
4-Flat portion of the RV harness with connector ends
containing the Green wire through the opening behind the
taillight shown in Figure 2. Push grommet back into hole
around the 4-Flat wire. It may be necessary to make a slit in
grommet. If so apply silicon around area to seal.
10. Back inside vehicle on driver’s side plug the connector
from the taillight into the other side of the RV Harness.
Figure 2
11. Underneath vehicle route 4-Flat wire above and around
suspension shown in Figure 3 and secure with cable tie.
Figure 3
12. Continue routing towards front of vehicle along side
frame rail until you reach the driver’s side wheel well
securing with cable ties along the way.
Caution: Make sure to avoid areas that contain moving
parts or could cut, pinch or burn the wires when routing
the 4-at harness towards the front of the vehicle. Also
avoid routing harness near the fuel lines as it may
cause the fuel to ignite.
Failure to follow these warnings may cause property
damage, personal injury or loss of life.
13. From the front of wheel well route a sh tape up and
over to the bottom right of the wheel well. It may be
necessary to remove plastic clips shown in Figure 4 for
routing sh tape.
Figure 4
14. Attach 4-Flat to sh tape and pull to front of the wheel
well. Replace any clips removed in Step 12.
15. Locate the front frame rail that goes across the front
of the vehicle. Locate a suitable position to mount the
4-Flat bracket shown in Figure 5. Using the bracket as a
template mark the two holes and drill two 3/32” holes
and attach the bracket using the two remaining screws.
*Caution: Take care not to drill through the body or any
exposed surface.*
Secure 4-Flat to frame rail with a cable tie.
Figure 5
16. With the 4-at extension plugged into the RV harness
on one end and the motorhome on the other, test that the
functions work on the Honda CRV.
These functions will only work on the brake/tail
combination lamp.
4-Flat Harness Color Code:
White - Ground
Brown - Tail Lights
Green - Right Turn and Brake Signal
Yellow - Left Turn and Brake Signal
When not in use store the 4-flat extension in the vehicles
glove box.
17. At the rear of the vehicle secure any loose wires to the
vehicle’s crossmember using cable ties provided. Re-install
taillights to vehicle.
58949