
Installation Guide

CURTMFG.COM
•
NEED ASSISTANCE?
•
877.287.8 634
•
70001-INS-RB
•
PAGE 3
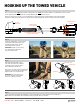
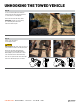
Step 5
While lifting the latch handle, extend
each arm to the vehicle tabs. Lifting the
latch handle eases moving the arms in
and out and aids in maneuvering.
At the end of each arm, position the tow bar lug
between the vehicle base plate tab and secure
with the provide 1/2" pin and lynch pin.
IMPORTANT: Ensure the lynch pin is in
the proper orientation and the folding
ring closes completely, as shown.
Step 4
Position the towed vehicle on a level surface
squarely behind the towing vehicle in the
approximate towing position, this will
make hooking up safe and easy.
IMPORTANT: Any time you are hooking
up or unhooking the tow bar both
vehicles should be in park.
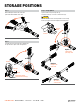
HOOKING UP THE TOWED VEHICLE
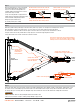
Step 3
The receiver hitch of the towing vehicle and the mounting tabs of the towed vehicle must be within a 3" height difference above or below.
See the diagram below. Go to curtmfg.com for leveling adapters and other tow bar accessories.
Never exceed more than one point of connection between the towing vehicle and the tow bar. Example: Using a leveling adapter
between the towing vehicle and tow bar is acceptable. Using a leveling adapter and extension is dangerous and not acceptable.
3"
max
Towing vehicle
receiver
Front of
towed vehicle
Latch handles shown vertically
in the locked position
Latch housing
facing upward
3"
max
Base plate tab
Lynch pin
Correct Incorrect
Tow bar lug
Step 6
On the towed vehicle, disengage the parking brake, set up the transmission for towing, and unlock the steering wheel.
Note: Follow your towed vehicle owner's manual for all steps needed to flat tow your vehicle.