
Installation Guide

Parts List
DESCRIPTIONPART NUMBERQTYITEM
WASHER,LOCK,3/8,YZ30-0013081
NUT,HEX,3/8-16 UNC,GRD8,YZ
20-0016642
HHCS,7/16-14 UNC,1-1/2,GRD8,YZ10-1041523
WASHER,LOCK,7/16,YZ30-0018424
NUT,HEX,7/16-14 UNC,GRD8,YZ
20-0014725
HHCS,3/8-16 UNC,1-3/4,GRD8,YZ10-1042046
WASHER,FLAT,3/8,YZ30-001864
7
GROSS LOAD CAPACITY WHEN USED AS A WEIGHT CARRYING HITCH: LBS. TRAILER WEIGHT & LBS. TONGUE WEIGHT.
***DO NOT EXCEED VEHICLE MANUFACTURER'S RECOMMENDED TOWING CAPACITY.***
WARNING: ALL NON-TRAILER LOADS APPLIED TO THIS PRODUCT MUST BE SUPPORTED BY AUXILIARY STABILIZING STRAPS.
** FAILURE TO PROPERLY SUPPORT NON-TRAILER LOADS WILL VOID PRODUCT WARRANTY**
HAVING INSTALLATION QUESTIONS? CALL TECHNICAL SUPPORT AT 877-287-8634
HITCH WEIGHT: LBS.
INSTALL TIME
PROFESSIONAL: MINUTES
NOVICE (DIY): MINUTES
INSTALL NOTES:
INSTALLATION STEPS
PERIODICALLY CHECK THIS RECEIVER HITCH TO ENSURE THAT ALL FASTENERS
ARE TIGHT AND THAT ALL STRUCTURAL COMPONENTS ARE SOUND.
Curt Manufacturing Inc., warrants this product to be free of defects in material and/or workmanship at the time of retail purchase by the original purchaser. If the product is found to be defective,
Curt Manufacturing Inc., may repair or replace the product, at their option, when the product is returned, prepaid, with proof of purchase. Alteration to, misuse of, or improper installation of
this product voids the warranty. Curt Manufacturing Inc.'s liability is limited to repair or replacement of products found to be defective, and specifically excludes liability for incidental or
consequential loss or damage.
2,000 200
36
45
79-86 MERCEDES BENZ 300 TD WAGON
11/20/2020
11805
90
257214
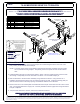
1. Remove the rear bumper by removing both bumper shock strut flanges from the rear of the car's
body, leaving struts attached to the bumper.
NOTE: The back-up light wires and grommets should be disconnected and made free from inside
the car, before removing bumper. Temporarily remove the spare tire and window washer
tank.
2. Install bolt plates through the vertical hitch plates in place of the two outside original screws at each
strut flange. Temporarily mount the hitch with nuts shown. Do not install bumper yet.
3. Bolt arm brackets to the hitch frame assembly using fasteners as shown. Using the hitch as a
template, drill the bottom surface of the car frame two places per side. Install one backing plate per
side into the box frame at the body opening and install the balance of the fasteners.
4. Remove the nuts in the vertical plate and reinstall the rear bumper at the struts at three holes on each
side. Use original fasteners in empty hole. Carefully reinstall the back-up light wire and grommets as
bumper is replaced.
5. Torque all 3/8" fasteners to 45 lb-ft, and all 7/16" fasteners to 59 lb-ft.
1
6
2
5
4
2
1
2
3
-DRILLING REQUIRED
-REMOVE BUMPER
USE ORIGINAL FASTENERS
AT THIS HOLE
DRIVER SIDE
FRAME RAIL
PASSENGER SIDE
FRAME RAIL
DESIGNED FOR USE WITH
BALLMOUNT #55001 / 45501