
Installation Guide

Step 1
Most weight distributing ball mounts come equipped
with a sway control ball plate attached. If so, attach the
sway control ball to the ball mount using the hole provided.
If no sway control ball hole is provided, then use the weld
on sway tab provided and weld to the ball mount as shown
in Figure 1.
Step 2
Measure 24" straight back from the center of the coupler
to the right side of the trailer frame (Figure 3) to determine
the location of the spacer plate. The trailer-mounted
attachment ball must be centered on the 24" measurement.
Step 3
Transfer the punch holes from the spacer
plate to the trailer frame and drill 11/32" holes.
Step 4
Attach the spacer plate and trailer-mounted attachment ball
to the trailer frame using the self-tapping screws provided.
See Figure 2.
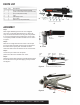
ASSEMBLY
Item# Qty Description
1 1 Sway control trailer ball (CURT# 40093)
2 1 Trailer mounted attachment ball (CURT# 17201)
3 1 Sway control (CURT# 17200)
4 2 Clips
5 8 Self-tapping screws
6 1 Spacer plate
7 1 Weld-on sway tab (CURT# 45822)
PARTS LIST
0 - 1 1/4"
5 1/2"
Fit and
weld here
Figure 1
On/Off
handle
Trailer
ball
Level with hitch head if possible
Slide
bar
Torsion
screw
Trailer
tongue ball
Spacer
plate
Figure 2
Figure 3
1
3
5
24"
2
4
6 7
CURTMFG.COM • NEED ASSISTANCE? • 1.877.287.8634 • 17200-INS-R1 • PAGE 2