
Installation Guide


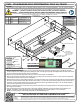
Table Of Contents

INSTALLATION WALKTHROUGH:
For more information log onto www.curtmfg.com, & for helpful towing tips log onto www.hitchinfo.com
3. Remove (9) screws from the bottom of the bumper cover, (5)
using a T25 Torx bit and (4) using a T15 Torx bit. Remove
the plastic nut that holds the smaller screws. Save for
reinstallation.
4. Remove bumper cover by gently pulling the bumper cover from the
location of the nuts for the bolts removed from the wheel well and
the bottom of the wheel well on both sides. Gently pull the bumper
cover from the wheel well area toward the rear of the vehicle on
both sides. Continue pulling straight back using a flat screwdriver
to detach clips retaining the bumper cover as needed. Carefully
remove the lower panel from the rest of the bumper cover.
5. Remove (7) M8 bolts from the bumper beam using a 13mm
socket. Remove the bumper beam from the vehicle by lifting
it up and then away from the vehicle.
6. Place hitch between bumper beam and vehicle. Secure with
supplied (3) M8 bolts and conical washers and (4) M8 bolts,
lock washers, and washers. Torque all M8 bolts to 23 ft-lbs.
Reinstall bumper cover following Steps 1-4 in reverse order.
NOTE:
For Golf Sportwagen vehicles with 4MOTION see
TRIM DIAGRAM on Page 2.