
Installation Guide


3
E5 5
th
Wheel Hitch
Assembly
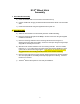
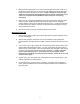
1. Hitch Handle Assembly
a) Rotate the handle shaft so the bolt hole is oriented at the top.
b) Hold the handle with the grip pointed downward and slide the handle onto the handle
shaft.
c) Fasten the hitch handle using the supplied bolt and nylock nut.
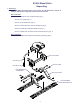
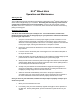
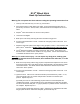
2. Hitch Assembly
a) Attach the hitch handle to the hitch head. [See hitch handle assembly]
b) Place the mounting rails [CM-16100-MRK] in the bed of the truck using the supplied
installation instructions.
c) Place the mounting channels into the mounting rails and secure using the ½”
diameter clevis pins [CM-16115-RMP]. Secure the clevis pins using the large hairpin
clips [CM-16115-RHP] in the bolt kit.
d) Slide the cross member weldment over the mounting channels. From the outside,
insert four ½” x 4 ½” bolts into the four holes of the cross member weldment. Place
nylock nuts on each bolt and finger tighten. (Use washers as needed to eliminate
any gaps between the mounting channels and the cross member weldment)
e) Place the hitch head onto the cross member weldment and secure with the supplied
3/8” clevis pins [CM-16115-HHMP] and hairpin clips [CM-16115-HHHP]. Check for
freedom of movement.
f) The E5 5
th
Wheel Hitch System is now ready for installation.
(Use washers as needed to eliminate
ygg
(
an
y
g
aps
b
etween t
h
e mount
i
n
g
c
h
anne
ls
and the cross member weldment
)
2. Hitch Assembly