
Installation Guide
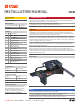


CURTMFG.COM
•
NEED ASSISTANCE?
•
877.287.8 634
•
16190-INS-RA
•
PAGE 9
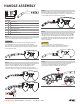
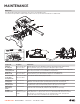
Component Frequency Instructions
Lubricate
the skid plate
Before each use and
every 1,000 miles
Liberally apply grease to the skid plate's top surface (#1). A high-pressure wheel-bearing
grease is preferred. If you prefer, you may use a lube plate in place of grease.
Lubricate the
center pivot point
Before each use Remove the center pivot pin (#2) and apply a light coating of high-pressure wheel bearing grease.
Replace the pin and ensure it is secured with the safety lynch pin.
Torque the
M14 hex bolts
Before each use and
every 1,000 miles
Torque the four M14 leg hex bolts (#3) to 100 ft-lbs. Re-torque after initial
500 miles and every 1,000 miles thereafter and prior to each individual use.
Check the torque
of the 16mm
head pivot bolts
Before each use and
every 1,000 miles
Torque the two 16mm head bolts (#4) to 175 ft-lbs.
Lubricate the
locking pawl
Before each use Open jaws and apply a small amount of grease to the curved surface of locking pawl (#5).
Pawl will be accessible through the operating handle opening in the head side plate.
Lubricate the
jaw pivot point
Before each use Use a grease gun to apply grease to both zerks (#6) located on the front of each jaw.
The jaws must be in the closed and locked position for the zerks to be accessible.
Lubricate the
linkage pivot
points
Before each use Use an aerosol applicator to spray a small amount of rust inhibitor
or lubricant on the lock handle (#7), linkage bar (#7) and pawl pivot points (#7).
Clean the
5th wheel hitch
After each use
and before long term
storage
For optimal service life, clean your 5th wheel hitch after each use with warm soapy water
and dry with towels or compressed air. It is also recommended that the 5th wheel is removed
from the vehicle or covered when not in use for extended periods of time. Spray exposed
surfaces with a light coat of rust inhibitor before long term storage.
4
Maintenance
The CURT 5th wheel hitch has been designed to offer years of safe and reliable service.
To achieve the best performance and the longest possible service life, please follow the maintenance schedule below.
MAINTENANCE
2
3
1
5
6
7
7
7