
Installation Guide


CURTMFG.COM
•
NEED ASSISTANCE?
•
877.287.8 634
•
16027-INS-RA
•
PAGE 3
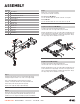
Step 5
With the legs secured and positioned in the truck bed puck mounts,
rotate the handles (#7, #8) back to the closed position. Secure the
handles by inserting the provided safety pin (#10).
Note: Slight resistance should be felt as the handles are rotated
closed. If the handles will not close with moderate pressure,
you must adjust the locking T-bolt; see 'T-bolt Adjustment'.
WARNING
Forcing the handle closed may damage the locking bolt
and handle, possibly resulting in trailer detachment.
Confirm both locking bolts are engaged in the truck bed puck
mounts and the castle nuts are secured with the cotter pins.
Ensure both handles are securely locked with the safety pin.
T-Bolt Adjustment
The locking T-bolts are pre-installed to ease installation. Due
to possible variation in the truck's mounting locations, some
adjustments may be required. If one or more of the locking handles
will not close, begin adjustment by removing the cotter pin securing
the castle nut above the handle. See figure below.
Next, loosen the castle nut 1/4-turn while pressing down on the
T-bolt. Reattempt to close the locking handle. If the handle closes,
re-secure the castle nut with the removed cotter pin. If the handle
does not close, loosen the castle nut 1/4-turn while pressing down
on the T-bolt and reattempt to close the locking handle.