
Installation Guide


CURTMFG.COM
•
NEED ASSISTANCE?
•
877.287.8 634
•
16027-INS-RA
•
PAGE 2
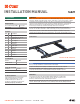
Parts List
Item Qty Description
1 2 Cross support tube
2 8 Carriage bolt, 1/2"-13 x 4"
3 8 Flange nut, 1/2"-13
4 2 Cross support
5 4 Locking bolt
6 4 Foot spacer
7 2 Handle, right
8 2 Handle, left
9 4 Castle nut
10 2 Safety pin
11 4 Cotter pin
12 4 Flat washer
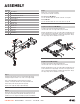
Step 1
Starting on the left side, insert a foot spacer (#6) and locking
bolt (#5) through the bottom of one of the cross supports (#4).
Place a left handle (#8) over the threads of the locking
bolt (#5). Securing the handle to the locking bolt with a flat
washer (#12), castle nut (#9) and cotter pin (#11).
Repeat on the right side using a right handle (#7).
Step 2
Remove the puck caps from bed of truck if present. Remove the
lynch pins securing the locking handles and swing open all four
handles of the cross support assembly to prepare for installation.
Step 3
Mount each cross support assembly
into the pucks in the bed of the truck.
For Chevrolet / GMC Models:
Face the handles towards the outside of the bed. See step 4A.
For Ford Models:
Face the handles towards the center of the bed. See step 4B.
Step 4A - For Chevrolet / GMC Models
You will be using the third and fifth mounting holes
from each end of the cross support tubes (#1). See below.
Align the mounting holes on the cross support tubes (#1) with the holes
in the assembled cross support (#4). Secure the cross support tubes to
the cross supports using eight 1/2" carriage bolts (#2) and 1/2" flange
nuts (#3). Torque all 1/2" hardware to 110 ft-lbs.
Step 4B - For Ford Models Only
You will be using the first and third mounting holes
from each end of the cross support tubes (#1). See below.
Align the mounting holes on the cross support tubes (#1) with the holes
in the assembled cross support (#4). Secure the cross support tubes to
the cross supports using eight 1/2" carriage bolts (#2) and 1/2" flange
nuts (#3). Torque all 1/2" hardware to 110 ft-lbs.
3
1
2
8
4
6
5
7
9
10
11
12
A SSEMBLY
4
3 1
2
4