
Owners manual
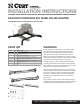


Figure 4
AS SEMBLY
Figure 2
Figure 3
Step 1
Prepare the 16022 roller adapter for assembly by locating
the hardware bag, front and rear support assemblies (#1, #3)
and the two angle cross supports (#2). Loosely assemble the
front and rear assemblies with the supplied hardware and
angle supports as show in figure 1.
Step 2
Remove the four lynch pins securing the locking handles to
the support assemblies. Swing all four handles completely
open and lower the assembly into position in the bed of the
truck as shown in figure 2. Ensure all four locking bolts and
spacers drop into the mounting holes before attempting to
close the handles.
NOTE: The rear mounting locations are larger than the two
front mounts. Be sure to orient the large locking feet towards
the rear of the vehicle.
WARNING: Forcing the handle closed may damage
the locking bolt and handle, possibly resulting in trailer
detachment.
Step 4
With the 16022 adapter installed in the truck bed it is ready
to accept the CURT roller. The 16022 is compatible with the
following roller models: 16550, 16560, 16570. Secure the
roller of your choice with the supplied hitch pins & clips (#7,
#8). See figure 4.
Figure 1
Step 3
With the 16022 adapter secured in the truck bed mounts,
rotate the handles back to the closed position. Secure the
handles by re-inserting all four lynch pins. See figure 3.
NOTE: Slight resistance should be felt as the handles are
rotated closed. If the handle will not close with moderate
pressure, adjustments must be made to the locking T-bolt;
see 'T-bolt Adjustment'.
Torque all eight M14 bolts to 100 ft. lbs.
to finalize the assembly.
Torque to 100 ft-lbs. (x8)
CURTMFG.COM • NEED ASSISTANCE? • 1.800.798.0813 • 16022-INS-RA • PAGE 2