
Installation Guide

CURTMFG.COM
•
PRODUCT SUPPORT: 877.287.8634
•
15927-INS-RA
•
05/08/2020
•
ECN7017
•
PAGE 2
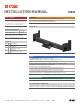
Hitch center section
44" max width
18" min width
Driver-side
frame rail
Driver-side
side plate
Passenger-side
side plate
Passenger-side
frame rail
Weld plate to vehicle
frame on both sides
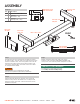
ASSEMBLY
3
2
FRONT
REAR
1
Step 1
Determine where the hitch side plates (#2,#3) will be mounted to
the vehicle's frame. Clean the surface of the frame down to the bare
metal in each weld location. Clean off any powder coat on the side
plates where they will be mounted to the frame and hitch center
section (#1). Clean all powder coat from the center section where
the side plates will be welded.
WARNING
If metal surfaces are not completely bare, the weld
will not be the required strength and may void warranty.
Step 2
Slide the side plates (#2,#3) onto the hitch center section (#1)
and raise it into position to be welded. Secure or clamp the side
plates into position on the frame. Center the hitch center section
between the side plates.
Step 3
Weld the side plates (#2,#3) to the frame of the vehicle
and hitch center section (#1) to AWS welding standards. Trim
off any excess center section beyond the side plates as needed.
TOWING BASICS & SAFETY INFORMATION
For information on safely towing your trailer,
visit curtmfg.com/understanding-towing.
Parts List
Item Qty Description
1 1 Hitch center section, 44"
2 1 Side plate,
driver-side, 9" drop
3 1 Side plate,
passenger-side, 9" drop