
Installation Guide

GROSS LOAD CAPACITY WHEN USED AS A WEIGHT CARRYING HITCH: LBS. TRAILER WEIGHT & LBS. TONGUE WEIGHT.
GROSS LOAD CAPACITY WHEN USED AS A WEIGHT DISTRIBUTION HITCH: LBS. TRAILER WEIGHT & LBS. TONGUE WEIGHT
***DO NOT EXCEED VEHICLE MANUFACTURER'S RECOMMENDED TOWING CAPACITY.***
HAVING INSTALLATION QUESTIONS? CALL TECHNICAL SUPPORT AT 1-877-287-8634
INSTALLATION STEPS
PERIODICALLY CHECK THIS RECEIVER HITCH TO ENSURE THAT ALL FASTENERS
ARE TIGHT AND THAT ALL STRUCTURAL COMPONENTS ARE SOUND.
CURT Manufacturing LLC., warrants this product to be free of defects in material and/or workmanship at the time of retail purchase by the original purchaser.
If the product is found to be defective, CURT Manufacturing LLC., may repair or replace the product, at their option, when the product is returned, prepaid,
with proof of purchase. Alteration to, misuse of, or improper installation of this product voids the warranty. CURT Manufacturing LLC.'s liability is limited to
repair or replacement of products found to be defective, and specifically excludes liability for incidental or consequential loss or damage.
8,000 800
12,000 1,200
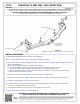
CHEVROLET & GMC 2500 / 3500 (SHORT BOX)
9/22/2014
13178
Scan
for more
information
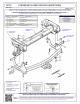
1. Temporarily lower spare tire from vehicle to ease installation.
NOTE: If removing factory hitch, retain the hardware for CURT hitch install.
2. On 2015 and newer non-hitch equipped vehicles you will need to remove a factory light duty bumper mount hitch
prior to hitch installation.
Remove this light duty bumper hitch as follows (See Detail A);
a. Remove (2) M8 bolts connecting the center hitch tabs to the bumper and return to owner.
b. Remove and retain (4) M14 bolts that secure the hitch to the side of the frame rails.
c. Remove (2) M14 bolts that secure the rear of the hitch to the weldnuts in the bottom of the frame rails.
d. Remove the hitch and return to owner.
3. Raise hitch into position, locating holes in hitch over weldnuts in vehicle frame.
4. Install M14 bolts and conical toothed washers through hitch into weldnuts in the bottom of vehicle frame.
5. Install 1/2" carriage bolts, spacers, and nuts as shown.
6. Install (2) M14 bolts removed from Step 2b into each side of the frame rail. Also install (2) carriage bolts
through each strap plate and into the side plate.
7. Torque all M14 fasteners to 126 ft-lbs, and all 1/2" fasteners to 110 ft-lbs.
8. Raise spare back into position on vehicle if lowered.
EXISTING M14 BOLT
BUMPER HITCH
(2015 AND NEWER
MODELS ONLY)
EXISTING M8 BOLT
DETAIL A
(REMOVAL OF EXISTING FACTORY LIGHT DUTY BUMPER MOUNT)
PAGE 2 OF 2