
Owners manual


INSTALLATION WALKTHROUGH:
For more information log onto www.curtmfg.com, & for helpful towing tips log onto www.hitchinfo.com
Parts List
DESCRIPTIONPART NUMBERQTYITEM
HEX HEAD BOLTM8 - 1.25 x 30 HEX BOLT
21
CONICAL TOOTHED WASHER3/8"22
CARRIAGE BOLT3/8-16 x 1 1/223
U-BOLT
3_8 - 16 x 1.00 x 1.8814
HEX FLANGE NUTHFN38164
5
3/8" FISHWIRE3_8 FISHWIRE26
SPACER11449-SP
27
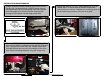
1. Remove plastic panel from drivers side of the vehicle by
removing (2) M6 screws with a 10mm socket and (2) plastic
clips. Lower the now exposed canister by removing (4) M8
screws using a 12mm socket and (1) M6 screw using a
10mm socket. Save for reinstallation in Step 5.
2. Rotate canister downward to provide access to the frame
rail. Remove exposed (2) M10 screws using a 12mm socket.
Save for reinstallation in Step 3.
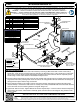
DRIVER SIDE
FRAME RAIL
EXISITING
WELDNUTS
TRUNK PAN
EXISTING
RECOVERY
LOOP
3
7
5
4
2
1
6
HOLE ENLARGEMENT
REQUIRED
EXISTING
ACCESS
HOLE
DESIGNED FOR USE WITH
BALLMOUNT #45521
EURO MOUNT
OPTION AVAILABLE
#45571 (1 7/8" BALL)
#45572 (2" BALL)