
Installation Guide


HAVING INSTALLATION QUESTIONS? CALL TECHNICAL SUPPORT AT 1-800-798-0813
PERIODICALLY CHECK THIS RECEIVER HITCH TO ENSURE THAT ALL FASTENERS
ARE TIGHT AND THAT ALL STRUCTURAL COMPONENTS ARE SOUND.
Curt Manufacturing LLC., warrants this product to be free of defects in material and/or workmanship at the time of retail purchase by the original purchaser. If the product is found to be defective,
Curt Manufacturing LLC., may repair or replace the product, at their option, when the product is returned, prepaid, with proof of purchase. Alteration to, misuse of, or improper installation of
this product voids the warranty. Curt Manufacturing LLC.'s liability is limited to repair or replacement of products found to be defective, and specifically excludes liability for incidental or
consequential loss or damage.
MINI COOPER COUNRTYMAN
5/23/2019
11333
PAGE 5 of 5
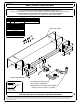
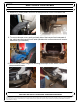
10. Attach hitch to vehicle so that the hitch will be sandwiched between the
frame and the bumper. Reuse the 15mm flange nuts on the (6) frame studs
to secure the hitch and the bumper. Torque 15mm hardware to 35 lb-ft.
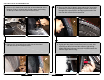
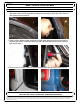
11. Trim center of bumper fascia as shown approximately 2 1/4" wide by 4 1/2" long.
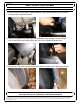
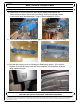
12. Reinstall the bumper cover by following the disassembly steps 1-10 in reverse.
Replace (6) removed plastic rivets with those supplied in the hardware kit attach
using a plasticrivet gun.