
Installation Guide


HAVING INSTALLATION QUESTIONS? CALL TECHNICAL SUPPORT AT
1-877-287-8634
INSTALLATION STEPS
Curt Manufacturing Inc., warrants this product to be free of defects in material and/or workmanship at the time of retail purchase by the original purchaser. If the product is found to be defective,
Curt Manufacturing Inc., may repair or replace the product, at their option, when the product is returned, prepaid, with proof of purchase. Alteration to, misuse of, or improper installation of
this product voids the warranty. Curt Manufacturing Inc.'s liability is limited to repair or replacement of products found to be defective, and specifically excludes liability for incidental or
consequential loss or damage.
BMW 7-SERIES
12/17/2012
11267
PAGE 2 of 2
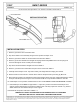
1. Remove (3) fasteners from each wheel well.
2. Pop off trim which runs horizontally along the lower portion of bumper cover.
3. Remove (4) fasteners which are located under trim removed in STEP 2.
4. Remove (3) nuts from behind each tail light and unplug electrical clip. These nuts and plugs are Note:
accessed through the trunk. Carefully remove tail lights.
5. Pop off trim located below the tail lights removed in STEP 4.
6. Remove (1) fastener from underneath each piece of trim removed in STEP 5.
7. Carefully remove bumper cover. Pop sides off first, pull straight back and unplug from vehicle.
8. Remove foam insert and return to vehicle owner. Remove bumper beam by removing (6) M10 nuts.
9. Place hitch into position over threaded studs and place bumper beam over hitch. Clamp hitch between vehicle
trunk pan and bumper beam using the nuts removed in STEP 8. Torque all M10 hardware to 48 ft-lbs.
10. Hold bumper cover in position and mark where to trim. See BUMPER COVER TRIM DIAGRAM on PAGE 1.
11. Reinstall bumper cover. An approximate 1" square may need to be trimmed from bumper cover Note:
support and heat shield if there is interference with the hitch. This may require the removal of (1) fastener
which attaches the heat shield to bumper cover support.
12. Reinstall all components removed in STEPS 1-6.
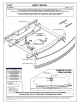
INSTALLED POSITION
HITCH
VEHICLE BUMPER BEAM
VEHICLE BUMPER COVER