
Installation Guide


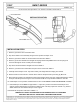

9. Place hitch into position over threaded studs and place
bumper beam over hitch. Clamp hitch between vehicle
trunk pan and bumper beam using the nuts removed in
STEP 8. Torque all M10 hardware to 48 ft-lbs.
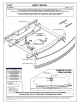
10. Hold bumper cover in position and mark where to trim.
See BUMPER COVER TRIM DIAGRAM on PAGE 1.
11. Reinstall bumper cover. An approximate 1" square Note:
may need to be trimmed from bumper cover support and
heat shield if there is interference with the hitch. This may
require the removal of (1) fastener which attaches the
heat shield to bumper cover support.
12. Reinstall all components removed in STEPS 1-6.
Install is complete.