
Installation Guide


GROSS LOAD CAPACITY WHEN USED AS A WEIGHT CARRYING HITCH: LBS. TRAILER WEIGHT & LBS. TONGUE WEIGHT.
WARNING: ALL NON-TRAILER LOADS APPLIED TO THIS PRODUCT MUST BE SUPPORTED BY 18050 STABILIZING STRAPS.
HAVING INSTALLATION QUESTIONS? CALL TECHNICAL SUPPORT AT
1-877-287-8634
HITCH WEIGHT: LBS.
INSTALL TIME
PROFESSIONAL: MINUTES
NOVICE (DIY): MINUTES
INSTALL NOTES:
INSTALLATION STEPS
Curt Manufacturing LLC., warrants this product to be free of defects in material and/or workmanship at the time of retail purchase by the original purchaser. If the product is found to be defective,
Curt Manufacturing LLC., may repair or replace the product, at their option, when the product is returned, prepaid, with proof of purchase. Alteration to, misuse of, or improper installation of
this product voids the warranty. Curt Manufacturing LLC.'s liability is limited to repair or replacement of products found to be defective, and specifically excludes liability for incidental or
consequential loss or damage.
1,000 100
30
30
HYUNDAI VELOSTER
12/7/2012
11254
60
Parts List
DESCRIPTIONPART NUMBERQTYITEM
CARRIAGE BOLT7/16-14 x 1 1/231
.250 x .88 x 2.25" SQUARE HOLE SPACERCM-SP232
HEX FLANGE NUT7/16-1433
7/16" FISHWIRE7_16 FISHWIRE34
CARRIAGE BOLT1/2 - 13 x 2"15
.250 x 1.00 x 3.00" SQUARE HOLE SPACERCM-SP616
HEX FLANGE NUTHFN 121317
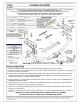
ENLARGE HOLE
-FISHWIRE HARDWARE
-ENLARGE ONE HOLE
1. Remove two M8 nuts which hold heat shield to frame rail and bend heat shield down slightly.
2. Remove one rubber plug from each frame rail and return to vehicle owner.
Enlarge rearmost hole on passenger
side frame rail using a 1/2" drill bit.
3. Fishwire 7/16" carriage bolt with CM-SP2 spacer through the access hole in the passenger side frame rail into
the hole enlarged in step 2. See FISHWIRE TECHNIQUE above. Leave fishwires attached to all 7/16" Note:
hardware to prevent loss of hardware inside frame rail.
4. Reverse fishwire 7/16" carriage bolt with CM-SP2 spacer into access hole on both sides. See REVERSE PULL
FISHWIRE TECHNIQUE above.
5. Using the fishwires as a guide raise hitch into position. Hitch will be placed between frame rail and heat Note:
shield. Remove fishwires and loosely attach 7/16" flange nuts.
6. Place 1/2" carriage bolt with CM-SP6 spacer through tow loop and hitch and secure hitch to tow loop with 1/2"
flange nut, as shown above.
7. Torque all 7/16" hardware to 70 ft-lbs and all 1/2" hardware to 110 ft-lbs and reinstall the two M8 nuts removed
in step 1.
4
2
1
6
5
7
3
ACCESS HOLE
ACCESS HOLE
TOW LOOP
DRIVER SIDE
FRAME RAIL
PASSENGER SIDE
FRAME RAIL
CAUTION:
BALLMOUNT MAY BECOME HOT DUE TO CENTER EXHAUST!
ELECTRICAL WIRING MUST BE A MINIMUM OF 12" FROM EXHAUST TIPS!
DESIGNED FOR USE
WITH BALLMOUNT
#D-55001 / 45501
EURO MOUNT
OPTION AVAILABLE
#45571 (1 7/8" BALL)
#45572 (2" BALL)
TOOLS REQUIRED
M10, 11/16" & 3/4" SOCKETS
RATCHET
8" SOCKET EXTENSION
1/2" DRILL BIT
DRILL
TORQUE WRENCH
SAFETY GLASSES