
Owners manual
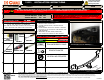

HAVING INSTALLATION QUESTIONS? CALL TECHNICAL SUPPORT AT 1-800-798-0813
INSTALLATION STEPS
PERIODICALLY CHECK THIS RECEIVER HITCH TO ENSURE THAT ALL FASTENERS
ARE TIGHT AND THAT ALL STRUCTURAL COMPONENTS ARE SOUND.
CURT Manufacturing LLC., warrants this product to be free of defects in material and/or workmanship at the time of retail purchase by the original purchaser. If the product is found to be defective, CURT
Manufacturing LLC., may repair or replace the product, at their option, when the product is returned, prepaid, with proof of purchase. Alteration to, misuse of, or improper installation of this product voids the
warranty. CURT Manufacturing LLC.'s liability is limited to repair or replacement of products found to be defective, and specifically excludes liability for incidental or consequential loss or damage.
This product complies with safety specifications and requirements for connecting devices and towing systems of the state of New York, V.E.S.C.Regulation V-5 and SAE J684.
INFINITI M37X, M56X, Q70
2/1/2018
11111
PAGE 2 of 2
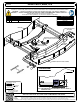
INSTALLED POSITION
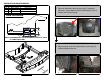
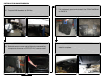
1. Remove underbody panel by removing (7) fasteners. Remove (1) push fastener which holds bumper cover to
vehicle next to the tow loop.
2. Begin bumper cover removal process by removing (2) fasteners behind rear tire.
3. Remove (2) push fasteners from wheel well liner and (2) fasteners from bottom of bumper cover.
4. Pull back wheel well liner to remove (1) hex head fastener.
5. Pull back piece of fascia which is glued to bumper cover directly behind rear tire and remove (1) hex fastener.
6. Repeat STEPS 2-5 on other side of vehicle.
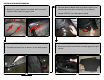
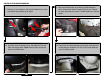
7. Remove trunk floor board which conceals spare tire inside of trunk.
8. Remove rearmost plastic cover inside of trunk by removing (4) loop fasteners and (2) push fasteners.
9. Pull back inner trunk liner to expose and remove (2) hex nuts. It may ease the process to remove push
fasteners from inner liner. Repeat on other side.
10. Pop off plastic covers attached to the inside of tail lights.
11. Carefully pull off tail lights by pulling straight back.
12. Remove (1) hex fastener and (2) push fasteners on each side which were hidden by tail lights.
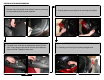
13. Carefully remove bumper cover. Pop sides off first and then pull straight back. Note: Remove foam insert
and return to vehicle owner.
14. Remove bumper beam by removing (6) M8 fasteners which hold bumper beam supports to trunk pan.
Repeat on other each side and return (12) M8 fasteners to vehicle owner.
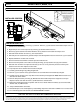
15. Raise hitch and bumper beam into position and secure to vehicle with the included (12) 3/8" conical tooth
washers and (12) M8 hex bolts.
16. Torque all M8 hardware to 23 ft-lbs.
17. Reinstall bumper cover and tail lights by reassembling components removed in STEPS 2-13 in reverse order.
18. Trim underbody panel and reinstall. See TRIM DIAGRAM on PAGE 1.