
Owners manual

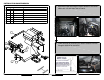


HITCH SHOWN IN PROPER POSITION
HAVING INSTALLATION QUESTIONS? CALL TECHNICAL SUPPORT AT 1-800-798-0813
INSTALLATION STEPS
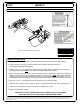
PERIODICALLY CHECK THIS RECEIVER HITCH TO ENSURE THAT ALL FASTENERS
ARE TIGHT AND THAT ALL STRUCTURAL COMPONENTS ARE SOUND.
Curt Manufacturing Inc., warrants this product to be free of defects in material and/or workmanship at the time of retail purchase by the original purchaser. If the product is found to be defective,
Curt Manufacturing Inc., may repair or replace the product, at their option, when the product is returned, prepaid, with proof of purchase. Alteration to, misuse of, or improper installation of
this product voids the warranty. Curt Manufacturing Inc.'s liability is limited to repair or replacement of products found to be defective, and specifically excludes liability for incidental or
consequential loss or damage.
MAZDA 2
11
073
PAGE 2 of 2
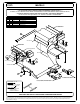
1. Remove the bolt securing the vapor canister to the driver side frame rail and return bolt to owner.
2. Lower exhaust by removing (2) rubber isolators from the hangers attached to the frame.
(See Rubber Isolator Removal Diagram)
3. Fishwire 7/16-14 x 1 1/4" carriage bolts and SP7 spacers through the end of the frame rails, both sides.
(See Fishwire Technique) Note
: Leave fishwires attached to passenger side bolts.
4. Raise passenger side plate over the exhaust and slide it past the exhaust hanger. Raise driver side plate
past the vapor canister and secure both plates using 7/16-14 flange nuts. Note: When raising hitch into
position you may have to push bolts part way back into the frame to get the plates into position. You may
use fishwires to guide hitch during mounting to prevent the loss of bolts and spacers inside the frame rail.
5. Place the 1/4-20 x 1" carriage bolt through the square hole in the driver side plate.
6. Attach the vapor canister lowered in Step (1) to the 1/4" carriage bolt and secure with 1/4-20 flange nut.
7. Torque all 7/16" hardware to 70 ft-lbs. Torque all 1/4" hardware to 12 ft-lbs.
8. Raise exhaust back into position.
TOOLS REQUIRED
RATCHET
TORQUE WRENCH
9" EXTENSION
10mm SOCKET
11/16" SOCKET