
Owners manual

DETAIL A
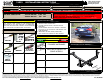
GROSS LOAD CAPACITY WHEN USED AS A WEIGHT CARRYING HITCH: LBS. TRAILER WEIGHT & LBS. TONGUE WEIGHT.
***DO NOT EXCEED VEHICLE MANUFACTURER'S RECOMMENDED TOWING CAPACITY.***
WARNING: ALL NON-TRAILER LOADS APPLIED TO THIS PRODUCT MUST BE SUPPORTED BY 18050 STABILIZING STRAPS.
** FAILURE TO PROPERLY SUPPORT NON-TRAILER LOADS WILL VOID PRODUCT WARRANTY**
HAVING INSTALLATION QUESTIONS? CALL TECHNICAL SUPPORT AT 1-800-798-0813
HITCH WEIGHT:
LBS.
INSTALL TIME
PROFESSIONAL: MINUTES
NOVICE (DIY): MINUTES
INSTALL NOTES:
INSTALLATION STEPS
PERIODICALLY CHECK THIS RECEIVER HITCH TO ENSURE THAT ALL FASTENERS
ARE TIGHT AND THAT ALL STRUCTURAL COMPONENTS ARE SOUND.
Curt Manufacturing Inc., warrants this product to be free of defects in material and/or workmanship at the time of retail purchase by the original purchaser. If the product is found to be defective,
Curt Manufacturing Inc., may repair or replace the product, at their option, when the product is returned, prepaid, with proof of purchase. Alteration to, misuse of, or improper installation of
this product voids the warranty. Curt Manufacturing Inc.'s liability is limited to repair or replacement of products found to be defective, and specifically excludes liability for incidental or
consequential loss or damage.
2,000 200
35
30
BMW 325i, 328xi & 335xi AWD SEDAN
11/12/2012
11033
60
Parts List
DESCRIPTIONPART NUMBERQTYITEM
WASHER7/16 WASHER161
HEX BOLT7/16-14 x 1 1/422
HEX FLANGE NUT7/16-1423
CARRIAGE BOLT1/2-13 x 1 1/224
HEX FLANGE NUTHFN 121325
.250 x 1.00 x 3.00" SQUARE HOLE SPACERCM-SP6
26
1/2" FISHWIRE1_2 FISHWIRE
27
A
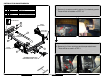
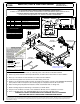
1. Remove (14) fasteners which secure (2) underbody panels. These will be re-installed in STEP 9.
2. Remove (2) 12mm nuts from each bumper attachment, as shown above. These will be re-used in STEP 4.
3. Place (4) 7/16" washers on each stud where a nut was removed in STEP 2.
4. Lift the hitch into position over studs and secure with existing 12mm nuts.
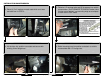
5. Fishwire 1/2" carriage bolts and SP-6 spacers into vehicle crossmember, as shown. (See FISHWIRE TECHNIQUE
above) Note: If holes are not present, use mounting strap as a template to mark & drill 17/32" holes.
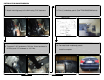
6. Raise mounting strap into position and attach to vehicle crossmember with 1/2" flange nuts.
7. Attach mounting strap to the hitch using 7/16" fasteners, as shown above.
8. Torque all 7/16" hardware to 70 ft-lbs, 12mm hardware to 82 ft-lbs, and 1/2" hardware to 110 ft-lbs.
9. Trim (1) underbody panel. (See TRIM DIAGRAM above) Re-install both underbody panels.
- DRILLING REQUIRED ON SOME MODELS
- FISHWIRE HARDWARE
4
6
5
1
2
3
7
TRIM DIAGRAM
2.00 in
.75 in
1.13 in
2.00 in
1.75 in
3.25 in
**DRILL & 17/32" DRILL BIT REQUIRED
ON SOME MODELS**
ON SOME MODELS
TOOLS REQUIRED
RATCHET
8mm & 10mm SOCKETS
11/16" & 1/2" SOCKETS
18mm OPEN END/BOX WRENCH
5/8" OPEN END/BOX WRENCH
SMALL DISK GRINDER
TORQUE WRENCH
BUMPER
ATTACHMENT
BUMPER
ATTACHMENT
VEHICLE
CROSSMEMBER
EXSITING NUTS
(BOTH SIDES)
(GAS MODELS WITH
SINGLE MUFFLER ONLY)
DESIGNED FOR USE WITH
BALLMOUNT #55001 / 45501