B U I L T - IN OVEN IN S T R U C T I O N / I N S T A L L A T I O N MANUAL C B C O N W 10 C B C O N X 10 CBCONW_X10_IB_110524_glo.
Contents Unpacking...................................................................................................................................... 3 Product Overview.......................................................................................................................... 4 Front View....................................................................................................................................................................4 Control Panel...........................
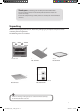
Thank you for purchasing your new Currys Essentials Built-In Oven. You must read this manual in order to fully understand how to install and operate it correctly. Read all the safety warnings carefully before use and keep this manual for future reference. Unpacking Remove all packaging from the unit. Retain the packaging. If you dispose of it please do so according to local regulations. The following items are included: 240 The Main Unit Wire Shelf x 1 P.N.
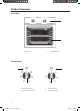
Product Overview Front View 1 240 2 1. Control Panel 2. Shelf Guide Slots Control Panel 1 3 240 240 2 4 1. Oven Indicator Lamp 3. Thermostat Lamp 2. Function Selector Control 4. Thermostat Control 4 CBCONW_X10_IB_110524_glo.
First Time Use of the Oven Unpack the oven. Remove any insert cards or plastic bags. Use a damp cloth to carefully wipe the inner cavity wall and housing. Clean all the detachable parts in hot, soapy water before using. Heat the oven on maximum for 45 minutes. There may be a little smoke and odour upon inital start up (for about 15 mins). This is normal. It is due to the protective substance on the heating elements which protects them from the effects of corrosion during shipping from the factory.
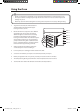
Using the Oven • Under no circumstances should the oven be lined with aluminium foil as overheating may occur. • Do not place dishes or baking trays directly onto the base of the oven as it becomes very hot and damage may occur. • Bread may catch fire if the toasting time is too long. Close supervision is necessary during toasting. 1. To get the best results, the smallest distance allowed between the food and the upper heating element is 30 mm. 2.
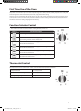
Using the Functions Symbol Function Description Static Cooking Function The static cooking function emits heat, ensuring even cooking of the lower and upper food, this is an excellent function for making pastries, cakes, baked pasta, lasagne and pizza. Lower Heating Function The lower heating function is ideal for baking pizza, as the heat rises from the bottom of the oven and warms food up, rather than cooking the foods.
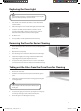
Cleaning Tips Ensure that the appliance is switched off and isolated before cleaning the oven to avoid the possibility of electric shock. 1. Allow the oven to fully cool before cleaning. Remove the wire shelves, wash them separately in hot soapy water and dry thoroughly. 2. Wash the interior of the oven with hot soapy water and wipe down with a damp cloth. 3. Leave the door open until the interior has dried, before replacing the wire shelves. 4.
Replacing the Oven Light Ensure that the appliance is switched off before replacing the light to avoid the possibility of electric shock. 1. Turn off the oven and make sure that it is cold. Switch off its isolation switch. 2. After removing the cover in front of the light, take out the bulb. 3. Insert the new bulb, which should be resistant to 300°C. For replacement bulbs contact your local service centre or Partmaster Direct (details at the back of this guide). 4. Re-fit the cover. 5.
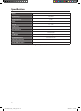
Specification Model CBCONW10 / CBCONX10 Rated Voltage 230-240V Rated Frequency 50 Hz Power 3200-3500 W Current 13 – 15 A Top Element 1200 W Bottom Element 1100 W Grill 2000/3200 W Net Weight Product Dimensions 30.2 kg 59.5 x 59 x 57 cm Usable Oven Capacity 61 Litres Energy Efficiency Class A Features and Specification are subject to change without prior notice. 10 CBCONW_X10_IB_110524_glo.
Installation • The electrical connection of this oven should be carried out by a competent person, if in doubt consult a qualified electrician, according to the instructions in this installation section and in compliance with the current regulations. • The oven is intended for housedhold use only. • The manufacturer reserves the right to introduce changes which do not affect the operation of the appliance.
Installing the Built-in Oven 1. The space where the oven will be placed needs to beat least 60cm wide, 58cm deep and 59.5cm high. A minimum gap of 2.5cm between the work surface and the control panel, and a distance of 5cm between the work surface and top of the oven is needed, in order to be able to get to the back of the oven if necessary and for easy access when sliding the oven out. 5656 cm cm 59.5cm 59.
Making an Electrical Connection An approved suitable cable must be connected from the Consumer Unit (main fuse box)and be protected by its own 30amp fuse or Micro Circuit Breaker (MCB). The electrician must provide a fused double-pole isolation switch, which disconnects both the line (live) and neutral conductors, with a contact separation of at least 3 mm incorporated into the fixed wiring.
Safety Warnings Installation Operation and Maintenance • The appliance must be installed only by an authorized person in compliance with the instructions provided. Incorrect installation may cause harm to persons, animals or may damage property. General Warnings • Before using the appliance, ensure that all packing materials are removed from the appliance. • In order to avoid any potential hazard, the enclosed installation instructions must be followed.
• Children should be supervised to ensure that they do not play with the appliance. • During use this appliance becomes hot. Care should be taken to avoid touching hot surfaces, e.g. oven door, heating elements. • To avoid burns and scalds children should be kept away. • Accessible parts may become hot when in use. Children should be kept away. Oven • During use the appliance becomes hot. Care should be taken to avoid touching the hot surfaces inside the oven.
If you require a replacement for any of the items listed below, please quote their corresponding part numbers: Replacement Part Part Number Grill Pan, Grid and Handle Set 20627919 Tray 20612977 Wire Shelf 37010933 Visit Partmaster.co.uk today for the easiest way to buy electrical spares and accessories. With over 1 million spares and accessories available we can deliver direct to your door the very next day. Visit www.partmaster.co.uk or call 0844 800 3456 (UK customers only).