UNDERCOUNTER L ARDER FRIDGE I N S T R U C T I O N MA N UA L C U L 5 5 W 10 CUL55W10_IB_final110505_door change.
CUL55W10_IB_final110505_door change.
Contents Unpacking..................................................................................................................................... 4 Installation.................................................................................................................................... 5 Location...................................................................................................................................................................... 5 Reversing the Door Swing..........
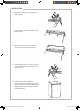
Thank you for purchasing your new Currys Essentials Larder. We recommend that you spend some time reading this instruction manual in order that you fully understand all the operational features it offers. Read all the safety instructions carefully before use and keep this instruction manual for future reference. Unpacking Remove all packaging from the unit. Retain the packaging. If you dispose of it please do so according to local regulations.
INSTALLATION Location When selecting a position for your unit you should make sure the floor is flat and firm, and the room is well ventilated with an average room temperature of between 16°C and 32°C. Avoid locating your unit near a heat source, e.g. cooker, boiler or radiator. Also avoid direct sunlight as it may increase the electrical consumption. Extreme cold ambient temperatures may also cause the unit not to perform properly. This unit is not designed for use in a garage or outdoor installation.
INSTALLATION 2. Remove the screws and hinge bracket from the base. 3. Slide the door down and remove away from the unit. 4. Remove the top hinge pin inside the door and refit on the opposite side. 5. Slide the door back on to the top hinge. Screw the bottom hinge into place on the new side. 6. Check that the door is aligned horizontally and vertically and that the seals are closed on all sides before finally tightening the bottom hinge. Re-adjust the levelling feet.
INSTALLATION Levelling the Unit To do this use the two levelling feet at the front of the unit. If the unit is not level, the door and magnetic seal alignments will not be covered properly. Cleaning Before Use Wipe the inside of the unit with a weak solution of bicarbonate soda. Then rinse with warm water using a ‘wrung-out’ sponge or cloth. Wash the shelves and salad bin in warm soapy water and dry completely before replacing in the unit. Clean the exterior of the unit with a damp cloth.
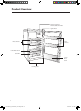
Product Overview Internal Light and Thermostat Control Dial Light Switch Door Shelves Glass Shelves Lower Glass Shelf Salad Bin Lower Door Shelf Levelling Feet 8 CUL55W10_IB_final110505_door change.
Operation Switching On Your Unit 1. Before connecting the unit to the mains supply make sure that the thermostat control dial is set at position 0. This is located on the right side of the cabinet. Connect the mains cable to the mains socket. 2. Adjust the thermostat control dial to the desired position, bear in mind that the higher the number, the lower the temperature. Position 4 is the recommended setting when operating at normal room temperature (between 16°C and 32°C). 3.
Noises Inside the Unit! You may notice that your unit makes some unusual noises. Most of these are perfectly normal, but you should be aware of them! These noises are caused by the circulation of the refrigerant liquid in the cooling system. It has become more pronounced since the introduction of CFC free gases. This is not a fault and will not affect the performance of your unit. This is the compressor motor working, as it pumps the refrigerant around the system.
Cleaning Defrosting Frost might build up in the unit after the it has been used for a period of time. Scrape away the frost using a plastic scraper. Do not use a metal or sharp instrument to scrap away the frost, nor should you use any electrical appliances to aid defrosting. We recommend that defrosting should be carried out when the frost layer builds up to 3cm (~1.18”). Choose a time when the stock of frozen food is low, follow these procedures: 1.
Maintenance Changing the Internal Light 1. Before carrying out the bulb replacement always adjust the thermostat control dial to Position 0, then disconnect the mains supply. 2. Hold and unscrew the light bulb cover. 3. Remove the plastic light bulb cover. 4. Remove the old bulb by unscrewing in an anti-clockwise direction. 5. Replace with a new bulb (10W SES). Please make sure that it is secure in the bulb cover. 6. Refit the light bulb cover and reconnect the unit to the mains supply and switch on.
Specification Model Overall Dimension (W x D x H) CUL55W10 544 x 570 x 845mm Total Gross Volume 127L Fresh Food Storage Compartment Volume 126L Defrosting Type Manual Defrost Storage Temperature 0-8 °C, average ≤ 4°C Energy Consumption 0.41kWh / 24h Energy Grading A Rated Voltage 230V~ Rated Current 0.7A Features and specifications are subject to change without prior notice. 13 CUL55W10_IB_final110505_door change.
Safety Warnings For your continued safety and to reduce the risk of injury or electric shock, please follow all the safety precautions listed below. • Read all instructions carefully before using the unit and keep them for future reference. • Retain the manual. If you pass the unit onto a third party, make sure to include this manual. • Keep ventilation openings in the appliance enclosure clear of obstructions.
Normal energy consumption Installation site Use Increased energy consumption In a ventilated room. In an enclosed, unventilated room. Protected from direct sunlight. In direct sunlight. Not situated near to a heat source (radiator, oven). Situated near to a heat source (radiator, oven). Where the ideal ambient room temperature is approx 20°C. Where there is a high ambient room temperature. Only open the doors when necessary and for as short a time as possible.
NOTE: If you require a replacement for any of the items listed below, please quote their corresponding part numbers: Replacement Part Part Number Door Shelf GJ05 Lower Door Shelf GJ06 Glass Shelf CJB07 Lower Glass Shelf CJB04 Salad Bin GCX-02 Visit Partmaster.co.uk today for the easiest way to buy electrical spares and accessories. With over 1 million spares and accessories available we can deliver direct to your door the very next day. Visit www.partmaster.co.