F R E E S TANDING DISHWASHER IN S T R U C T I O N M A N U A L CD W 6 0 W 1 0 CDW60W10_IB_110324.
CDW60W10_IB_110324.
Contents Unpacking..................................................................................................................................... 5 Location...................................................................................................................................................................... 6 Product Overview....................................................................................................................... 10 Internal View.............................
Helpful Tips and Guide............................................................................................................... 24 Fault Code................................................................................................................................................................24 Technical Problems...............................................................................................................................................24 Disposal of Dishwasher................
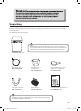
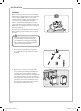
Unpacking Remove all packaging from the unit. Retain the packaging. If you dispose of it please do so according to local regulations. The following items are included: 1 STRONG 2 3 NORMAL ECONOMY 4 5 6 RINSE RAPID SOAK PROG 1 2 6 START 3 5 ON O FF RESET 4 This product has been wet tested to ensure correct operation. As a result some water may remain inside the unit. This is normal and safe. Remove any water droplets from the exterior if necessary.
INSTALLATION Location When selecting a position for your freestanding dishwasher you should make sure the installation surface is flat and firm, and the room is well ventilated. Avoid locating your dishwasher near a heat source, eg. cooker, boiler or radiator. Extreme cold ambient temperatures may also cause the appliance not to perform properly. This dishwasher is not designed for use in a garage or outdoor installation.
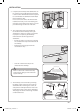
INSTALLATION 3. If required, the worktop of the dishwasher can be removed. The height without the worktop is 820 mm. The minimum dimensions required to accommodate the dishwasher within fitted kitchen furniture units. Do not connect the unit to the mains before installation. Ensure you are not installing the unit right in front of the mains. This is to avoid potential damage to the back of the unit. 4.
INSTALLATION 6. Position the dishwasher next to a water tap and a drain. Ensure the water inlet and drain hoses are not kinked or squashed. The unit must not stand on the mains cable. 7. Make sure your plumbing is suitable for use with the dishwasher. If in doubt contact a qualified plumber. This unit MUST BE connected to COLD WATER MAINS using the new water inlet hose. OLD HOSE SETS MUST NOT BE RE-USED. The water pressure from the water mains needs to be at a minimum of 0.04 MPa and a maximum of 1.00MPa.
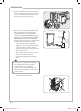
INSTALLATION • You may use the U-shaped drain hose holder to secure your drain hose and to avoid bending it. U-shaped drain hose holder water drain hose • Secure the water drain hose to the waste pipe to avoid it coming off during the washing process. ST4 screws The waste pipe must only be connected to the foul drains and not the surface water drainage system.
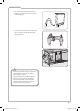
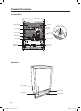
Product Overview Internal View Cup Rack Upper Basket Cutlery Basket Spray Arm Pressure Switch Lower Basket Salt Reservoir Spray Arm Filter System Rinse Aid Reservoir Detergent Dispenser Rear View Drain Oulet Water Inlet Drain Hose Mains Cable GB-10 CDW60W10_IB_110324.
Control Panel Overview 1 STRONG 2 3 4 NORMAL ECONOMY RINSE 5 RAPID 6 SOAK PROG 1 2 6 START 3 5 4 ON O FF 1 RESET 2 3 4 5 1. On/Off Button • To turn the dishwasher on and off. Power On Light • Illuminates when On/Off button is pressed. 2. Washing Cycle Indicator • Illuminates when different washing cycle (pre-wash, main wash, rinse and drying) of the selected programme is in progress. Pre-wash Main wash Rinse Drying 3.
Before Operating To Open the Door • Pull the door handle to open the door. • If the door is opened during operation, all functions are automatically interruped. To Close the Door • After loading the dishes, push the baskets fully into the dishwasher. • Life the door upwards and push until it clicks into position. • Do not slam the dishwasher door. • When purchasing new crockery and cutlery, please make sure they are dishwasher-proof. Some items are not suitable for dishwashers, for examples: 1.
Adding the Detergent Powder and Tablet Only use detergents specifically designed for use in dishwashers. To be more environmentally friendly, please use no more than the correct amount of detergent. Fill the detergent dispenser with detergent power or tablet. Please follow the steps below to fill the detergent dispenser. 1. Push the button on the lid of the detergent dispenser in the direction of the arrow until the flap springs open. 2.
Adding of Rinse Aid Rinse aid helps to ensure water does not cling and leave marks on crockery during the drying phase and helps crockery dry faster after it has been washed. Only pour rinse aid that is for domestic dishwashers into the reservoir. This model is designed to use liquid rinse aid only. Please follow the steps below to pour the rinse aid into the storage reservoir, and the amount will dispense automatically. 1. Turn the cap and open.
Adding of Salt If the water in your area is hard, deposits will form on your dishes and utensils. As such, this appliance contains a salt reservoir for you to reduce the hardness of the water. Open Please follow the steps below to pour the salt into the salt reservoir and to correspond to the water hardness level in your area. Open 1. Remove the lower basket and unscrew the reservoir cap. OPEN 2. Fill the reservoir with approximately 500ml of water (first use only). Open 3.
Loading the Dishwasher Before Loading the Dishwasher In general, please observe the following notes before loading your cutlery and crockery in the basket. • Remove lipstick stains and any food residues from crockery and dishes. Rinse if necessary. • Dishes and cutlery must not lay inside one another or cover each other. • Loading your cutlery and crockery so that water can access all surfaces. • Ensure all items are securely positioned. • Hollow items such as cups, glasses, pans, etc.
Hinged Cup Rack To make room for taller items in the dishwasher basket, raise the cup rack upwards. You can lean the tall glasses against it. You can also remove it when it is not required for use. raise upwards Loading the Upper Basket for 12 Place Settings For placement method of the upper basket, please refer to the list below.
Loading the Lower Basket for 12 Place Settings For placement method of the lower basket, please refer to the list below. Number Item 7 Dessert dishes 8 Oval platter 9 Dinner plates 10 Soup plates 11 Cutlery basket 7 IN 9 7 7 9 8 10 10 Cutlery Basket To make unloading much easier, cutlery should be grouped in zones and placed in the cutlery basket. Please refer to the list below for placement method.
Wash Cycle Table Programme Cycle Selection information Process Detergent Running Time (min.) Energy Consumption (Kwh) Water Consumption (l) Strong Pots, utensils and cutlery. Highly soiled. • Pre-wash (50°C) • Wash (50°C) • Rinse (70°C) • Drying • Pre-wash (5g) • Main wash (25g) 130 1.5 22 Normal* (EN50242) Pots, utensils and cutlery. Normally soiled. • • • • Pre-wash Wash (47°C) Rinse (70°C) Drying • Pre-wash (5g) • Main wash (25g) 160 1.05 16 Economy Plates, glasses, bowls.
Starting a Wash Cycle Please follow the steps below to start a wash cycle. 1. Ensure the unit is connected to the mains power and the water supply is fully opened (water pressure between 0.04MPa and 1.00MPa). 2. Open the door. Pull out the dishwasher basket, load the dishes and push the baskets back. 3. Pour in the detergent or place the detergent tablet in the detergent compartment. 4. Close the dishwasher door. Do not slam the door. 5. Press On/Off button. 6.
Switching Off the Dishwasher For energy saving, please remember to switch the dishwasher off using the On/Off button. The dishwasher will continue to use electricity until it is switched off with the On/Off button. If the dishwasher is not going to be used for a long period of time, e.g. on holiday, please disconnect the dishwasher from the mains supply. Unloading the Dishwasher Allowing dishes to cool down before unloading is important because dishes tend to break and chip more easily when they are hot.
Cleaning After Use External Care The Door and the Door Seal Clean the door seals regularly with a soft damp cloth to remove food deposits. When the dishwasher is being loaded, food and drink residues may drip onto the sides of the dishwasher door. These surfaces are outside the wash cabinet and are not accessed by water from the spray arms. Any deposits should be wiped off these surfaces before the door is closed.
Spray Arms Particles of food can get stuck in the spray arm jets and bearings. The spray arms should therefore be checked and cleaned regularly. 1. Ensure the dishwasher is switched off. 2. Use a pointed object, for instance a cocktail stick, to loosen food particles in the spray arms’ jets. Do not attempt to remove the spray arms. Frost Precaution Avoid placing the dishwasher in a location where the temperature is below 0˚C.
Helpful Tips and Guide • Repairs should only be carried out by a qualified technician in strict accordance with current local and national safety regulations. Unauthorised or incorrect repairs could cause personal injury or damage to the unit. • Before calling for service, please refer to Helpful Tips and Guide to solve some general problems by yourself. Fault Code Codes Light is flashing. Possible Causes Remedy Water tap is not turned on. Turn on the water tap. Low water pressure (<0.
General Problems (continue) Problem Dishes, cutlery and glasses are not dry. White residue is visible on cutlery and crockery, clouding occurs on glassware; film can be wiped off. Glassware is dull and discoloured; film cannot be wiped off. Tea or lipstick stains have not been completely removed. Possible Causes Remedy The amount of rinse aid may be insufficient, or the rinse aid reservoir is almost empty.
Disposal of Dishwasher • When disposing your old dishwasher, first make it unusable. Disconnect, cut off the cable and the plug from the cable. Make the door lock inoperative, so that children cannot accidentally shut themselves in. Make appropriate arrangements for the disposal of the dishwasher. • At the end of its working life, the product must not be disposed of as urban waste. It must be taken to a special local authority differentiated waste collection centre or to a dealer providing this service.
Specification Model CDW60W10 Rated Voltage 230 V Rated Frequency 50 Hz Overall Dimension (W x D X H) Water Pressure Required Capacity Power Consumption 600(W) x 580(D) x 850(H) (in mm) 0.04 - 1.00MPa 12 Place Settings 1930W Features and specifications are subject to change without prior notice. GB-27 CDW60W10_IB_110324.
Safety Warnings For your continued safety and to reduce the risk of injury or electric shock, please follow all the safety precautions listed below. • • • • • • • • • • • • • • • • • Read all instructions carefully before using the dishwasher and keep them for future reference. Retain the manual. If you pass the dishwasher onto a third party, make sure to include this manual. Keep ventilation openings in the dishwasher enclosure clear of obstructions.
• • • • • • • • • Other means for disconnection from the supply must be incorporated in the fixed wiring with at least 3mm contact separation in all poles. The door should not be left in the open position since this could present a tripping hazard. For energy saving, always remember to switch the dishwasher off when you have finished using it. The dishwasher should not be left unattended when in use. Remove the door to the washing compartment when removing an old dishwasher from service or discarding it.
CDW60W10_IB_110324.
CDW60W10_IB_110324.
If you require a replacement for any of the items listed below, please quote their corresponding part numbers: Replacement Part Part Number Cutlery Basket 673002200098 Water Supply Hose 673005400045 Drain Hose 673005400041 Detergent Measuring Spoon (approx. 20g) 673002200079 Coarse Filter 673006400065 Fine Filter 672005300010 Measuring cup (approx. 60ml) 673006200004 U-shape Hose holder 673006200003 Visit Partmaster.co.uk today for the easiest way to buy electrical spares and accessories.