
User guide


Install and Configure a Touch or Standard Monitor
Polycom, Inc. 22
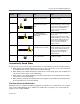
b Connect the other end of the USB cable to the USB port on the RealPresence Group system.
A USB memory device can also be installed in the second USB port on the RealPresence Group
system for importing and exporting slides, images, or photos.
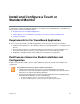
Install a touch monitor as a second monitor
Configure the Monitor
Some monitors might delay the time between writing and displaying, due to processing within the monitor.
When using the VisualBoard application with a monitor, configure your monitor or projector to use Game
Mode, if that setting is available.
To configure monitor 2 to show content:
1 In the web interface, go to Admin Settings > Audio/Video > Monitors.
2 Choose one of the following:
● For Monitor 1, use the Monitor Profile Decide for Me. With this default option, monitor 2 displays
content by default.
● Set the Monitor Profile for both monitors:
a For monitor 1, do not select Decide for Me; choose either Content Only or Speaker and
Content.
b For monitor 2, select Content Only or Speaker and Content.
For more information on these settings, refer to the Administrator Guide for Polycom RealPresence Group
Series at support.polycom.com.
Note: RealPresence Group 300 and 310 systems require a monitor option key
To use the VisualBoard application with RealPresence Group 300 and 310 systems, you
must purchase the monitor option key to enable a second monitor.
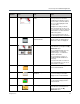
Monitor 2/
Touch Monitor
USB
HDMI
DVI-HDMI adaptor (optional)
1
RealPresence Group
300, 310, 500, 700
System
2