
User guide


Install and Configure a Touch or Standard Monitor
Polycom, Inc. 21
Install a Monitor as a Second Monitor for RealPresence
300, 310, 500, and 700 Systems
If you are installing a touch or standard monitor as a second monitor, follow the steps in this section.
Touch Monitor Support and Required Components
The VisualBoard application is compatible with the following touch monitors.
For RealPresence Group 500 and 700 systems, the VisualBoard application works only as monitor 2, so the
monitor must be connected to monitor 2 HDMI monitor output. For RealPresence Group 300 and 310
systems, you must purchase the second monitor option key to use the VisualBoard application.
You need the following components:
● HDMI cable
● DVI-HDMI adaptor (optional)
● USB cable
● USB memory device (optional)
To install a monitor as a second monitor:
1 Connect the video cable by doing one of the following:
Connect one end of an HDMI cable to the HDMI Input port on the monitor. Connect the other end
of the HDMI cable to the Monitor 2 HDMI Output port on the RealPresence Group Series system.
If your monitor has only a DVI input port, use a DVI-HDMI adaptor to connect it to the HDMI output
port of the RealPresence Group system.
2 Connect the touch monitor to the system.
If you are using a Polycom UC Board sensor with your current content monitor, the sensor is
connected to the RealPresence Group system.
a Connect one end of a USB cable to the USB port on the touch monitor.
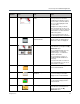
Brand Model Size
Polycom Touch Digital Display 70”
HP Compaq L2206 22”
Planar PCT2785 27”
Sharp PN-L702B 70”
Note: Digital output for content recommended
Polycom recommends the use of digital output for content (DVI-D or HDMI) instead of analog (VGA or
YPbPr) when using the VisualBoard application. Digital content produces the optimum results with
alignment of the VisualBoard application.