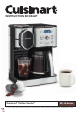
INSTRUCTION BOOKLET Cuisinart® Coffee Center® SS-16 Series For your safety and continued enjoyment of this product, always read the instruction book carefully before using.
IMPORTANT SAFEGUARDS 16. Do not set a hot carafe on a wet or cold surface. When using electrical appliances, basic safety precautions should always be taken to reduce the risk of fire, electric shock, and/or injury to persons, including the following: 18. Do not lift handle to open the lid of the coffeemaker while brewing is in progress. 17. Do not use a cracked carafe or a carafe with a loose or weakened handle. 19. Do not overfill the water reservoir.
WARNING: RISK OF FIRE OR ELECTRIC SHOCK NOTICE This appliance has a polarized plug (one blade is wider than the other). To reduce the risk of electric shock, this plug will fit into a polarized outlet only one way. If the plug does not fit fully into the outlet, reverse the plug. If it still does not fit, contact a qualified electrician. Do not modify the plug in any way.
CONTENTS THE QUEST FOR THE PERFECT CUP OF COFFEE Important Safeguards. . . . . . . . . . . . . . . . . . . . .2 Unpacking Instructions . . . . . . . . . . . . . . . . . . .4 The Quest for the Perfect Cup of Coffee. . . . . .4 Features and Benefits . . . . . . . . . . . . . . . . . .5–6 ELEMENT 1: WATER Control Panel . . . . . . . . . . . . . . . . . . . . . . . . .7–8 Hot beverages are made up primarily of water. If water doesn’t taste good from the tap, it won’t taste good in your drink.
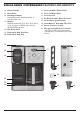
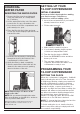
12-CUP COFFEEMAKER FEATURES AND BENEFITS 8. Charcoal Water Filter Eliminates chlorine, bad tastes, and odors from tap water. 1. Coffeemaker Reservoir Cover Flips back for easy filling. 2. Coffeemaker Water Reservoir (not shown) With water-level indicator window. 9. Adjustable Heater Plate Keeps brewed coffee at desired temperature. Scratch resistant with nonstick coating. 3. Showerhead (not shown) Distributes water evenly over coffee, reducing temperature loss as water passes through grounds. 10.
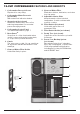
SINGLE-SERVE COFFEEMAKER FEATURES AND BENEFITS 14. Brewer Handle 21. Charcoal Water Filter Holder 15. Brew Head 22. Charcoal Water Filter 16. Brewing Chamber Holds Removable Capsule Holder or reusable filter cup. 23. Reservoir Lid 24. 42-Oz Removable Water Reservoir 25. Removable Capsule Holder 17. Display Displays brew size (4 oz, 6 oz, 8 oz, 10 oz or 12 oz) when in POD mode, and the ADD WATER Indicator. 26. HomeBarista® Reusable Filter Cup 27. Power Cord (not shown) 28.
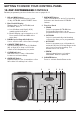
GETTING TO KNOW YOUR CONTROL PANEL 12-CUP COFFEEMAKER CONTROLS Detailed programming and use instructions are on pages 9–11. 7. BREW/OFF Button Turns coffeemaker on and off for brewing. Activates and deactivates AUTO ON feature. 1. HR and MIN Buttons Use to set hours and minutes for time of day, AUTO ON, and AUTO OFF times. 2. Blue Backlit Display Displays time of day, AUTO ON, and AUTO OFF times. 8. Function Knob a. PROG Select to program AUTO ON time.
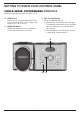
GETTING TO KNOW YOUR CONTROL PANEL SINGLE-SERVE COFFEEMAKER CONTROLS Detailed use instructions are on pages 12–15. 12. Blue Backlit Display When in POD Brew mode: 10. POD Button Press once to activate single-serve side. Use to select desired size of single-serve brew (4, 6, 8, 10, or 12 oz.). a. Will display the last brew size selected. To change the brew size, press the POD button continuously to scroll through size options. 11.
SETTING UP YOUR 12-CUP COFFEEMAKER CHARCOAL WATER FILTER INITIAL CLEANING INSERTING THE WATER FILTER Perform an initial cleaning before making your first beverage. Follow these instructions, without adding coffee. 1. Remove the filter from the polybag and soak, fully immersed, in cold tap water for 15 minutes. 2. Lift the water filter holder out of the water reservoir the 12-cup coffeemaker side. 3. Press down on the filter compartment and pull toward you to open. 4.
SETTING THE AUTO ON TIME 2. Fill the water reservoir Open the coffeemaker reservoir cover by lifting it up. Pour in the desired amount of water, using the water level indicator located at the side of the coffeemaker. When you turn the function knob to PROG, the previously selected AUTO ON time or the default time (12:00) will flash. 1. Turn the function knob to PROG. Use the HR and MIN buttons as above to program your start-brew time. 3.
7. After brewing When the brewing cycle has been completed, coffee will continue to stream from the filter for several seconds. When streaming completely stops, five beeps will sound, and you can now enjoy your coffee. BREW PAUSE™ FEATURE This feature interrupts the flow of coffee from the basket to let you pour that first cup mid-brew.
To Descale Your Coffeemaker Depending on the mineral content of water in your area, calcium deposits (scale) may build up in your coffeemaker. Though scale is not toxic, it can affect performance. Descaling the coffeemaker when the indicator signals it is time to do so will help protect the heating element and other parts that come into contact with water. 1. Insert the charcoal water filter if you haven’t already. Instructions on page 9. 2. Remove the water reservoir from the unit.
USING THE SINGLE-SERVE COFFEEMAKER display will show the default brew size 8 oz or the previously used setting. NOTE: The ADD WATER indicator will appear on the LCD when the water level is below 10.5 oz and no brewing can be done. To activate the single-serve mode, simply fill the water reservoir and press the POD button to continue to brew as usual. Follow instructions in Setting Up Your Single-Serve Coffeemaker above. BREWING 1. Remove water reservoir to fill. a.
2. Remove the capsule holder from the brewing chamber by pulling toward you. 9. Once fully dispensed, all of the lights will go off and the LCD will display the current time. Lift the handle, then remove and dispose of the used capsule. Close the brew head. CAUTION: Capsule will be hot. a. Drop the reusable coffee capsule into the brewing chamber. There is no need to snap it into place. 10. Enjoy your cup of coffee! Your brewer is ready to use again.
SINGLE-SERVE COFFEEMAKER CLEANING AND MAINTENANCE Should a clog arise because of coffee grounds, it can be cleaned using a paper clip or similar tool. Remove the capsule holder from the unit, then remove the funnel from the capsule holder and insert the paper clip into the exit needle to loosen the clog and push it out. CLEANING EXTERNAL PARTS We recommend regular cleaning of the coffeemaker’s external components. 1. Never immerse the coffeemaker in water or other liquids.
CLEANING THE WATER RESERVOIR 6. When descaling is complete, all LED lights will be off. 7. Discard any remaining diluted vinegar into the sink. It is normal over time for discoloration, spotting, or staining to appear in the water reservoir. Results will vary depending on the mineral content of the water used, but will not affect the operation of the brewer. However, be sure to clean the water reservoir regularly to minimize buildup. Step 2: Fresh Water Rinse 1.
TROUBLESHOOTING PROBLEM SOLUTION Machine will not brew. Turn off and unplug the machine for 1 minute or more. Make sure there is water in the reservoir. Make sure the removable reservoir is properly installed. Make sure the brew head is completely closed. Machine turned off by itself. The machine’s energy-save mode puts the unit to sleep after 30 minutes of nonuse. Simply turn the function knob or press any button to “wake up” the unit. Coffee basket is overflowing.
LIMITED THREE-YEAR WARRANTY 1-800-726-0190. Cuisinart will be responsible for the cost of the repair, replacement, and shipping and handling for such nonconforming products under warranty. Limited Three-Year Warranty This warranty is available to U.S. consumers only who purchase products directly from Cuisinart® or an authorized Cuisinart® reseller only. You are a consumer if you own a Cuisinart® Coffee Center® that was purchased at retail for personal, family, or household use.
©2022 Cuisinart Glendale, AZ 85307 Printed in China 22CE084519 F IB-17748-ESP
MANUAL DE INSTRUCCIONES Cafetera 2 en 1 Coffee Center® Para su seguridad y para disfrutar plenamente de este producto, siempre lea atentamente las instrucciones antes del uso.
MEDIDAS DE SEGURIDAD IMPORTANTES 14. Para evitar las quemaduras, no abra la tapa durante el funcionamiento. Al usar aparatos eléctricos, siempre se deben tomar precauciones básicas de seguridad para reducir el riesgo de incendio, descarga eléctrica o lesiones personales, entre ellas las siguientes: 16. No coloque la jarra caliente en una superficie húmeda o fría. 15. La jarra provista con esta cafetera ha sido diseñada para ser usada con esta únicamente; no la coloque sobre un hornillo caliente. 17.
GUARDE ESTAS INSTRUCCIONES PARA USO DOMÉSTICO SOLAMENTE Se puede usar un cable alargador/de extensión, siempre que respete las precauciones siguientes. ADVERTENCIA: RIESGO DE INCENDIO O DESCARGA ELÉCTRICA El cable de este aparato cuenta con un enchufe polarizado (una pata es más ancha que otra). Como medida de seguridad, aquel enchufe se podrá enchufar de una sola manera en las tomas de corriente polarizadas. Si el enchufe no entra en la toma de corriente, inviértalo.
ÍNDICE Sugerencias para la preparación de un buen café . . . . . . . . . . . . . . . . . . . . . . . . .4 SUGERENCIAS PARA LA PREPARACIÓN DE UN BUEN CAFÉ Piezas y características . . . . . . . . . . . . . . . . 5–6 ELEMENTO 1: EL AGUA Panel de control . . . . . . . . . . . . . . . . . . . . . . .7–8 Programación de la cafetera de 12 tazas . .9–10 El ingrediente principal de cualquier bebida caliente es el agua. Si el agua tiene mal sabor, el café tendrá mal sabor.
PIEZAS Y CARACTERÍSTICAS DE LA CAFETERA DE 12 TAZAS (1.75 L) 1. Tapa del depósito de agua de la cafetera Articulada para un fácil llenado. 8. Filtro de agua de carbón Elimina el cloro y el mal olor y sabor del agua corriente. 2. Depósito de agua de la cafetera (no ilustrado) con indicador de nivel de agua. 9. Placa calentadora de temperatura regulable Mantiene el café a la temperatura deseada. Revestimiento antiadherente y a prueba de rayas. 3.
PIEZAS Y CARACTERÍSTICAS DE LA CAFETERA MONODOSIS 14. Asa 20. Bandeja de goteo removible 15. Tapa de la cámara de preparación 21. Soporte del filtro de agua de carbón 16. Cámara de preparación Para cápsulas monodosis desechables o reutilizables. 22. Filtro de agua de carbón 23. Tapa del depósito de agua 24. Depósito de agua caliente removible de 42 oz (1.2 L) 17.
FAMILIARÍCESE CON EL PANEL DE CONTROL CONTROLES DE LA CAFETERA DE 12 TAZAS (1.75 L) Véase las instrucciones detalladas de programación y uso en las páginas 9 a 11. 1. Botones HR (horas) y MIN (minutos) Permiten fijar la hora, la hora de encendido automático y el tiempo de apagado automático. 6. Botón OVER ICE (café helado) Ajusta proceso de preparación para maximizar el sabor del café cuando prepare café helado. 2.
FAMILIARÍCESE CON EL PANEL DE CONTROL CONTROLES DE LA CAFETERA MONODOSIS Véase las instrucciones de uso en las páginas 13 a 15. 12. Pantalla con retroiluminación azul En el modo “monodosis”: 10. Botón POD (modo “monodosis”) Presiónelo una vez para activar el modo “monodosis”. Úselo para elegir el tamaño de la taza: 4 oz (120 ml), 6 oz (175 ml), 8 oz (235 ml), 10 oz (295 ml) o 12 oz (355 ml). a. Muestra el último tamaño de taza elegido.
PREPARACIÓN DE LA CAFETERA DE 12 TAZAS (1.75 L) FILTRO DE AGUA DE CARBÓN INSTALACIÓN DEL FILTRO DE AGUA LIMPIEZA INICIAL Limpie el sistema interno antes del primer uso, como se indica a continuación. Nota: No use café durante la limpieza inicial. 1. Retire el filtro de la bolsa de plástico y remójelo en agua fría por 15 minutos. 2. Retire el soporte del filtro ubicado en el depósito de agua de la cafetera de 12 tazas (1.75 L). 3. Abra los soportes. 4. Instale el filtro en el soporte y ciérrelo.
CÓMO PROGRAMAR EL TIEMPO DE APAGADO AUTOMÁTICO NOTA: Cuando fije una hora de tarde/noche, el indicador “PM” aparecerá en la pantalla. NOTA: El selector de función debe estar en “BREW” para poder cambiar la hora. Ponga el selector de función en “AUTO OFF” Use los botones HR y MIN para programar el apagado automático deseado, hasta 4 horas después del final del ciclo de preparación. Nota: El tiempo por defecto es de dos horas.
2. Agregue hielo Llene la jarra la cantidad deseada de cubitos de hielo. Compruebe que la jarra esté en su puesto y que su tapa esté puesta. 5. Agregue café molido Agarre el portafiltros por el asa y levántelo para retirarlo. Instale un filtro de papel n.° 4 o un filtro permanente. Compruebe que el filtro está completamente abierto y correctamente instalado. Puede resultar útil doblar y aplanar las costuras del filtro de papel de antemano.
LIMPIEZA Y MANTENIMIENTO DE LA CAFETERA DE 12 TAZAS (1.75 L) Para descalcificar: Llene el depósito de agua hasta la capacidad máxima con 1⁄3 de vinagre blanco y 2⁄3 de agua. 5. Ponga el selector de función en “BREW” y mantenga presionado el botón CLEAN. Cuando el indicador luminoso del botón CLEAN empiece a parpadear, la cafetera está en el modo de descalcificación. Suelte el botón. Siempre apague y desenchufe el aparato antes de limpiarlo. Abra el depósito de agua de la cafetera.
PREPARACIÓN DE LA CAFETERA MONODOSIS 7. Presione repetidamente el botón POD para elegir el tamaño de taza “10 oz”. Presione el botón BREW/OFF; el indicador luminoso parpadeará y el agua empezará a bajar poco después. LIMPIEZA INICIAL Limpie el sistema interno antes del primer uso, como se indica a continuación. Nota: No use cápsula monodosis durante la limpieza inicial. 1. Si aún no lo ha hecho, instale el filtro de agua de carbón (véase las instrucciones en la sección “Filtro de agua de carbón”). 2.
7. Para cambiar el tamaño de taza, mantenga presionado el botón POD para desplazarse por las opciones: 4 oz (120 ml), 6 oz (175 ml), 8 oz (235 ml), 10 oz (295 ml) o 12 oz (355 ml). Suelte el botón cuando la opción deseada aparezca en la pantalla. 5. Abra la cámara de preparación y coloque una cápsula en ella. Cerciórese de presionar la cápsula hasta que quede completamente colocada. Cierre la tapa de la cámara de preparación.
NOTA: El ciclo de preparación no empezará si el indicador “ADD WATER” (nivel de agua bajo) aparece en la pantalla. Deberá llenar el depósito de agua para que el ciclo empiece. b. Siga las instrucciones de preparación del café en las páginas 13–14. NOTA: Para cancelar la preparación, simplemente presione el botón BREW/ OFF otra vez; la preparación se detendrá. PRECAUCIÓN: Hay dos agujas en el portacápsula (una arriba y una en el fondo), cuyo papel es perforar las cápsulas.
LIMPIEZA Y MANTENIMIENTO DE LA CAFETERA MONODOSIS 3. Limpieza del pico del portacápsula El pico del portacápsula, situado en el mismo, debe limpiarse en caso de atascamiento, usando la punta de un sujetapapeles u otro objeto similar. Retire el portacápsula de la cámara de preparación, y luego retire el embudo del portacápsula. Introduzca la punta del sujetapapeles en el pico del portacápsula para desatascarlo. LIMPIEZA DE LAS PARTES EXTERNAS Se recomienda limpiar la carcasa del aparato regularmente. 1.
LIMPIEZA DEL DEPÓSITO DE AGUA 5. Repita estos pasos hasta que el indicador “ADD WATER” aparezca en la pantalla. 6. Cuando el sistema interno esté limpio, todos los indicadores luminosos se apagarán. Con el tiempo, es normal que manchas aparezcan en el depósito de agua. Estas manchas son el resultado del alto contenido en minerales del agua y no afectarán el buen funcionamiento de la cafetera. Sin embargo, cerciórese de limpiar regularmente el depósito de agua para minimizar la acumulación de depósitos.
RESOLUCIÓN DE PROBLEMAS PROBLEMA El ciclo de preparación no se inicia. SOLUCIÓN Apague y desenchufe el aparato por 1 minuto o más. Compruebe que haya agua en el depósito. Compruebe que el depósito esté correctamente instalado. Compruebe que la cámara de preparación esté bien cerrada. El aparato se apagada solo. El modo de ahorro de energía del aparato se activa automáticamente después de 30 minutos de inactividad.
GARANTÍA LIMITADA DE TRES AÑOS Los residentes de California también pueden, si lo desean, mandar el producto defectuoso directamente a Cuisinart para que sea reparado o sustituido. Para esto, se debe llamar a nuestro servicio de atención al cliente al 1-800-726-0190. Cuisinart será responsable por los gastos de reparación, reemplazo, manejo y envío de los productos defectuosos durante el período de garantía.
©2022 Cuisinart Glendale, AZ 85307 Impreso en China 22CE084519 F IB-17748-ESP