
Use and Care Guide


4
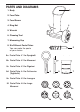
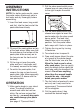
ASSEMBLY
INSTRUCTIONS
NOTE: For better pasta results, warm
the pasta maker attachment parts in
hot water and dry thoroughly before
assembling.
1. Insert the feed screw, long metal
end first, into the front end of the
pasta attachment body.
2. Fit one of the pasta plates on top
of the feed screw. Make sure that
the notches on the bottom of the
pasta plate slide securely on to
the two pins on the front end of
the body.
3. Fit the ring nut over the pasta
plate and turn it clockwise until
it is loosely secured to the body.
4. To switch the pasta plate, first
remove the ring nut and current
pasta plate, then follow assembly
instructions 2-3 above with the
new pasta plate.
OPERATION
1. Make pasta dough in your stand
mixer. The dough should be
smooth and moist but not too
sticky. Do not use recipes that
are too dry – an overly dry pasta
mix could damage your pasta
maker.
(see page 5 “Tips and Hints”)
2. Pull the slow speed outlet cover
release lever on your stand mixer
to the right to open the outlet
cover.
3. Pull the slow speed outlet cover
release lever again to insert the
pasta maker into the slow speed
power outlet. The feed tube
should face you in an upright
position. Turn the pasta maker
both ways until it locks in place.
4. Tighten the ring nut by turning
it clockwise.
5. Turn stand mixer to speed 4.
6. Drop small pieces (about the size
of a grape) of the pasta dough
into the feed tube, one at a time.
Allow the feed screw to clear
after each piece. You can gently
push the dough further down the
feed tube using the handle of the
wrench. Do not use anything
other than the wrench handle
to push the mix – this might
break your pasta maker.
7. The first batch of pasta will come
out curly so it may need to be
reprocessed. The second batch
will be straighter.
8. Cut the pasta when it has
reached the desired length.