
Specifications


54
CAUTION: Before using an adapter, it must
be determined that the outlet cover plate
screw is properly grounded. If in doubt,
consult a licensed electrician. Never use
an adapter unless you are sure it is
properly grounded.
Note: Use of an adapter is not permitted in
Canada.
CONTENTS
Important Safeguards................... 2
Unpacking Instructions ................. 4
Introduction .......................... 4
Features and Benefits .................. 5
Preparing Your Espresso Machine ........ 6
Using Your Espresso Machine ........... 6
Programming ......................... 7
Steam ................................7
Cappuccino or Latte ....................7
Temperature Controls....................8
Cleaning and Maintenance .............. 8
Troubleshooting ........................9
Recipes ............................ 11
Warranty ............................ 17
IMPORTANT UNPACKING
INSTRUCTIONS
1. Place the box on a large, sturdy, flat surface.
2. Remove the instruction book and any
other literature.
3. Remove the sample pack of illy’s
iperEspresso capsules.
4. Turn the box so that the backside of the
machine is down, and slide the espresso
maker from the box.
5. After the espresso maker has been removed,
place the box and the side pulp-molded
inserts out of the way.
6. Remove all packing materials, tape, etc.
We suggest you save all packing materials in the
event that future shipping of the machine is
needed. Keep all plastic bags away from
children.
INTRODUCTION
Cuisinart and illy are proud to introduce this
Buona Tazza
™
Super Automatic Single Serve
Espresso, Caffè Latte, and Cappuccino Maker
powered by Cuisinart and featuring illy’s
proprietary iperEspresso capsule system.
This combines Cuisinart’s excellence in
coffeemakers and illy’s legendary coffee
heritage to bring the pleasure of savouring the
rich, smooth taste of illy to the comfort of your
own home.
1
2
3
5
7
6
8
9
10
11
12
13
18
19 23
20 24
21 25
22 26
14
16
15
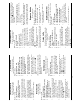
FEATURES AND BENEFITS
1. Water Reservoir Lid
2.
Removable 34-ounce (1 L) Water Reservoir
3.
Cup-Warming Plate
Convenient place to warm cups.
4.
19 Bar Pump (not shown)
5.
Brew Head Lever
Use the die-cast metal lever to open and
close the brew head.
6. Brew Head
7.
Brewing Spout
Strategically positioned for optimal results.
8.
Used Capsule Container
(Also contains some residual liquid left after
brewing.)
9.
Espresso Cup Tray
Folds up when taller mugs need to be used.
10.
Drip Tray Grate
11.
Latte and Cappuccino Tray/Removable
Drip Tray
12. Travel Mug Tray
13. Removable 22-ounce (650 ml)
Milk Tank
Store in refrigerator.
14.
Milk Tank Cover with Removable
Parts, i.e. Steam Wand and sleeve, Lid,
Tube and dial.
15. Milk Tank Connector
16.
Steam Control Dial
To control air/froth in milk.
= more steam, lighter froth
= less steam, denser froth
17.
Burst of Steam (not shown)
Patented technology automatically cleans
steam wand after each milk cycle.
18.
Power Switch
19.
Short Espresso Button
20.
Long Espresso Button
21.
Manual/Adjustable Strength Control/
Programmable Button
22. Steam Button
23. Cappuccino Button
24. Latte Button
25. Hot Setting Button
Select if less-hot coffee temperature
is desired.
26. Hotter Setting Button
Default coffee temperature setting.
27. Energy Saver Mode (not shown)
Saves 50% of power after 30 min. non-use.
28. Auto Off Mode (not shown)
Shuts off after 60 min. non-use.
29. Power Cord (not shown)
30. BPA Free (not shown)
All materials that come in contact with liquid
are BPA free.
31. 14-Capsule Pack (not shown)
Choose from a variety of 100% Arabica
varieties!