
Use and Care Manual


5
PRESSURE COOKER
SETTINGS
1. Low Pressure
2. High Pressure
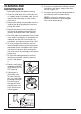
3. Brown –
This preset temperature allows cooking over
high heat, without the lid, before pressure
cooking. Browning
foods in a small
amount of fat in this
way seals the outer
surfaces of meats and
vegetables, producing
a visually appealing,
flavorful exterior with
a moist, tender
interior. Browning
reduces the time it
takes full pressure to
build and pressure
cooking to begin.
NOTE: Use wooden
spoon to scrape up
brown bits. DO NOT use metal utensils.
4. Sauté – The preset temperature, done prior to
pressure cooking with lid removed, allows you
to quickly soften vegetables in a small
amount of fat or liquid without browning, and
to cook items such as rice (Arborio, brown,
Carnaroli, white, etc.) or pilafs and risottos.
Sautéing reduces the time it takes full
pressure to build and pressure cooking to
begin.
5. Simmer – This preset temperature allows you
to cook liquids at a lower temperature. It is
primarily used to finish cooking some items,
e.g., to add ingredients to a risotto, sauce,
or stew, or to continue cooking process to
achieve preferred texture. Simmering reduces
the time it takes full pressure to build and
pressure cooking to begin.
6. Keep Warm – Holds and keeps cooked food
warm for up to 12 hours.
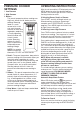
OPERATING INSTRUCTIONS
With the unit on and the LED displayed, press the
MENU button to select the desired cooking
function. The function light will flash. Press the
flashing function to select.
If Selecting Brown, Sauté, or Simmer
Press START, and unit will begin to heat up.
When browning, sautéing or simmering is
complete, press START/CANCEL to cancel
program. Press MENU again and select Low
or High Pressure function.
If Selecting Low or High Pressure
Press TIME to select number of minutes needed
for pressure cooking. Time increases in 1-minute
increments up to 40 minutes. Time increases in
5-minute increments from 40 to 99 minutes.
Once cooking time is programmed, press START/
CANCEL to start the cooking process. As the unit
heats up and pressure builds, the red float will
rise. The amount of liquid and other ingredients in
the pressure cooker determines the length of time
needed for full pressure to build – generally 5 to
40 minutes, depending on the recipe. (A red
blinking dot on lower right-hand corner of LED
indicates the unit is on and heating up.)
NOTE: When full pressure is reached,
red light in the lower right-hand corner
of the LED will stop flashing and remain lit.
Pressure cooking will begin and the timer
will start to count down.
The raised red float indicates you are cooking
under pressure. The lid is double-locked and
cannot be opened. YOU SHOULD NEVER
ATTEMPT TO OPEN THE LID WHILE
PRESSURE COOKING.
Automatic Keep Warm Feature
When LED display reaches
,
the pressure
cooker automatically shifts to Keep Warm
temperature. The Keep Warm light will turn on and
unit will beep to indicate cooking is complete.
NOTE: The Keep Warm setting should not be
used for more than 12 hours. The quality or
texture of the food will begin to change after 1
hour on Keep Warm. In the Keep Warm setting, a
little condensation in the upper ring is normal.
To Reset or Cancel
Users can reset the function or cancel the timing
setup anytime by pressing the START/CANCEL
button.