
Operation Manual
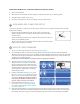
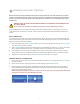
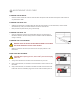

1. Use scissors to remove the cartridge from its packaging.
2. Tap Setup on your Cube’s touchscreen, select Load Cartridge, and press Next.
3. Remove the thumbscrew from the side of the Material Cartridge and remove the blue tape from the material. Save the
screw to reinstall into cartridge if material was not fully used during printing. This will prevent lament from unravelling
during storage. Press Next to begin cartridge installation.
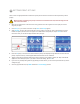
Do not pull out plastic until the thumbscrew is removed from the cartridge. Failure to remove the
thumbscrew will damage the cartridge.
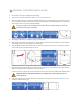
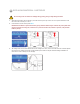
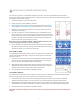
7. Filament will then be drawn into the Print Jet until a small amount comes out of the heated tip at the bottom. Carefully
dispose of the lament without touching the hot print tip. Press Next.
(If nothing comes out of the print tip, remove the plastic from the top of the Print Jet and repeat these installation steps.)
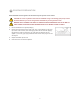
WARNING: PRINT TIP BECOMES EXTREMELY HOT DURING SET-UP AND OPERATION. DO NOT
TOUCH PRINT TIP.
8. Insert Cube Tube (the clear tube that’s already around the lament at the top) into the Print Jet. Press Next and your
cartridge is loaded and ready to go!
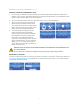
4. Tilt cartridge so that bottom of cartridge is resting on cartridge holder.
5. Slide cartridge in the holder ensuring that top of cartridge feeder is seated into the Cube feeder. Do not slide cartridge
without tilting, doing so can cause damage to t he Cube Feeder.
6. Insert the lament coming from the tube into the hole at the top of the Print Jet. Press Next, and continue to push la-
ment into the Print Jet until it feeds through on its own.
!
!
22
17 MATERIAL CARTRIDGE INSTALLATION