Safety • Assembly • Operation • Tips & Techniques • Maintenance • Troubleshooting • Warranty OPERATOR’S MANUAL Time Saver™ Wide Cut Mower IMPORTANT READ SAFETY RULES AND INSTRUCTIONS CAREFULLY BEFORE OPERATION Warning: This unit is equipped with an internal combustion engine and should not be used on or near any unimproved forest-covered, brushcovered or grass-covered land unless the engine’s exhaust system is equipped with a spark arrester meeting applicable local or state laws (if any).
This Operator’s Manual is an important part of your new mower. It will help you assemble, prepare, and maintain the unit for best performance. Please read and understand what it says. Table of Contents Slope Gauge...........................................................................3 Safety.....................................................................................4 Assembly................................................................................6 Operation.............................
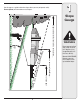
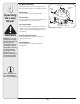
1 Use this page as a guide to determine slopes where you may not operate safely. Do not operate your lawn mower on such slopes. Slope Gauge 3IGHT AND HOLD THIS LEVEL WITH A VERTICAL TREE &O OR A FENCE POST OR A CORNER OF A BUILDING OT LD ALO NG D ESEN TED L I N E REPR LOPE TS A S WARNING Do not mow on inclines with a slope in excess of 15 degrees (a rise of approximately 2-1/2 feet every 10 feet). Operate WALK-BEHIND mowers across the face of slopes, never up and down slopes.
2 Safe Operation Practices WARNING This symbol points out important safety instructions which, if not followed, could endanger the personal safety and/or property of yourself and others. Read and follow all instructions in this manual before attempting to operate this machine. Failure to comply with these instructions may result in personal injury. When you see this symbol.
19. Shut the engine off and wait until the blade comes to a complete stop before removing the grass catcher or unclogging the chute. The cutting blade continues to rotate for a few seconds after the engine is shut off. Never place any part of the body in the blade area until you are sure the blade has stopped rotating. 20. Never operate mower without proper trail shield, discharge cover, grass catcher, blade control handle or other safety protective devices in place and working.
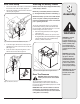
3 Assembly Please carefully follow these assembly steps to properly prepare your machine for use. We recommend that you read this section in its entirety before beginning assembly. WARNING: Disconnect the spark plug wire and ground it against the engine to prevent unintended starting. Unpacking the Mower 1. 2. All references to left, right, front, and rear of the machine are determined by standing behind the handlebars and facing the direction of forward travel.
Shift Lever Setup 1. 2. Attaching the Battery Cables Remove the 5/16-18 screw and the lock nut that hold NOTE: Some models may be shipped with the battery cables already connected. the shift lever to the shift lever plate, Figure 3-4. Remove the remaining screw and nut from the lower shift lever plate, Figure 3-4. NOTE: The positive battery terminal is marked Pos. (+). The negative battery terminal is marked Neg. (–).
4 Know Your Lawn Mower Throttle/Choke Control Lever Blade Control Gas Cap Operating the Lawn Mower Ignition Switch Deck Height Lever Systems Indicator Monitor Drive Control Gear Shift Lever WARNING WARNING: Always remove the ignition key when leaving mower unattended or when performing any type of maintenance on the machine. WARNING: If you strike a foreign object, stop the engine, disconnect the spark plug wire(s) and ground against the engine. Thoroughly inspect the machine for any damage.
Ignition Switch Systems Indicator Monitor WARNING: Never move the key into the Start position while the engine is running; doing so may cause damage to the engine’s starter. Run The three-position switch is used Off Start to start and stop the engine on electric start models. Insert the key into the ignition switch and turn clockwise to the START position. Release key into the RUN position once the engine has started. Turn the key to OFF to stop the engine.
4 Operating the Lawn Mower Engine Controls Recoil Starter Refer to Figure 4-2 for locations of the engine controls. Refer to the engine manual for more detailed information. Recoil Starter The recoil starter is used to pull-start the engine. Oil Drain Valve Oil Drain Valve Use the oil drain valve to drain oil from the engine. Refer to the Maintenance section for instructions. Electric Starter Air Cleaner Handle The air cleaner handle is used to gain access to the air cleaner.
WARNING: The operation of any lawn mower can result in foreign objects being thrown into the eyes, which can damage your eyes severely. Always wear safety glasses while operating the mower, or while performing any adjustments or repairs on it. WARNING: Be sure no one other than the operator is standing near the lawn mower while starting engine or operating mower. Never run engine indoors or in enclosed, poorly ventilated areas. Engine exhaust contains carbon monoxide, an odorless and deadly gas.
4 Operating the Lawn Mower Starting the Mower 1. 2. 3. 4. WARNING WARNING: If you strike a foreign object, stop the engine. Remove wire from the spark plug, thoroughly inspect mower for any damage, and repair damage before restarting and operating. Extensive vibration of mower during operation is an indication of damage. The unit should be promptly inspected and repaired. WARNING: Keep hands and feet clear of mower blades or other rotating parts.
Mulching or Side-Discharge Mowing WARNING: Before installing or removing mulch plug, stop engine, wait for parts to stop moving, and disconnect spark plug wire. Remove ignition key on electric start models. You can use the mower either as a mulching mower or as a side-discharge mower. To use the mulching feature, insert the mulch plug as described below. Remove the mulch plug to side-discharge grass clippings. The mulch plug is designed to keep the discharge chute raised up while mowing.
5 Maintaining the Lawn Mower General Recommendations • • • • • Always observe safety rules when performing any type of maintenance on the mower. The warranty on this lawn mower does not cover items that have been subjected to operator abuse or negligence. To receive full value from warranty, operator must maintain the lawn mower as instructed here. Changing of engine-governed speed will void engine warranty. All adjustments should be checked at least once each season.
Changing the Engine Oil 1. A B Oil Drain Valve 2. 3. Figure 5-3: Pivot the right brace support tube forward to gain access to the oil valve. Oil Fill Cap/ Dipstick 4. 5. 6. Protective Drain Cap 7. 8. Oil Drain Valve Oil Drain Hose CAUTION: Check oil level in engine before every use. To gain access to the oil drain valve on the engine, the right handle brace tube should be pivoted forward. a. Remove the upper star knob and carriage screw on the right side of the handle, Figure 5-3. b.
5 Maintaining the Lawn Mower Mower Maintenance WARNING: Before performing any type of maintenance/service, disengage all controls and stop the engine. Wait until all moving parts have come to a complete stop. To prevent unintended starting, disconnect spark plug wire and ground it against the engine and remove ignition key. Always wear safety glasses during operation or while performing any adjustments or repairs.
5 Lubrication Pivot Points & Linkage Lubricate all the pivot points on the drive system and lift linkage at least once a season, or 25 hours of operation, with light oil. Maintaining the Lawn Mower Grease fitting on frame Rear Wheels The rear wheels should be removed from the axles once a season. Lubricate the axles and the rims well with an all-purpose grease before reinstalling them.
5 Maintaining the Lawn Mower Rear Tire Pressure WARNING: Never exceed the maximum inflation pressure shown on the sidewall of tire. The recommended operating rear tire pressure is approximately 20 psi for the rear tires. IMPORTANT: Refer to the tire sidewall for exact tire manufacturer’s recommended or maximum psi. Do not overinflate. Uneven tire pressure could cause the cutting deck to mow unevenly.
Battery Maintenance Battery Jump Starting The battery is sealed and is maintenance-free. Acid levels cannot be checked. • Always keep the battery cables and terminals clean and free of corrosive build-up. • After cleaning the battery and terminals, apply a light coat of petroleum jelly or grease to both terminals. • Always keep the rubber boot positioned over the positive terminal to prevent shorting.
5 Maintaining the Lawn Mower Replacing Belts The mower uses three belts: 1) drive belt, 2) deck engagement belt, 3) blade timing belt. Before removing belt, observe how the belt is routed around the pulleys and brackets to help when installing a replacement belt. IMPORTANT: The belts on the mower are specially designed to engage and disengage safely. Substitute (non-OEM) belts can be dangerous by not disengaging completely. For a proper working machine, use factory approved belts.
Replacing the Deck Engagement Belt WARNING: Before performing any type of maintenance on the machine, wait for all parts to stop moving, and disconnect the spark plug wire. Remove the ignition key from the ignition switch (if equipped). Failure to follow this instruction could result in personal injury or property damage. Avoid the possibility of a pinching injury. Do not place your fingers between belts and pulleys. 1. 2. 3. 4. 5. 6. 7. 8. 9.
5 Maintaining the Lawn Mower Replacing the Blade Timing Belt WARNING: Before performing any type of maintenance on the machine, wait for all parts to stop moving, and disconnect the spark plug wire. Remove the ignition key from the ignition switch (if equipped). Failure to follow this instruction could result in personal injury or property damage. 1. 2. 3. 5. 6.
Maintenance Schedule WARNING: Before performing any type of maintenance/service, disengage all controls and stop the engine. Wait until all moving parts have come to a complete stop. To prevent unintended starting, disconnect spark plug wire and ground it against the engine and remove ignition key. Always wear safety glasses during operation or while performing any adjustments or repairs. Follow the maintenance schedule given below. This chart describes general service guidelines only.
6 Troubleshooting Troubleshooting WARNING: Before performing any type of maintenance/service, disengage all controls and stop the engine. Wait until all moving parts have come to a complete stop. Disconnect spark plug wire and ground it against the engine to prevent unintended starting. Always wear safety glasses during operation or while performing any adjustments or repairs. For repairs beyond the minor adjustments listed here, contact an authorized service dealer.
Off-Season Storage WARNING: Never store lawn mower with fuel in tank indoors or in poorly ventilated areas where fuel fumes may reach an open flame, spark, or pilot light as on a furnace, water heater, clothes dryer, or gas appliance. Preparing the Engine Preparing the Lawn Mower For engines stored over 30 days: 1. To prevent gum from forming in fuel system or on carburetor parts, run engine until it stops from lack of fuel or add a gasoline additive to the gas in the tank.
NOTES Use this page to make notes and write down important information.
NOTES Use this page to make notes and write down important information.
CUB CADET LLC MANUFACTURER’S LIMITED WARRANTY FOR 33-Inch wide cut mower IMPORTANT: To obtain warranty coverage owner must present an original proof of purchase and applicable maintenance records to the servicing dealer. Please see the operator’s manual for information on required maintenance and service intervals.