
User guide

28 T2
®
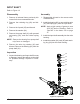
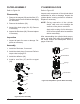
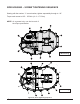
SWASHPLATE
Figure 20, Swash Plate
Refer to Figures 20-21
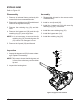
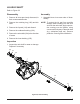
Disassembly
1. Requires removal of all items beginning on
page 17.
2. Remove the swashplate (40) and pump
cylinder block assembly (70) as a single
item.
NOTE: Removal will be aided by applying a
small amount of pressure on the trun-
nion mounted swashplate towards the
center section. While CAREFULLY
removing the swashplate and block as-
sembly, keep the block face ush with
the center section to minimize damage
to the running surface.
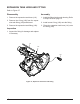
3. Separate the pump cylinder block assembly
(70) and the thrust bearing (74) from the
swashplate (40) and set aside.
Inspection
1. Inspect the swashplate (40) and thrust
bearing assembly (74) for wear or damage.
Replace if necessary.
2. Inspect pump block per detail on page 31.
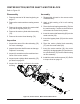
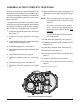
Assembly
1. Reassemble all parts in the reverse order
of disassembly.
2. Apply a light coating of oil to running sur-
faces on center section, swashplate bearing
races, thrust bearing assembly and pump
block assembly.
3. Place the thrust bearing assembly (74) into
swashplate (40).
4. With the pistons facing the thrust bearing,
place the pump block assembly (70) into the
swashplate.
5. While pressing the pump block assembly
(thrust bearing – pump cylinder block) and
swashplate together, align to center section
in main housing.
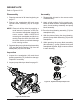
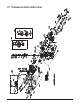
Figure 21, Hydraulic Pump Components
40
74
70
70
40