
User guide

20 T2
®
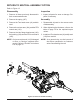
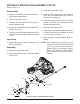
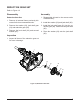
RETURN TO NEUTRAL ASSEMBLY OPTION
Refer to Figure 12
Disassembly
1. Remove all items previously discussed in
their recommended order.
2. Remove the spring (167).
3. Remove the Torx head screw (41) and dis-
card.
4. Remove the scissor arm (164), and the RTN
control arm (161).
5. Remove the Hex ange head screw (162),
the bushing (166) and the RTN neutral arm
(165).
NOTE: Only remove the seal (110) if damaged
or worn, or if doing a complete disas-
sembly. Refer to “Seal Kit” in the Items
List on page 37.
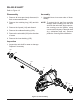
Inspection
1. Inspect all parts for wear or damage. Re-
place if necessary.
Assembly
1. Reassemble all parts in the reverse order
of disassembly.
2. When tightening the fasteners, refer to the
table on page 15 for the required torque
values.
3. Install new Torx head screw (41) and lip seal
(110) from seal kit.
NOTE: As a general rule, use the low end of
the torque specication on fasteners
when reassembling the unit.
110
167
164
161
162
166
165
Figure 12, Return to Neutral Assembly
41