
Manual

Body Panels
47
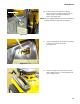
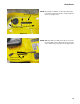
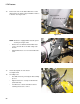
5b. Unbolt the drive pedal using a 1/2” wrench, and
maneuver it out of the tractor.
See Figure 4.29.
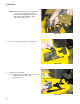
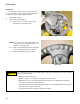
5c. Remove the brake pedal using a 1/2” wrench.
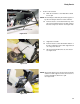
6. Remove the fender panel.
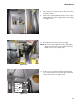
6a. Carefully peel-up the large operating instruc-
tions label from the floor portion of the fender
panel.
See Figure 4.30.
• Gentle application of heat will help loosen the
adhesive.
• Start at the back: the back edge is closer to the
fasteners that are concealed by the label.
• Use wax paper to preserve the adhesive.
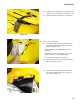
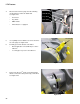
6b. Remove the two bolts that are found under the
label using a 3/8” wrench.
6c. Remove the four bolts that hold the fender to
the seat-box portion of the frame using a 1/2”
wrench.
See Figure 4.31.
Figure 4.29
Drive pedal
Drive linkage
Figure 4.30
Bolts
under label
Wax paper
Figure 4.31
Bolts