
Manual


LTX Tractors
206
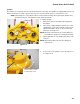
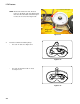
4. Remove the blade.
5. Install the blade by following the above steps in
reverse order. Tighten the blade nut to a torque of
70 - 90 ft-lbs (95 - 122 Nm).
NOTE: There are words stamped onto the blade.
They must be facing the ground while cutting
grass.
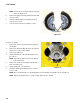
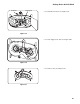
See Figure 8.10.
NOTE: The spindle has a star on the shaft. The
blade must be seated over the star before
tightening the nut.
NOTE: A 15/16” wrench can be used to hold the top
of the spindle shaft.
6. Test run the mower in a safe area.
NOTE: Confirm that all safety and control features
work correctly. DO NOT return an unsafe mower to service.
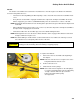
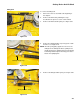
Sharpening the blades:
• To properly sharpen the cutting blades, remove equal amounts of metal from both ends of the blades
along the cutting edges, parallel to the trailing edge, at a 25° to 30° angle.
• Sharpen the top of the blade only, maintaining the factory cutting edge angle.
IMPORTANT: If the cutting edge of the blade has already been sharpened to within 1 2/8” from the edge, or if
any metal separation is present, replace the blades with new ones.
IMPORTANT: It is important that each cutting blade edge be ground equally to maintain proper blade balance.
IMPORTANT: Replace any blade with severe nicks or dents that cannot be removed by filing.
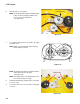
• Blade balance should be tested using a blade balancer tool. Grind metal from the heavy side until it bal-
ances evenly.
Figure 8.10
Star center
! CAUTION! CAUTION
A poorly balanced blade will cause excessive vibration. This vibration may cause damage to the
mower and result in personal injury.