
Operator`s manual


Rolling the Belt onto the PTO Pulley.
Using the deck lift handle, raise the deck to the position
that provides the most horizontal run of the belt between
the engine.
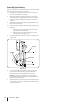
Make certain the belt is in the spindle pulleys of the deck, 2.
and that the backside of the belt is against both the fixed
and movable idler pulleys. Refer to Fig. 7-4.
belt is not twisted; then reach beneath the tractor to grasp
WARNING! Use caution to avoid pinching your
4.
While holding the belt and pulley together, rotate the 5.
rotating the pulley and belt until the belt is fully rolled into
Replacing the Deck Drive Belt
Remove the deck from beneath the tractor, (refer to Deck
Remove the hex tapping screws securing the belt covers 2.
to the deck and remove the belt from the spindle pulleys.
Refer to Fig. 7-7.
Install the new belt around the spindle pulleys as shown in
Fig. 7-7 and reinstall the belt covers.
Route the belt rearward between the two idler pulleys 4.
and reinstall the deck following the instructions in Deck
Hex Tap
Screw
Hex Tap
Screw
Belt Cover
Belt Cover
Spindle
Pulleys
Belt
Figure 7-7
Mower Blade Care
WARNING!
the parking brake lever, turn the ignition key to the
handling the blades. When servicing the mower
deck, be careful not to cut yourself on the
sharpened blades.
cutting edges of the blades evenly so that the blades remain
balanced and the same angle of sharpness is maintained.
If the cutting edge of a blade has already been sharpened many
times, or if any metal separation is present, it is recommended
that new blades be installed. New blades are available at your
authorized dealer.
The blades may be removed as follows.
Remove the deck from beneath the tractor, (refer to Deck
expose its underside.
Use a 2. ⁄
assembly when loosening the hex nut securing the blade.
A block of wood may be placed between the deck housing
and the cutting edge of the blade to help in breaking loose
Hex Flange Nut
Spindle Assembly
Wood Block
Figure 7-8
32 se c t i O n 7— se r v i c e