
Operator`s manual


Se rvice
7
18
Belt Replacement
If the drive belt need to be replaced, it is best to replace both belts
at the same time. Use only a factory-authorized belt as an “over- the-
counter” belt may not perform satisfactorily. The procedure requires
average mechanical ability and commonly available tools.
To replace the Drive and Reverse belts, follow these steps:
1. Make sure the tiller is on a flat surface, with the engine
turned off and the spark plug wire unplugged and
grounded to prevent unintended firing of the engine.
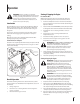
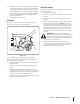
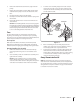
2. Remove the belt cover as seen in Figure 7-1, by first
removing the two 1⁄4-20 hex washer screws and one flat
washer. Lift the belt cover up and away from the tiller and
set in a safe location until reinstallation.
Hex Washer Screw
Hex
Washer
Screw
Flat Washer
Figure 7-1
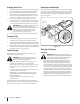
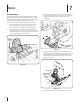
3. Remove the four ⁄4-20 hex washer screws that secure the
pulley shield to the frame as seen in Figure 7-2, and remove
the pulley shield and set aside in a safe location until
reinstallation.
Hex Washer
Screws
Figure 7-2
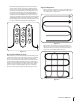
4. Remove the idler bracket extension spring from the idler
bracket using a pair of needle-nosed pliers. Grab the spring
by the end that hooks over the frame, pull it away from
the frame, then up and carefully relieve the tension of the
spring. See Figure 7-3.
Remove the
idler bracket
extension
spring
Drive Cable
Figure 7-3
5. Unhook the drive cable from the idler bracket. See Figure 7-3.